Advanced Frida Usage Part 5 – Advanced root detection & bypass techniques
Introduction
Welcome to another blog post in our series on Advanced Frida Usage. In this blog, we will explore techniques related to root detection on Android devices and methods to bypass it. Our main focus will be on the strategies employed by app developers to protect their applications and prevent them from running on compromised devices. For learning purposes, we will be using a sample root detection application named Root Detector that can be downloaded here (external link).
Analysis
The sample application is already installed on our rooted device, and as we can see it indicates that the device is rooted.
Let us begin the analysis by decompiling the apk using jadx-gui to get an idea of what the Root Detector app is doing once installed on the device. AndroidManifest.xml is the entrypoint for all the android apps where different components and services are defined for the application.Permissions
Nothing seems to be interesting from the permissions point of view. It is mainly using the storage permission.Other than these defined permissions, let us see what other components are present in this application.
We can see that it only has one activity which is the MainActivity** that gets launched.
Decompiled Code Analysis
Let’s see what do we have in this MainActivity.java
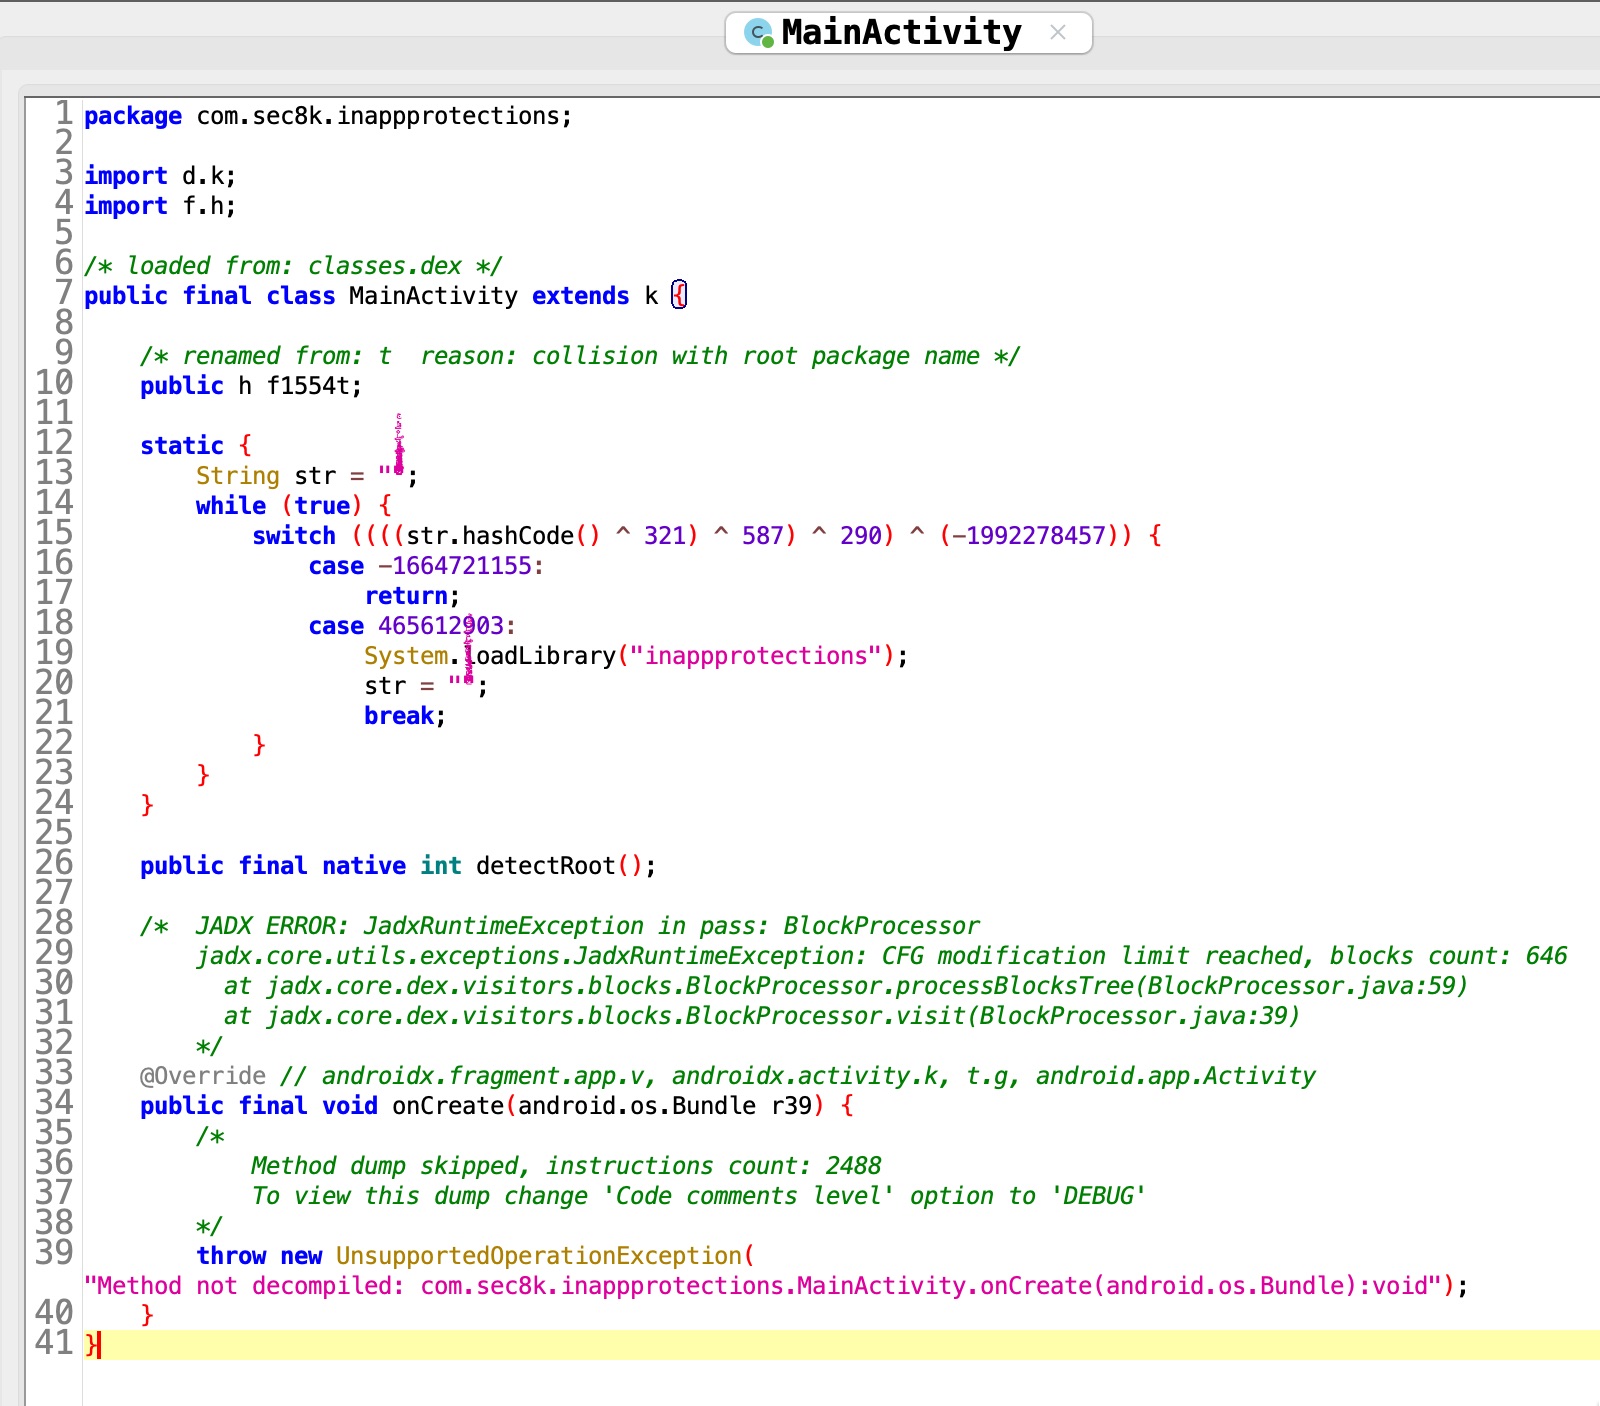
We can see that jadx was not able to decompile most of the code. This is because of obfuscation. But let’s try to figure out whatever we can from the decompiled code that we have!
It seems that MainActivity has a static block where it is calling System.loadLibrary("inappprotections") which is responsible for loading the native library into the memory.
static {
        String str = "ۧ۠ۧۤ۬۠ۗۛۙۡۦۚۙۡۧۢۛۡۘ۟ۛۥۢ۬۠۬ۨ۬۟ۤۙۙۢۘ۠ۡۛۤۨۨۨۙۜ۟۬ۜۜۙۦۘۤ۠ۨۨ۟ۡ";
        while (true) {
            switch ((((str.hashCode() ^ 436) ^ 234) ^ 912) ^ (-1907612566)) {
                case -1083933248:
                    return;
                case 1567145872:
                    System.loadLibrary("inappprotections");
                    str = "۟ۚۨۘۤۜۧۘۛ۬ۧۖۤ۟ۨ۫ۜۘ۟ۢۥۜۦۦ۫۬ۖۘ۬ۤۢۙ۫ۥۘ";
                    break;
            }
        }
    }
Since it is in a static block this native library will get loaded as soon as the appl launches.
Other than this, we can also observe an interesting function named detectRoot().
public final native int detectRoot();By looking at the functions signature it looks like a native function that is coming from the inappprotections library and its return value is integer.
Usually, such functions return true in case root is detected otherwise it returns false. Our goal here is to somehow bypass the root detection so that we can run the app on a compromised device.
Dynamic Analysis
Given the preceding assumption, we can employ Frida to intercept the function at the Java layer. This will allow us to inspect the function’s return value. If the return value happens to be a boolean, we can easily modify it to consistently return false.
Frida Hooking
We can hook the detectRoot() function using the following Frida script:
let MainActivity = Java.use("com.8ksec.inappprotections.MainActivity");
};
MainActivity[“detectRoot”].implementation = function () { let ret = this.detectRoot(); console.log(‘detectRoot ret value is ’ + ret); return ret;
In this hook, we are just printing the return value of detectRoot() function. Let’s run this script using frida.
Before you run frida, make sure that frida-server** is already running on your Android device. You can use a utility like FridaLoader (https://github.com/dineshshetty/FridaLoader/) to run a frida server on your rooted device.
frida -U -l root_bypass.js -f com.8ksec.inappprotections … . Connected to Pixel 4a (id=0B151JEC202420) Spawned com.8ksec.inappprotections. Resuming main thread! [Pixel 4a::com.8ksec.inappprotections ]-> detectRoot is called detectRoot ret value is 404
In the console we can see that the return value is 404**. Okay, so its not just 0 or 1.
Let’s run the script again to see if we are getting the same value:
… . Connected to Pixel 4a (id=0B151JEC202420) Spawned com.8ksec.inappprotections. Resuming main thread! [Pixel 4a::com.8ksec.inappprotections ]-> detectRoot is called detectRoot ret value is 500
This time we get 500 which is not consistent. Unfortunately, it seems that manipulating the return value alone may not be sufficient to bypass this specific root detection case. Additionally, the code is obfuscated, making it challenging to understand the underlying logic of the root detection mechanism solely based on this class.
Hence, we need to look into the native library where this function is defined i.e this inappprotections library.
Extracting APK
Let’s quickly extract this APK using apktool so that we can access these internal files and resources of the APK.
apktool d root_detector.apk
Picked up _JAVA_OPTIONS: -Dawt.useSystemAAFontSettings=on -Dswing.aatext=true I: Using Apktool 2.5.0-dirty on root_detector.apk I: Loading resource table… I: Decoding AndroidManifest.xml with resources… I: Loading resource table from file: /home/kali/.local/share/apktool/framework/1.apk I: Regular manifest package… I: Decoding file-resources… I: Decoding values / XMLs… I: Baksmaling classes.dex… I: Copying assets and libs… I: Copying unknown files… I: Copying original files… I: Copying META-INF/services directory
Inside the lib folder we can find the libinappprotections.so library.
Analyzing inappprotections library
Ghidra
To examine this library, we will utilize the Ghidra disassembler. Our objective is to identify imported functions within the library, that can serve as a starting point for further analysis of potentially interesting functions.
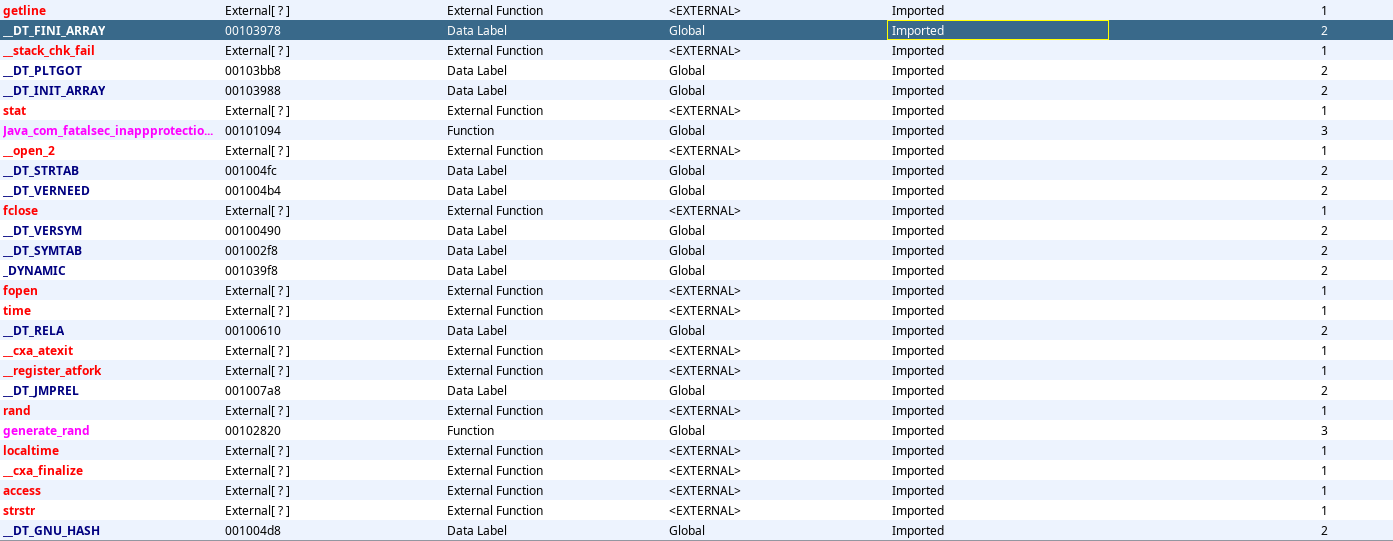
It seems we don’t have many functions and the first function we can see is our detectRoot function. Let’s quickly navigate to this function to see the disassembly and try to understand the logic.

Okay so the function itself is not so big, but by having a quick look at this disassembly we can say that it is using indirect branching to break the control flow by analyzing this disassembly. The X8 register is dynamically loaded at runtime and this subsequent branch instruction will invoke the function based on the address pointed out by this X8 register. So just by looking at this disassembly we cannot predict what function will be called. Similar kind of indirect branching instructions are spread through out the code. So it is quite difficult here to understand the logic just by simply doing a static analysis on this function.
Root Detection #1
Before moving forward, let’s get some idea about how root detection is performed in general on any Android device. When we root a device it places an executable with the name su in system directory. In order to detect su binary, app has to check for su in a default path like system/bin/su. These paths have to be hardcoded somewhere in this library. It is most likely hardcoded in the read only section of the binary because all the hardcoded constant values are present in that section.
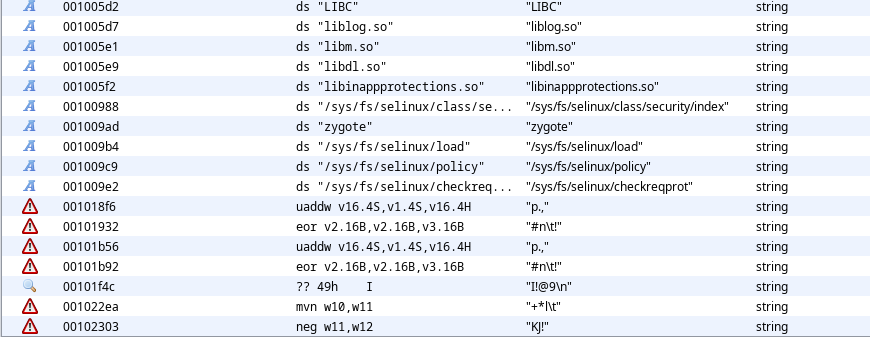
Unfortunately, nothing related to su paths have been found in the strings and we can see that lot of random characters are present in the text section. This indicates that the strings have been encrypted and stored into text section. We cannot do much at this point.
What should we consider trying next? We’ve noticed that there are several imported functions related to file handling, including access(), fopen(), fclose(), and stat(). To confirm this, let’s apply a Frida interceptor to these functions.
var arg0 = null;
    Interceptor.attach(Module.findExportByName("libc.so", "fopen"), {
        onEnter: function (args) {
            arg0 = args[0];
            console.log(fopen: ${args[0].readCString()});
        }
    })
    Interceptor.attach(Module.findExportByName("libc.so", "stat"), {
        onEnter: function (args) {
            console.log(stat: ${args[0].readCString()});
        }
    })
    Interceptor.attach(Module.findExportByName("libc.so", "access"), {
        onEnter: function (args) {
            console.log(access: ${args[0].readCString()});
        }
    })
Let’s run the script now and see what do we get:
… . Connected to Pixel 4a (id=0B151JEC202420) Spawned com.8ksec.inappprotections. Resuming main thread! [Pixel 4a::com.8ksec.inappprotections ]-> stat: /data/app/MxHO_xqdQgeBWi4_Wpoj4A==/com.8ksec.inappprotections-1XZhJp18cue2EZWsYq4xjA==/base.apk stat: /data/app/MxHO_xqdQgeBWi4_Wpoj4A==/com.8ksec.inappprotections-1XZhJp18cue2EZWsYq4xjA==/base.apk stat: /data stat: /data stat: /data/dalvik-cache/arm64 access: /data/app/MxHO_xqdQgeBWi4_Wpoj4A==/com.8ksec.inappprotections-1XZhJp18cue2EZWsYq4xjA==
We’re currently receiving a substantial amount of output, much of which appears to be related to default paths that typical application processes access during execution. In order to refine our results and obtain a more meaningful output, we should invoke these hooks only after our libinappprotections library has been successfully loaded. To achieve this, we’ll be hooking into linker64 since it plays a crucial role in initially loading the library into memory.
var do_dlopen = null;
var call_constructor = null;
Process.findModuleByName('linker64').enumerateSymbols().forEach(function (symbol) {
    if (symbol.name.indexOf('do_dlopen') >= 0) {
        do_dlopen = symbol.address;
    } else if (symbol.name.indexOf('call_constructor') >= 0) {
        call_constructor = symbol.address;
    }
})
We can easily find the linker64 module by using Process.findModuleByName() API of frida and then we need to enumerate all the symbols in linker64 to get the addresses of do_dlopen() and call_constructor functions. These functions will be invoked when linker64 tries to load a library into the memory.
Once we have these addresses, we can attach the hooks and trace all the libraries loaded by the linker.
var lib_loaded = 0;
Interceptor.attach(do_dlopen, function () {
    var library_path = this.context.x0.readCString();
    if (library_path.indexOf('libnative-lib.so') >= 0) {
        console.log(Target library is loading...);
        Interceptor.attach(call_constructor, function () {
            if (lib_loaded == 0) {
                var native_mod = Process.findModuleByName('libinappprotections.so');
                console.log(Target library loaded at ${native_mod.base});
            }
            lib_loaded = 1;
        })
    }
})
Let’s run the script again and see the intercepted data:
frida -U -l root_bypass.js -f com.8ksec.inappprotections … . Connected to Pixel 4a (id=0B151JEC202420) Spawned com.8ksec.inappprotections. Resuming main thread! [Pixel 4a::com.8ksec.inappprotections ]-> Target library is loading… Target library loaded at 0x6d5d956000 stat: /data/app/~~MxHO_xqdQgeBWi4_Wpoj4A==/com.8ksec.inappprotections-1XZhJp18cue2EZWsYq4xjA==/base.apk stat: /data/resource-cache/product@overlay@NavigationBarModeGestural@NavigationBarModeGesturalOverlay.apk@idmap stat: /product/overlay/NavigationBarModeGestural/NavigationBarModeGesturalOverlay.apk access: /data/user/0/com.8ksec.inappprotections access: /data/user/0/com.8ksec.inappprotections/cache access: /data/user_de/0/com.8ksec.inappprotections access: /data/user_de/0/com.8ksec.inappprotections/code_cache stat: /system/framework/framework-res.apk stat: /data/resource-cache/product@overlay@GoogleConfigOverlay.apk@idmap stat: /product/overlay/GoogleConfigOverlay.apk stat: /data/resource-cache/product@overlay@GoogleWebViewOverlay.apk@idmap stat: /product/overlay/GoogleWebViewOverlay.apk stat: /data/resource-cache/product@overlay@NavigationBarModeGestural@NavigationBarModeGesturalOverlay.apk@idmap stat: /product/overlay/NavigationBarModeGestural/NavigationBarModeGesturalOverlay.apk access: /system/xbin/su access: /system/bin/su detectRoot ret value is 669 access: /dev/hwbinder stat: /vendor/lib64/hw/gralloc.sm6150.so
We can observe the execution of our detectRoot() function. The function is invoked, and subsequently, the application attempts to access certain system paths using the access() function. It’s important to note that these specific paths will exist on any rooted device. Following the path access, the function then determines whether root access has been detected based on a constant value.
Now, let’s explore potential strategies to bypass this root detection mechanism.
One viable approach is to manipulate the path being checked by the access() function and provide a fake path instead. This alteration will mislead the app into believing that the su binary path is not present, prompting it to return a non-rooted status. To implement this workaround, let’s modify the script accordingly:
Interceptor.attach(Module.findExportByName("libc.so", "access"), {
        onEnter: function (args) {
            var path = args[0].readCString();
            if(path.indexOf("/su") >= 0){
                console.log(Manipulating su path...);
                args[0].writeUtf8String("/system/nonexisting");
            }
            console.log(access: ${args[0].readCString()});
        }
    })
Run the script again.
Manipulating su path… access: /system/nonexisting access: ing Manipulating su path… access: /system/nonexisting access: onexisting Manipulating su path… access: /system/nonexisting fopen: stat: /sys/fs/selinux/class/security/index detectRoot ret value is 572
This time we can observe that access function is now trying to access our modified non existent path instead of su paths right. But the app UI still indicates that a root device was detected.
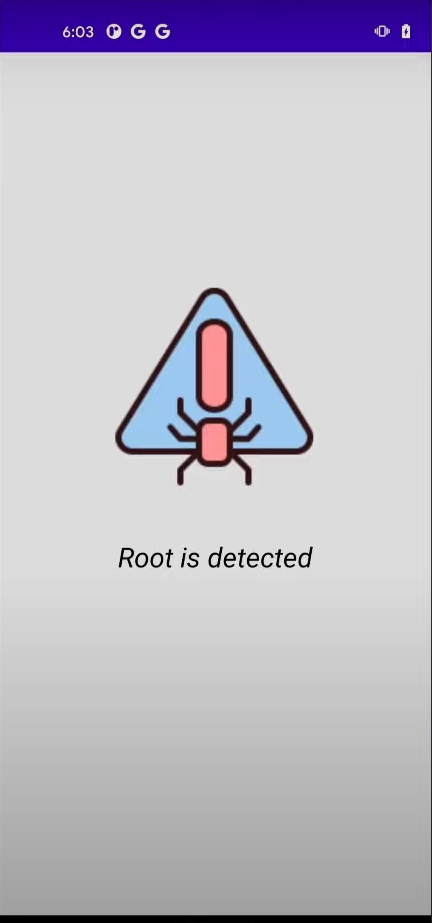
This may be because the app could be searching for additional artifacts related to root detection.
Root Detection #2
Coming back to the output log we can observe that before returning the value it is calling a stat() function which is trying to access selinux policies file. We can assume that the app is trying to access these selinux policy to detect root. To bypass this check again we can use the same approach of altering the input parameter being passed to stat function using frida:
Interceptor.attach(Module.findExportByName("libc.so", "stat"), {
        onEnter: function (args) {
            var path = args[0].readCString();
            if(path.indexOf("/selinux") >= 0){
                console.log(Manipulating selinux path...);
                args[0].writeUtf8String("/non/existing");
            }
            console.log(stat: ${args[0].readCString()});
        }
    })
And its time to run the script again to see the changes in the console log.
access: /system/nonexisting fopen: Manipulating selinux path… Error: access violation accessing 0x6d5d9568f8 at (frida/runtime/core.js:147) at onEnter (/home/kali/Documents/trainings_2023/root_detection_bypass/root_bypass.js:58) detectRoot ret value is 628
In the output, an error was reported: “Access violation accessing 0x6d5d9568f8.” This error log suggests that there may be an issue with Frida attempting to tamper with or overwrite the value at this specific memory location. Fortunately, there is a solution available. We can utilize an alternative Frida API, Memory.protect(), to modify the permissions of the memory space in question.
Memory.protect(args[0],Process.pointerSize, 'rwx');Let’s run the script now and see whether this has fixed the issue or not.
Manipulating su path… access: /system/nonexisting access: ing Manipulating su path… access: /system/nonexisting access: onexisting Manipulating su path… access: /system/nonexisting fopen: Manipulating selinux path… stat: /non/existing Manipulating selinux path… stat: /non/existing Manipulating selinux path… stat: /non/existing Manipulating selinux path… stat: /non/existing fopen: /proc/self/attr/prev detectRoot ret value is 560
It worked! Awesome. In the console log we can observe that stat input paths have been modified and if we have a look at the app, it still says root detected. So clearly, just bypassing this is not enough and we need to analyze it more to identify other checks present in the app.
Root Detection #3
In the console log after these stat calls this time we have another imported function being called i.e fopen() and its trying to access /proc/self/attr/prev. Let’s access this file from adb shell to see what is there in this file.
adb shell
cat /proc/self/attr/prev
u:r:zygote:s0
It says zygote here. Let’s check this same file on a non rooted device and see its contents:
cat /proc/self/attr/prev
u:r:untrusted_app:s0:c7,c257,c512,c768
Okay this means that something is getting changed when we are on a rooted device as compared to non rooted one. And after doing some research it was found that this file will contain zygote when we have magisk zygisk module running. So to bypass this check we can either disable zygisk module or we can try to bypass this using Frida.
Let’s go with later approach first. Based on our understanding about this file we can assume that the app has to make a comparison at some point of time to to check whether this file contains “zygote” or not. Let’s look at the strings section again in Ghidra:

In the strings listed, we do have zygote present. Next we have to figure out the function responsible for doing this string comparison. Let’s head back to the imported functions in Ghidra:

Here, we have the strstr() function available, that could be used for string comparison. Let’s attach our hook to this function and intercept its arguments.
Interceptor.attach(Module.findExportByName("libc.so", "strstr"), {
        onEnter: function (args) {
            console.log(strstr: haystack -> ${args[0].readCString()} & needle -> ${args[0].readCString()});
        }
    })
Examine the output:
Manipulating selinux path… stat: /non/existing Manipulating selinux path… stat: /non/existing fopen: /proc/self/attr/prev strstr: haystack -> u:r:zygote:s0 & needle -> zygote detectRoot ret value is 571
As we have anticipated, after fopen function it is calling strstr() function and is looking for zygote in this string.
Now, to bypass this let’s modify this second argument so that the comparison will fail.
Interceptor.attach(Module.findExportByName("libc.so", "strstr"), {
        onEnter: function (args) {
            var needle = args[1].readCString();
            if(needle.indexOf("zygote") >= 0){
                args[1].writeUtf8String("blabla");
                console.log(strstr: haystack -> ${args[0].readCString()} & needle -> ${args[1].readCString()});
            }
        }
    })
Running the script again and see what do we get this time:
Manipulating su path… access: /system/nonexisting access: ing Manipulating su path… access: /system/nonexisting access: onexisting Manipulating su path… access: /system/nonexisting Manipulating selinux path… stat: /non/existing Manipulating selinux path… stat: /non/existing Manipulating selinux path… stat: /non/existing Manipulating selinux path… stat: /non/existing fopen: /proc/self/attr/prev strstr: haystack -> u:r:zygote:s0 & needle -> blabla fopen: /proc/self/mountinfo detectRoot ret value is 532
We can observe now that this second argument is modified with blabla now but the app is still not convinced, and still detects rooted device.
After the strstr() function call, there is another fopen() call which then tries to access mountinfo.
Root Detection #4?
What is mountinfo?
When we have a rooted device, many additional paths are mounted, such as those for Magisk. Many paths that are supposed to be read-only, such as /system that are supposed to be readonly, become writable.
So it is possible that the app is trying to look for these changes.
Since the app might be looking for the changes we identified in the strstr() function, it’s possible that it’s using the same function to find those strings in the mountinfo file. Another option is to point fopen() to a non-existent path, but let’s try the first approach first. As we already have the hook attached to the strstr() function, we just need to observe the output.
fopen: /proc/self/mountinfo
strstr: haystack -> 20533 20532 253:5 / / ro,relatime master:1 - ext4 /dev/block/dm-5 ro,seclabel & needle -> magisk strstr: haystack -> 20534 20533 0:18 / /dev rw,nosuid,relatime master:2 - tmpfs tmpfs rw,seclabel,size=2852132k,nr_inodes=713033,mode=755 & needle -> magisk strstr: haystack -> 20535 20534 0:20 / /dev/pts rw,relatime master:3 - devpts devpts rw,seclabel,mode=600,ptmxmode=000 & needle -> magisk strstr: haystack -> 20536 20534 0:19 / /dev/ltgnxkz rw,relatime master:4 - tmpfs magisk rw,seclabel,size=2852132k,nr_inodes=713033,mode=755 & needle -> magisk detectRoot ret value is 655
As we suspected - the app is accessing the contents of the mountinfo file to search for this specific string magisk. Here in the last iteration we have this magisk present in mountinfo. Let’s bypass this using the same approach we used earlier, modifying the second argument of this function:
if(needle.indexOf("magisk") >= 0){
    args[1].writeUtf8String("blabla");
}
After rerunning the script, we noticed that the app now displays “suspicious” instead of “rooted.” This suggests that we have successfully bypassed the root detection to some extent.
Root Detection #5
There are still some missing checks causing the app to believe the device environment is not clean. Upon reexamining the output console, we couldn’t identify any other noteworthy function calls.
So, what else could it be?
Let’s launch Ghidra again and try to find some other low hanging fruit.
On randomly analyzing the subroutines we can see an interesting instruction : SVC 0x0.
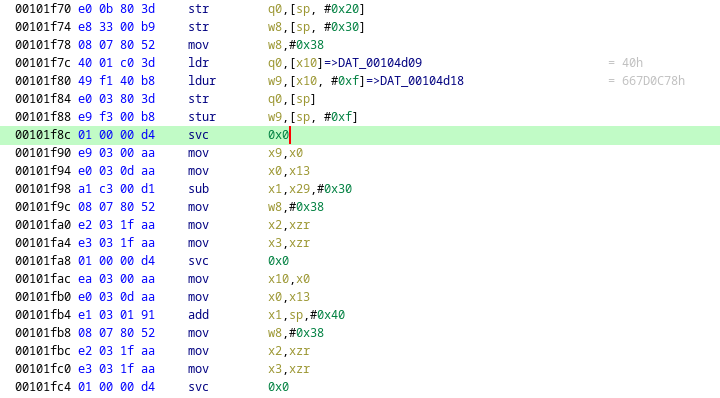
And these instructions are spread throughout the binary as you can see from the above screenshot.
What are these SVC instructions?
These instructions are used to call functions using system call number. Since we are dealing with Arm64 binary let’s open up the system call mapping table for this architecture. You can find a complete list of syscalls here: https://chromium.googlesource.com/chromiumos/docs/+/master/constants/syscalls.md#arm64-64_bit
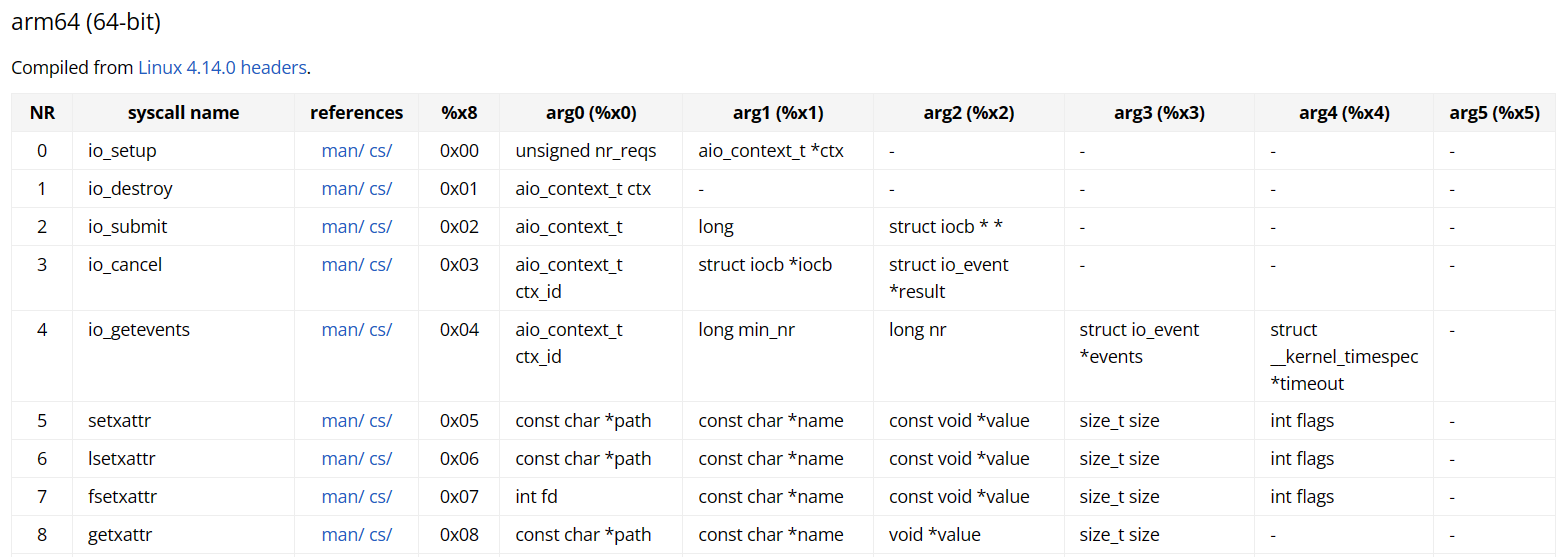
In this first column we have the name of the function, then in the 3rd column we have system call number and as specified here it gets stored in X8 register and then the arguments to the functions will be stored in registers starting from X0 to X5. Let’s analyze this in the disassembly we just saw:
0x00001994      08078052       mov w8, 0x38
0x00001998      010000d4       svc 0
0x38 is stored in w8 register here, we can match this syscall number with this table to figure out what function is getting called. In the table the corresponding function to this syscall number is openat(). This function is similar to open() function that will open the file in memory for reading or writing purpose. This is a good candidate to look for and developers use such techniques to hide the function names from being analyzed statically.
To attach the Frida interceptor on all these SVC instructions, we first need to find out the offsets where all these instructions are present. We can do this easily with the help of Ghidra search instruction pattern feature.
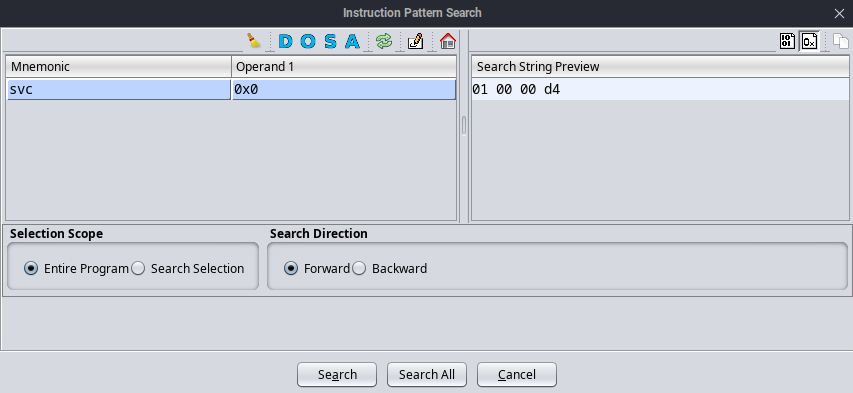
And we found all the SVC instructions as shown below:
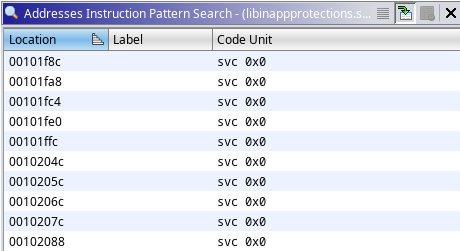
Let’s now intercept these supervisor calls and see what file the openat functions invoke.
function hookSVC(base_addr){
    Interceptor.attach(base_addr.add(0x00001998), function(){
        var path = this.context.x1.readCString();
        console.log(svc: ${path});
    })
    Interceptor.attach(base_addr.add(0x000019bc), function(){
        var path = this.context.x1.readCString();
        console.log(svc: ${path});
    })
    Interceptor.attach(base_addr.add(0x000019dc), function(){
        var path = this.context.x1.readCString();
        console.log(svc: ${path});
    })
    Interceptor.attach(base_addr.add(0x00001a00), function(){
        var path = this.context.x1.readCString();
        console.log(svc: ${path});
    })
    Interceptor.attach(base_addr.add(0x00001a20), function(){
        var path = this.context.x1.readCString();
        console.log(svc: ${path});
    })
}
Let’s run the script and see whether it shows anything interesting or not.
svc 56: /system/xbin/su svc 56: /system/bin/su svc 56: /sbin/su svc 56: /system/bin/.ext/su svc 56: /system/sd/xbin/su detectRoot ret value is 566
From the output we can clearly observe that these SVC instructions are trying to access su binary paths. Great! Now we can bypass this easily by passing a non-existing path in the X1 register.
Interceptor.attach(base_addr.add(0x000025a0), {
        onEnter: function (args) {
            var path = Memory.readCString(this.context.x1);
            this.context.x1.writeUtf8String("/non/exist");
            console.log(svc ${this.context.x8.toInt32()}: ${path});
        }
    })
Alright, the app is no longer displaying any complaints, and it now indicates that the device environment is clean. We have successfully bypassed all the checks!
Conclusion
In this blog post, we have learned about various root detection techniques used in Android apps. One technique was to check for the presence of the su binary path. Another technique was to check the selinux policy. We found that even after bypassing these checks, the app was still detecting root.
Further analysis revealed some new detections based on zygote and mountinfo, which were being performed using string comparison. Finally, we discovered a very interesting detection that was based on su binary detection, but was being done stealthily with the help of supervisor instructions (SVC). SVC instructions are used to call a function using a system call number. We saw how to identify these system calls and how to figure out the function names mapped to the system call number.
In the end, we were able to bypass all of these checks using Frida as our hooking framework!
GET IN TOUCH
Visit our training page if you’re interested in learning more about these techniques and developing your abilities further. Additionally, you may look through our Events page and sign up for our upcoming Public trainings.
Check out our Certifications Program and get Certified today.
Please don’t hesitate to reach out to us through out Contact Us page or through the Button below if you have any questions or need assistance with Penetration Testing or any other Security-related Services. We will answer in a timely manner within 1 business day.
We are always looking for talented people to join our team. Visit out Careers page to look at the available roles. We would love to hear from you.


