Memory Integrity Enforcement (MIE) on iOS Deep Dive – Part 1
All parts in this series
- 1 Memory Integrity Enforcement (MIE) on iOS Deep Dive – Part 1
- 2 MIE Deep Dive Part 2: Enabling Apps & Crash Analysis
Introduction
In this two-part blog series, we will explore Apple’s groundbreaking Memory Integrity Enforcement (MIE) feature. In Part 1, we’ll cover the fundamentals: what memory corruption vulnerabilities are, how MIE works at a technical level, and how to analyze the kernel implementation using Binary Ninja. In Part 2, we’ll shift to the practical side—enabling MIE in applications, checking entitlements, and analyzing crash logs.
Memory corruption vulnerabilities represent the most critical and persistent security challenge facing the industry today. When we look at the statistics, both Google and Microsoft have published data showing that approximately 70% of all severe security vulnerabilities in their codebases stem from memory safety issues. These aren’t just theoretical problems, they are the foundation of virtually every sophisticated attack that we see in the wild.
The Memory Safety Crisis
Let’s break down what we mean by memory corruption. The three most common categories are:
- Buffer Overflows – Where an attacker writes beyond the bounds of an allocated memory region
- Use-After-Free (UAF) – Where memory is accessed after it has been freed and potentially reallocated
- Type Confusion – Where memory is interpreted as the wrong type
These bugs are so valuable because they give attackers the ability to read and write arbitrary memory, which is the fundamental primitive needed to take control of a system.
A single iOS zero-day exploit chain—used by mercenary spyware companies like NSO Group or Intellexa—can cost between $1 million and $5 million to develop. Yet these chains are remarkably reliable because memory corruption bugs are so prevalent and interchangeable.
This is why Apple has invested around five years of extraordinary reverse engineering and engineering resources into solving this problem at a fundamental level.
Apple’s Answer: Memory Integrity Enforcement
Memory Integrity Enforcement (MIE) is Apple’s biggest leap in memory safety. It is the result of a five-year collaboration between the Apple Silicon team and the OS security team. What’s remarkable is that this brings always-on memory safety with zero performance cost—something the industry has been trying to achieve for years.
MIE Availability:
- iPhone 17 (all variants)
- iPhone 17 Air
- Powered by A19/A19 Pro chips
- Protects: Kernel + 70+ userland processes by default
MIE vs AddressSanitizer: Why Hardware Matters
Before MIE, the industry’s best tool for finding memory bugs was AddressSanitizer (ASan)—a compiler-based instrumentation tool. While ASan has been invaluable for developers, it has fundamental limitations that make it unsuitable for production deployment:
| Aspect | AddressSanitizer (ASan) | Memory Integrity Enforcement (MIE) |
|---|---|---|
| Implementation | Software instrumentation | Hardware-enforced (A19 silicon) |
| Performance Overhead | 50-100% slowdown | Near-zero (tag checks in LDR/STR) |
| Memory Overhead | 2-3x memory usage | ~3% for tag storage |
| Deployment | Development/testing only | Always-on in production |
| Bypass Difficulty | Software-bypassable | Hardware-enforced |
ASan is a detection tool for developers—it helps find bugs during testing but cannot be shipped to end users due to its massive overhead. MIE, by contrast, is a protection mechanism that runs on every customer device with no performance penalty.
┌─────────────────────────────────────────────────────────────────┐
│                    DEVELOPMENT → PRODUCTION                     │
├─────────────────────────────────────────────────────────────────┤
│                                                                 │
│   ASan (Development)          MIE (Production)                  │
│   ┌─────────────────┐         ┌─────────────────┐               │
│   │ Find bugs in    │         │ Stop exploits   │               │
│   │ testing         │   →→→   │ on user devices │               │
│   │                 │         │                 │               │
│   │ 50-100% slower  │         │ Zero overhead   │               │
│   │ 2-3x memory     │         │ ~3% memory      │               │
│   └─────────────────┘         └─────────────────┘               │
│                                                                 │
│   "Find bugs before release"  "Block exploits in the wild"      │
└─────────────────────────────────────────────────────────────────┘
The Philosophy
Apple combined their hardware innovations (A19 silicon), software security measures, and secure allocators into one unified design. The result is a complete end-to-end memory safety solution that closes entire classes of exploitation techniques.
The Evolution: From PAC to MTE to EMTE
Understanding MIE requires understanding its evolution.
2018: Pointer Authentication Codes (PAC)
In 2018, Apple shipped the A12 Bionic chip with Pointer Authentication Code (PAC). This made them the first in the industry to deploy this protection at scale. PAC uses cryptographic signatures to verify that code pointers have not been tampered with.
2019: ARM Memory Tagging Extension (MTE)
When ARM published the Memory Tagging Extension specification in 2019, it was designed primarily as a debugging tool. The core idea is elegant: tag every memory allocation with a secret 4-bit value, and have the hardware check that subsequent accesses provide the correct tag.
However, Apple’s security team identified critical weaknesses:
| Weakness | Problem |
|---|---|
| Async Mode | Tag mismatches don’t raise immediate exceptions—leaves race window for attackers |
| Non-Tagged Memory | Global variables and static allocations weren’t protected—easy to bypass |
2022: Enhanced MTE (EMTE)
Apple worked directly with ARM to address these shortcomings. EMTE requires synchronous checking (immediate exceptions), protects non-tagged memory access, and includes several other improvements that make it viable as a real-time defensive measure.
The Three Pillars of MIE
MIE is built on three interconnected pillars that work together to provide comprehensive protection:
┌─────────────────────────────────────────────────────────────────────┐
│                    MEMORY INTEGRITY ENFORCEMENT                     │
├─────────────────────┬─────────────────────┬─────────────────────────┤
│    PILLAR 1         │     PILLAR 2        │       PILLAR 3          │
│                     │                     │                         │
│  Secure Type-Aware  │   Enhanced MTE      │   Tag Confidentiality   │
│    Allocators       │   (EMTE)            │     Enforcement         │
│                     │                     │                         │
│  • kalloc_type      │  • 4-bit tags       │  • SPTM protection      │
│  • xzone malloc     │  • Synchronous      │  • Anti-timing          │
│  • libpas           │  • 16-byte granule  │  • Anti-spectre         │
└─────────────────────┴─────────────────────┴─────────────────────────┘
Pillar 1: Secure Type-Aware Allocators
Apple has developed several allocators:
kalloc_typefor the kernelxzone mallocfor userlandlibpasfor WebKit/browsers
These allocators use compile-time type information to organize memory, making it extremely difficult for attackers to position malicious allocations where they need to be.
Pillar 2: Enhanced MTE (EMTE)
EMTE fills the gap that software allocators cannot address—protection within a single type bucket at sub-page granularity:
- Every memory allocation gets tagged with a 4-bit secret (16 possible values)
- Adjacent buffers get different tags
- If code writes beyond one buffer into the next, the hardware sees a tag mismatch and immediately raises a synchronous exception
Pillar 3: Tag Confidentiality Enforcement
This is where Apple goes beyond the ARM specification with custom implementations. To understand why this pillar is critical, we need to examine the TikTag attack.
The TikTag Threat: Why Tag Confidentiality Matters
In 2024, security researchers from Seoul National University and Samsung Research published a devastating attack against MTE called TikTag. Using speculative execution side-channels, TikTag can leak MTE tags with 95%+ success rate in under 4 seconds.
┌─────────────────────────────────────────────────────────────────┐
│                    TIKTAG ATTACK FLOW                           │
├─────────────────────────────────────────────────────────────────┤
│                                                                 │
│  1. Attacker triggers speculative memory access                 │
│  2. CPU speculatively checks MTE tag                            │
│  3. Tag check result influences cache state                     │
│  4. Attacker measures timing to infer tag value                 │
│  5. Repeat for all 16 possible tags → leak correct tag          │
│                                                                 │
│  Result: With leaked tags, MTE protection is BYPASSED           │
└─────────────────────────────────────────────────────────────────┘
TikTag demonstrated that standard MTE on Android (Pixel devices) could be bypassed. The researchers successfully used TikTag gadgets against Google Chrome and the Linux kernel on MTE-enabled Pixel phones.
Apple’s Tag Confidentiality Countermeasures
| Countermeasure | How It Works |
|---|---|
| Timing-Safe Tag Evaluation | Apple designed silicon so tag values cannot influence speculative execution—eliminating TikTag side-channels |
| Cryptographic Tag Seeding | Frequent re-seeding of the pseudo-random tag generator prevents attackers from predicting tag assignments |
| Spectre V1 Mitigation | Novel low-cost approach requiring attackers to chain 25+ Spectre V1 gadgets for 95% exploitability—practically infeasible |
Deep Dive: SPTM Protection
The Secure Page Table Monitor (SPTM) is Apple’s hypervisor-level protection layer that provides guarantees even if the kernel is fully compromised:
┌─────────────────────────────────────────────────────────────────┐
│                    PROTECTION HIERARCHY                         │
├─────────────────────────────────────────────────────────────────┤
│                                                                 │
│   ┌─────────────────────────────────────────────────────────┐   │
│   │                    SPTM (Hypervisor)                    │   │
│   │    • Controls page table access                         │   │
│   │    • Protects allocator backing stores                  │   │
│   │    • Guards tag storage memory                          │   │
│   │    • Enforces tag checks even on kernel accesses        │   │
│   └────────────────────────────────────────┬────────────────┘   │
│                                            │                    │
│   ┌────────────────────────────────────────▼────────────────┐   │
│   │                    iOS Kernel (XNU)                     │   │
│   │    • Even if compromised, cannot:                       │   │
│   │      - Read tag memory directly                         │   │
│   │      - Modify tag assignments                           │   │
│   │      - Bypass SPTM tag checks                           │   │
│   └─────────────────────────────────────────────────────────┘   │
│                                                                 │
└─────────────────────────────────────────────────────────────────┘
This is a critical differentiator from Android’s MTE implementation, where a kernel compromise can potentially disable or bypass MTE protections.
How MTE Works: Technical Deep Dive
The Tag Memory Architecture
MTE introduces a parallel “tag memory” layer alongside regular data memory:
┌─────────────────────────────────────────────────────────────────┐
│                         REGULAR MEMORY                          │
├────────────────────┬────────────────────┬────────────────────────┤
│  0x8493520 (16B)   │  0x8493530 (16B)   │  0x8493540 (16B)       │
│  [data granule 1]  │  [data granule 2]  │  [data granule 3]      │
└─────────┬──────────┴────────┬───────────┴──────────┬─────────────┘
          │                   │                      │
          ▼                   ▼                      ▼
┌─────────────────────────────────────────────────────────────────┐
│                          TAG MEMORY                             │
├─────────────────────┬───────────────────┬───────────────────────┤
│       Tag: 0xA      │     Tag: 0xB      │      Tag: 0xC         │
│      (4 bits)       │     (4 bits)      │      (4 bits)         │
└─────────────────────┴───────────────────┴───────────────────────┘
Key Points:
- Every 16 bytes of data (called a “granule”) has a 4-bit tag
- Tags are stored in hardware-protected memory
- Normal load/store instructions cannot access tag memory
- Storage overhead is around 3%
Understanding Tagged Pointers
The tag is stored in the lower 4 bits of the top byte of a 64-bit address:
64-bit Address: 0xAFFFFFFE0008493520
                │
                └── Tag value = 0xA (bits 59:56)

┌────────┬────────┬──────────────────────────────────────────────┐
│Reserved│  TAG   │              Address Bits                    │
│(4 bits)│(4 bits)│                (56 bits)                     │
├────────┼────────┼──────────────────────────────────────────────┤
│  1111  │  1010  │  11111111 11111110 0000 0000 ...             │
│   (F)  │   (A)  │            (actual address)                  │
└────────┴────────┴──────────────────────────────────────────────┘
 [63:60]  [59:56]                    [55:0]
Hardware Tag Checking: No Extra Instructions!
An important thing to note is that there are no additional instructions for checking the tag value every time. The LDR and STR instructions do it for you under the hood.
Whenever you load or store using a pointer:
- The tag value is extracted from the pointer (bits 59:56)
- The tag value for the corresponding granule is read from tag memory
- If the pointer tag matches the memory tag → valid access
- If they don’t match → synchronous hardware fault
Memory Allocation Flow: What Happens on malloc()
Let’s trace through what happens when you call malloc(64):
Step 1: Find Free Memory
The xzone malloc finds free memory at address 0xFFFFFE0008493520.
Step 2: Tag the Pointer (IRG Instruction)
The pointer is tagged using the IRG (Insert Random Tag) instruction:
IRG x0, x0, x1
; x0: Untagged address (0xFFFFFE0008493520)
; x1: Exclusion mask (recent tags to avoid)
; Result: Tagged address (0xAFFFFFFE0008493520, tag = 0xA)
Step 3: Tag the Memory (STG Instruction)
The memory that this pointer points to must also be tagged using the STG (Store Tag) instruction:
STG x0, [x0], #16   ; Tag granule 0 with 0xA
STG x0, [x0], #16   ; Tag granule 1 with 0xA
STG x0, [x0], #16   ; Tag granule 2 with 0xA
STG x0, [x0], #16   ; Tag granule 3 with 0xA
Now both the pointer AND the memory it points to have the same tag (0xA).
┌────────────────────────────────────────────────────────────────┐
│  Pointer: 0xAFFFFFFE0008493520                                 │
│           ↑                                                    │
│           └── Tag = 0xA                                        │
│                                                                │
│  Memory Tags:                                                  │
│  ┌──────────┬──────────┬──────────┬──────────┐                 │
│  │   0xA    │   0xA    │   0xA    │   0xA    │  ← Same tag!    │
│  └──────────┴──────────┴──────────┴──────────┘                 │
│   [granule0] [granule1] [granule2] [granule3]                  │
│                    64 bytes total                              │
└────────────────────────────────────────────────────────────────┘
How MIE Prevents Attacks
Buffer Overflow Prevention
Our Buffer (64 bytes)              Next Object
┌────────────────────────┐      ┌────────────────┐
│                        │      │                │
│     Tag: 0xA           │      │   Tag: 0xB     │
│     [our data]         │      │   [other data] │
└────────────────────────┘      └────────────────┘
                                 ↑
Pointer (0xA) ──────────────────── Overflow attempt here!
When buf[80] = 'X' is executed:
┌─────────────────────────────────────────────────────────────────┐
│ 1. Extract tag from pointer: 0xA                                │
│ 2. Load tag from memory at offset +80: 0xB                      │
│ 3. Compare: 0xA ≠ 0xB → TAG MISMATCH!                          │
│ 4. Hardware fault → Program crashes safely                      │
└─────────────────────────────────────────────────────────────────┘
Use-After-Free Prevention
Step 1: Allocate buffer (tag = 0xA)
┌────────────────────┐
│ Pointer → Memory   │  Both have tag 0xA
└────────────────────┘
Step 2: Call free(buffer)
┌────────────────────┐
│ Memory retagged    │  Memory now has tag 0xB
│ Pointer unchanged  │  Pointer still has tag 0xA (dangling!)
└────────────────────┘
Step 3: Attacker uses stale pointer
┌────────────────────┐
│ Pointer tag: 0xA   │
│ Memory tag:  0xB   │  MISMATCH → Hardware Fault!
└────────────────────┘
Reversing MTE in the iOS Kernel
Now let’s look at how to analyze the MTE implementation in the iOS kernel.
Step 1: Download the Kernelcache
Using the ipsw tool from blacktop’s ipsw repository:
$ ipsw extract --remote --kernel \
  "https://updates.cdn-apple.com/.../iPhone18,3_26.1_23B85_Restore.ipsw"

Extracting kernelcache
  • Created 23B85__iPhone18,3/kernelcache.release.iPhone18,3
Step 2: Symbolicate the Kernel
We can use the ipsw symbolicator repo to symbolicate the kernel.
$ ipsw kernel sym kernelcache.release.iPhone18,3 \
  --json \
  --signatures /path/to/symbolicator/kernel

Symbolicating...
  • Created kernelcache.release.iPhone18,3.json
Step 3: Load in Binary Ninja
- Open the kernelcache in Binary Ninja
- Select the main kernel image (not a kext)
- Use the ipsw symbolicate plugin to import the JSON symbols
- Search for MTE instructions using Command+F
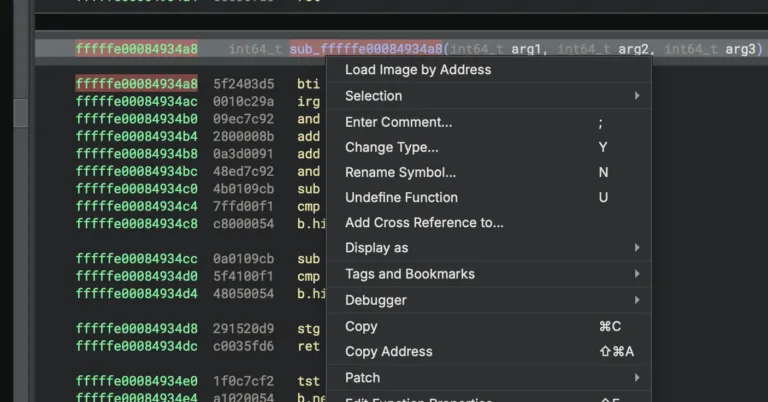
Finding the IRG and STG Instructions
Search for IRG in Binary Ninja. You’ll find a function that implements MTE tag initialization. Let’s rename it irg-stg:
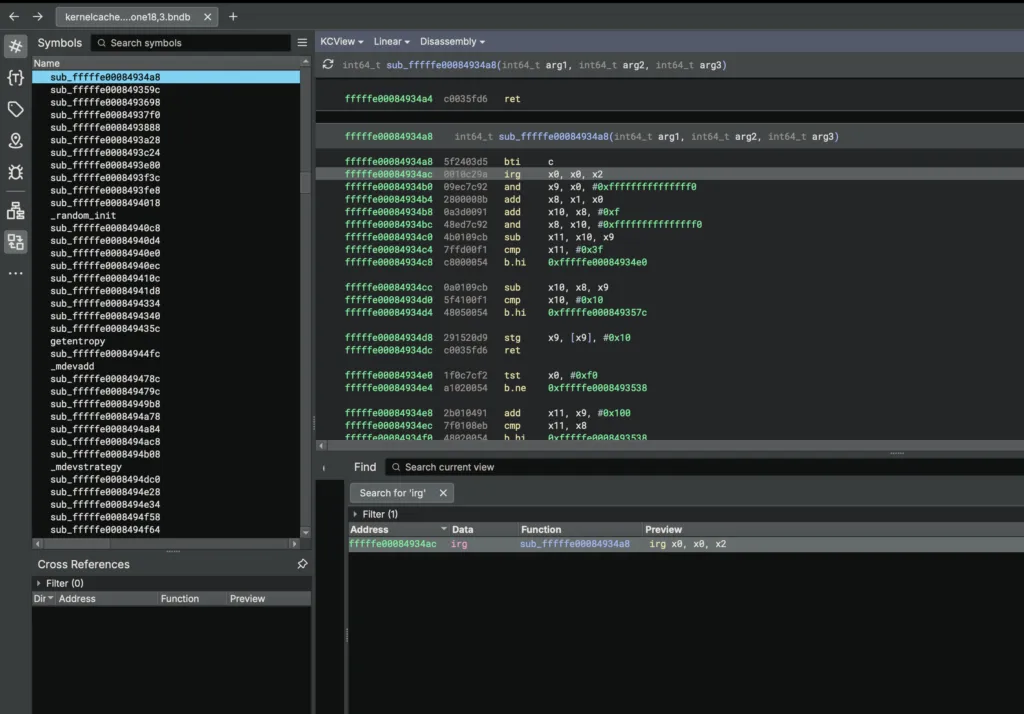
┌─────────────────────────────────────────────────────────────────┐
│ Function: irg-stg (0xfffffe00084934a8)                          │
│ Purpose: MTE tag initialization for kernel memory regions       │
├─────────────────────────────────────────────────────────────────┤
│                                                                 │
│   IRG x0, x0, x1      ; Generate random tag                     │
│   ...                                                           │
│   STG x0, [x0], #16   ; Store tag to memory                     │
│   STG x0, [x0], #16                                             │
│   ...                                                           │
│                                                                 │
└─────────────────────────────────────────────────────────────────┘
MTE Instructions Reference
| Instruction | Purpose |
|---|---|
IRG | Insert Random Tag – generates random 4-bit tag |
STG | Store Tag – stores tag for 16-byte granule |
ST2G | Store Tag Pair – stores tags for 32 bytes (2 granules) |
STGM | Store Tag Multiple – bulk tagging for large regions |
GMI | Get Mask of Included tags – builds exclusion mask |
LDG | Load Tag – reads tag from memory |
Cross-References: Who Calls This Function?
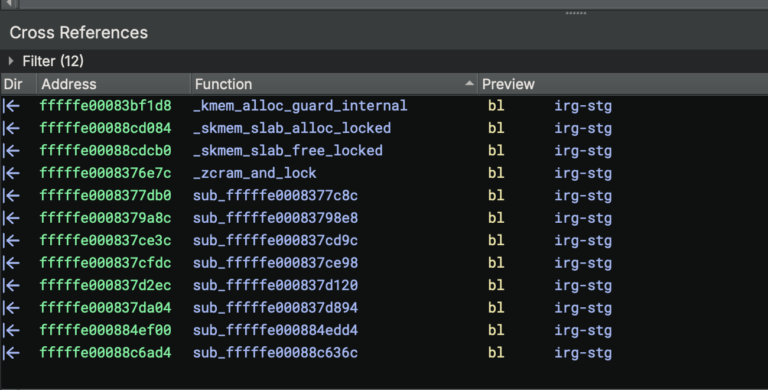
Looking at the cross-references reveals 12 caller locations across kernel subsystems:
| Caller Function | Component | Purpose |
|---|---|---|
_zcram_and_lock | Zone Allocator | Tags zone allocations (processes, threads, sockets, IPC ports) |
_kmem_alloc_guard_internal | Kernel Heap | Tags large allocations with guard pages |
_skmem_slab_alloc_locked | Network Stack | Tags socket memory allocations |
_skmem_slab_free_locked | Network Stack | Retags on free |
This shows Apple is applying MTE system-wide across all major kernel subsystems.
Security Implications
What MTE Protects Against
| Attack Type | How MTE Stops It |
|---|---|
| Use-After-Free | Tagged pointers become invalid when memory is freed |
| Buffer Overflows | Adjacent allocations have different tags |
| Type Confusion | Different object types get different tags |
| Heap Feng Shui | Random tags make heap layout unpredictable |
Probabilistic Security
With 4-bit tags (16 possible values), there’s a 1/16 (6.25%) chance that two adjacent allocations happen to have the same tag. Combined with secure allocators, this provides near-complete protection.
Apple’s MIE vs Standard ARM MTE: Key Differences
Apple didn’t just adopt ARM’s MTE specification—they significantly enhanced it:
| Feature | Standard ARM MTE | Apple’s MIE (EMTE) |
|---|---|---|
| Exception Mode | Async mode available (deferred checking) | Synchronous-only (immediate exceptions) |
| Non-Tagged Memory | Not protected | Protected—accessing requires valid tag |
| Tag Confidentiality | Not specified | SPTM-protected, timing-safe evaluation |
| Spectre Mitigation | Limited | Custom silicon-level mitigations |
| Deployment | Developer option (Android 13+) | Always-on consumer default |
| Performance Impact | Measurable overhead | Near-zero (dedicated silicon) |
Why Synchronous Mode Matters
Standard MTE supports asynchronous mode where tag mismatches set a flag that’s checked later. This creates a race window:
┌─────────────────────────────────────────────────────────────────┐
│                    ASYNC vs SYNC MTE                            │
├─────────────────────────────────────────────────────────────────┤
│                                                                 │
│   ASYNC (Standard MTE):                                         │
│   ┌───────────────────────────────────────────────────────────┐ │
│   │  1. Attacker writes to memory                             │ │
│   │  2. Tag mismatch detected, flag set                       │ │
│   │  3. ══════ RACE WINDOW ══════                             │ │
│   │  4. Attacker can detect flag and adjust strategy          │ │
│   │  5. System eventually checks flag and responds            │ │
│   └───────────────────────────────────────────────────────────┘ │
│                                                                 │
│   SYNC (Apple's EMTE):                                          │
│   ┌───────────────────────────────────────────────────────────┐ │
│   │  1. Attacker writes to memory                             │ │
│   │  2. Tag mismatch detected → IMMEDIATE EXCEPTION           │ │
│   │  3. Process terminates instantly                          │ │
│   │  4. No race window, no recovery, no retry                 │ │
│   └───────────────────────────────────────────────────────────┘ │
│                                                                 │
└─────────────────────────────────────────────────────────────────┘
Conclusion
Memory Integrity Enforcement represents a fundamental shift in how we approach memory safety. Rather than relying solely on software mitigations that can be bypassed, MTE provides a hardware-enforced security boundary that makes entire classes of vulnerabilities unexploitable.
In Part 2, we’ll cover enabling MIE in your applications via Xcode, checking entitlements to verify MIE protection, analyzing the MIE demo app code, and understanding MIE crash logs.
References
Apple Official Documentation
- Apple Security Blog: Memory Integrity Enforcement
- Apple Developer: Enhanced Security Capability
- WWDC 2025: Memory Safety in iOS 26
ARM Architecture
Security Research
- TikTag: Breaking ARM’s Memory Tagging Extension with Speculative Execution – Seoul National University & Samsung Research (2024)
- Security, Cryptography, Whatever Podcast: Apple MIE Analysis
- AmpereOne MTE Performance Analysis – Datacenter MTE research
Industry Coverage
- MacRumors: iPhone 17 Memory Security Feature
- Privacy Guides: Memory Integrity Enforcement Changes the Game
Tools
GET IN TOUCH
Visit our Live and On-Demand Trainings to learn more about our offerings. Please don’t hesitate to reach out through our Contact Us page.