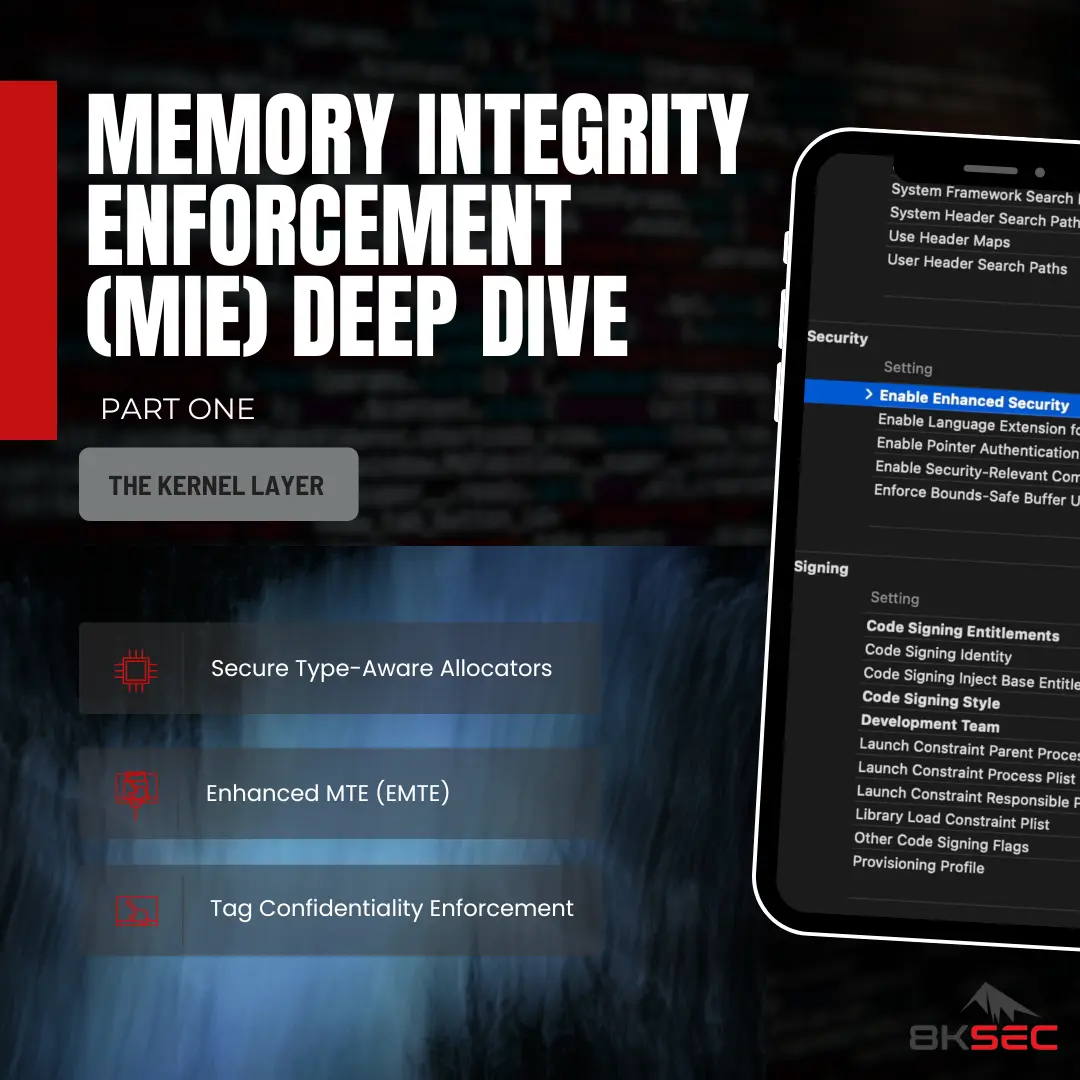
MIE Deep Dive Part 2: Enabling Apps & Crash Analysis
All parts in this series
- 1 Memory Integrity Enforcement (MIE) on iOS Deep Dive – Part 1
- 2 MIE Deep Dive Part 2: Enabling Apps & Crash Analysis
Introduction
In Part 1, we explored the fundamentals of Memory Integrity Enforcement (MIE), how it works at the hardware level, and how to analyze the kernel implementation using Binary Ninja. Now in Part 2, we’ll shift to the practical side:
- How to enable MIE in your own applications
- How to check if an app has MIE enabled via entitlements
- Analyzing the MIE demo app code
- Understanding and analyzing MIE crash logs
By the end of this post, you’ll be able to verify MIE protection in any iOS application and understand what happens when MIE catches a memory corruption bug.
Enabling MIE in Your Applications
Hardware Requirements
Before enabling MIE, ensure you have compatible hardware:
- iPhone 17 (all variants)
- iPhone 17 Air
- iPhone 17 Pro / Pro Max
All these devices use the A19/A19 Pro chips which support Memory Integrity Enforcement. MIE will not work on older devices.
Enabling MIE in Xcode
To enable MIE for your application:
-
Open your project in Xcode
-
Navigate to Signing & Capabilities
- Select your target
- Go to “Signing & Capabilities” tab
-
Add Enhanced Security
- Click the ”+” button to add a capability
- Search for and select “Enhanced Security”
-
Enable Hardware Memory Tagging
- Check the box for “Hardware Memory Tagging”
┌─────────────────────────────────────────────────────────────────┐
│ Signing & Capabilities                                          │
├─────────────────────────────────────────────────────────────────┤
│                                                                 │
│  ☑ Enhanced Security                                            │
│    ├── ☑ Hardened Process                                       │
│    ├── ☑ Hardened Heap                                          │
│    └── ☑ Hardware Memory Tagging  ← Enable this for MIE         │
│                                                                 │
│    ☐ Soft Mode for Memory Tagging  ← Leave DISABLED for crashes │
│                                                                 │
└─────────────────────────────────────────────────────────────────┘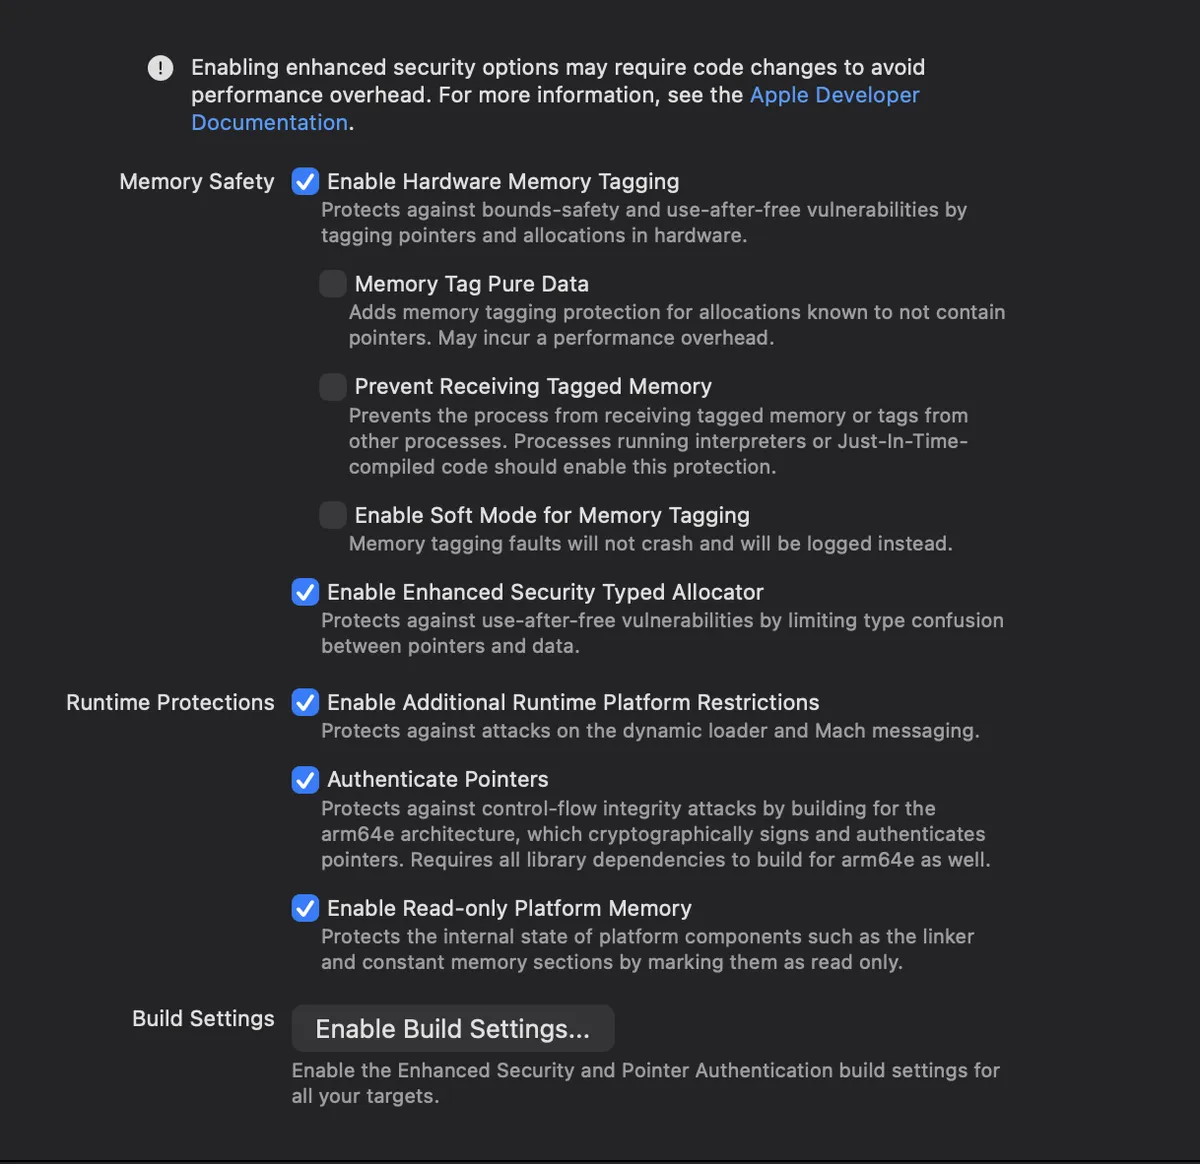
Understanding Soft Mode vs Hard Mode
There are two modes for MIE:
| Mode | Behavior | Use Case |
|---|---|---|
| Hard Mode (default) | Crashes the application on tag mismatch | Production security |
| Soft Mode | Logs the issue but doesn’t crash | Debugging/Testing |
For security purposes, you want Hard Mode (soft mode disabled). Soft mode is only useful during initial testing when you want to see how many issues exist without crashing constantly.
Checking MIE Entitlements
When MIE is enabled, Xcode adds specific entitlements to your application binary. You can verify these entitlements to confirm MIE is active.
The MIE Entitlement
The key entitlement for MIE is:
<key>com.apple.security.cs.checked_allocations</key>
<true/>
When you enable the full Enhanced Security feature, you’ll see additional entitlements:
<key>com.apple.security.enhanced_security</key>
<true/>
<key>com.apple.security.hardened_process</key>
<true/>
<key>com.apple.security.hardened_heap</key>
<true/>
Checking Entitlements with codesign
You can dump the entitlements of any application using codesign:
$ codesign -d --entitlements - /path/to/YourApp.app/YourAppExample: Comparing Three Apps
Let’s examine three versions of the same app with different configurations:
App 1: No Enhanced Security
$ codesign -d --entitlements - MIEDemo_NoEnhancedSecurity.app/MIEDemo

Executable=/path/to/MIEDemo_NoEnhancedSecurity.app/MIEDemo
<?xml version="1.0" encoding="UTF-8"?>
<!DOCTYPE plist PUBLIC "-//Apple//DTD PLIST 1.0//EN" ...>
<plist version="1.0">
<dict>
    <key>application-identifier</key>
    <string>TEAMID.com.8ksec.MIEDemo</string>
    <!-- No MIE-related entitlements -->
</dict>
</plist>Result: No additional entitlements—MIE is NOT enabled.
App 2: Enhanced Security WITHOUT MIE
$ codesign -d --entitlements - MIEDemo_NoMIE.app/MIEDemo

<dict>
    <key>application-identifier</key>
    <string>TEAMID.com.8ksec.MIEDemo</string>
    <key>com.apple.security.enhanced_security</key>
    <true/>
    <key>com.apple.security.hardened_process</key>
    <true/>
    <key>com.apple.security.hardened_heap</key>
    <true/>
    <!-- Note: NO checked_allocations entitlement -->
</dict>Result: Enhanced Security is enabled, but checked_allocations is missing—MIE is NOT active.
App 3: Enhanced Security WITH MIE
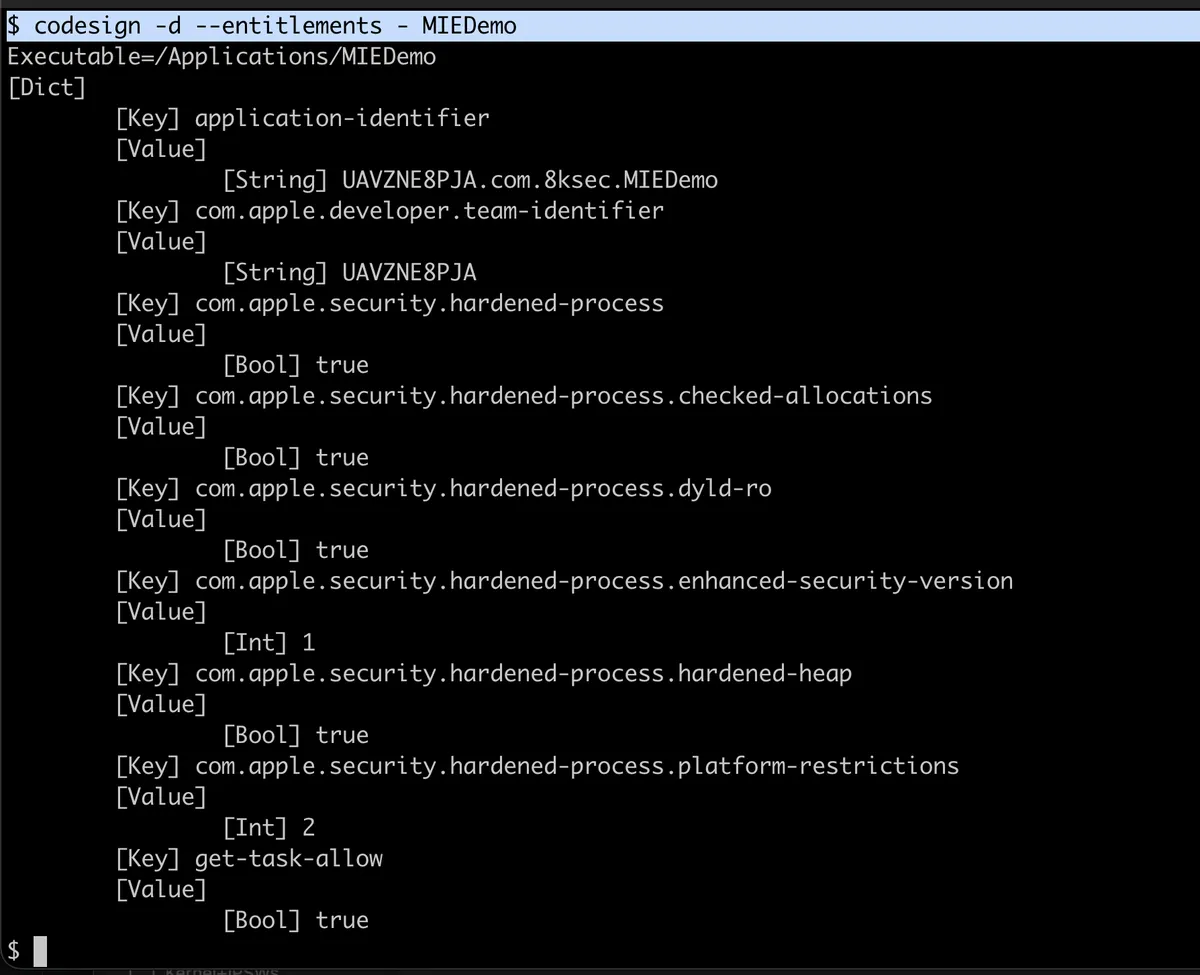
$ codesign -d --entitlements - MIEDemo_WithMIE.app/MIEDemo

<dict>
    <key>application-identifier</key>
    <string>TEAMID.com.8ksec.MIEDemo</string>
    <key>com.apple.security.enhanced_security</key>
    <true/>
    <key>com.apple.security.hardened_process</key>
    <true/>
    <key>com.apple.security.hardened_heap</key>
    <true/>
    <key>com.apple.security.cs.checked_allocations</key>
    <true/>
</dict>Result: The checked_allocations entitlement is present—MIE is ACTIVE!
Quick Check Script
#!/bin/bash
# check_mie.sh - Check if an app has MIE enabled

APP_PATH="$1"

if [ -z "$APP_PATH" ]; then
    echo "Usage: $0 /path/to/App.app"
    exit 1
fi

BINARY=$(find "$APP_PATH" -type f -perm +111 -name "$(basename "${APP_PATH%.app}")" 2>/dev/null | head -1)

if codesign -d --entitlements - "$BINARY" 2>&1 | grep -q "checked_allocations"; then
    echo "✅ MIE is ENABLED for $(basename "$APP_PATH")"
else
    echo "❌ MIE is NOT enabled for $(basename "$APP_PATH")"
fi
Analyzing the MIE Demo App
Let’s examine a sample application designed to demonstrate MIE protection.
The Demo App Structure
The demo app has two buttons:
- Heap Overflow - Triggers a buffer overflow
- Use-After-Free - Triggers a UAF vulnerability
These are implemented in C and called from Swift via a bridging header.
The Vulnerable C Code
MIEBugs.h
#ifndef MIEBugs_h
#define MIEBugs_h

#include <stdio.h>

void triggerHeapOverflow(void);
void triggerUseAfterFree(void);

#endif /* MIEBugs_h */
MIEBugs.c
#include "MIEBugs.h"
#include <stdio.h>
#include <stdlib.h>
#include <string.h>

void triggerHeapOverflow(void) {
    printf("Heap Overflow Test\n");

    // Allocate only 16 bytes
    char *a = malloc(16);

    // Write 2000 bytes - MASSIVE overflow!
    // MIE will catch this at the first granule boundary
    memset(a, 'A', 2000);
}

void triggerUseAfterFree(void) {
    printf("Use-After-Free Test\n");

    // Allocate 32 bytes
    char *p = malloc(32);
    strcpy(p, "HELLO");

    // Free the memory - this retags the memory
    free(p);

    // Attempt to use freed memory - tag mismatch!
    strcpy(p, "HELLO");  // MIE catches this
}
What Happens When You Click “Heap Overflow”
1. malloc(16) returns tagged pointer, e.g., 0xA0000001F0465BB0
   - Pointer tag: 0xA
   - Memory tags: [0xA] (1 granule of 16 bytes)

2. memset(a, 'A', 2000) starts writing...
   - Writes bytes 0-15: OK (tag 0xA matches)
   - Writes byte 16: FAULT! (crosses into next granule with tag 0xB)

3. Hardware raises synchronous exception
   - EXC_GUARD with flavor GUARD_EXC_MTE_SYNC_FAULT
   - Process terminates immediately
What Happens When You Click “Use-After-Free”
1. malloc(32) returns tagged pointer, e.g., 0xC0000001F0465BC0
   - Pointer tag: 0xC
   - Memory tags: [0xC, 0xC] (2 granules)

2. strcpy(p, "HELLO") - works fine (tag matches)

3. free(p) - memory is retagged!
   - Pointer still has tag: 0xC
   - Memory now has tag: 0xD (different!)

4. strcpy(p, "HELLO") - FAULT!
   - Pointer tag: 0xC
   - Memory tag: 0xD
   - Tag mismatch → Exception
Analyzing MIE Crash Logs
When MIE catches a memory corruption bug, it generates a distinctive crash log. Let’s analyze a real example.
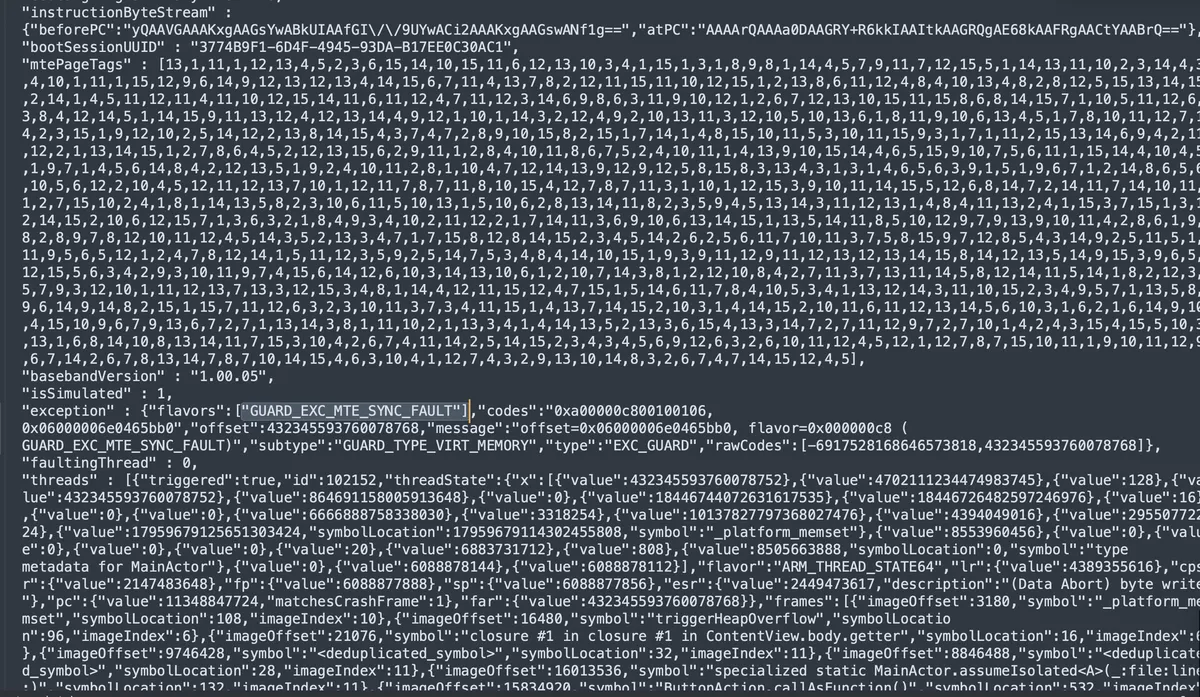
Sample Crash Log
Here’s the crash log from clicking “Heap Overflow” in the demo app:
{
  "app_name": "MIEDemo",
  "bundleID": "com.8ksec.MIEDemo",
  "os_version": "iPhone OS 26.0.1 (23A355)",
  "modelCode": "iPhone18,1",
  "cpuType": "ARM-64",

  "exception": {
    "type": "EXC_GUARD",
    "subtype": "GUARD_TYPE_VIRT_MEMORY",
    "flavors": ["GUARD_EXC_MTE_SYNC_FAULT"],
    "codes": "0xa00000c800100106, 0x06000006e0465bb0",
    "message": "offset=0x06000006e0465bb0, flavor=0x000000c8 (GUARD_EXC_MTE_SYNC_FAULT)"
  },

  "mteState": "enabled",

  "mtePageTags": [13,1,11,1,12,13,4,5,2,3,6,15,14,10,15,11,...],

  "threads": [
    {
      "triggered": true,
      "frames": [
        {
          "symbol": "_platform_memset",
          "symbolLocation": 108,
          "imageIndex": 10
        },
        {
          "symbol": "triggerHeapOverflow",
          "symbolLocation": 96,
          "imageIndex": 6
        }
      ]
    }
  ]
}
Key Fields to Examine
1. Exception Type and Flavor
"exception": {
  "type": "EXC_GUARD",
  "flavors": ["GUARD_EXC_MTE_SYNC_FAULT"]
}
GUARD_EXC_MTE_SYNC_FAULT is the definitive indicator that MIE caught the violation. This is different from a regular EXC_BAD_ACCESS crash.
2. MTE State
"mteState": "enabled"Confirms MIE was active when the crash occurred.
3. MTE Page Tags
"mtePageTags": [13,1,11,1,12,13,4,5,2,3,6,15,14,10,15,11,...]This array contains the 4-bit tag values (0-15) for memory pages. Notice the values range from 0-15 (4 bits). This data can help forensic analysis determine which tag caused the mismatch.
4. Faulting Address
"codes": "0xa00000c800100106, 0x06000006e0465bb0"The second code (0x06000006e0465bb0) contains the faulting address. The upper nibble (0x06) is the tag embedded in the pointer.
5. Stack Trace
"frames": [
  {"symbol": "_platform_memset", "symbolLocation": 108},
  {"symbol": "triggerHeapOverflow", "symbolLocation": 96}
]
The crash occurred in _platform_memset (the system’s optimized memset), called from triggerHeapOverflow. This is exactly where we’d expect—the overflow attempt is caught immediately.
MIE Crash vs Regular Crash
| Aspect | MIE Crash | Regular Crash |
|---|---|---|
| Exception Type | EXC_GUARD | EXC_BAD_ACCESS |
| Flavor | GUARD_EXC_MTE_SYNC_FAULT | KERN_INVALID_ADDRESS |
| Timing | At corruption point | When corrupted data is used |
| MTE State | "enabled" | N/A or "disabled" |
| Page Tags | Array of 4-bit values | Not present |
What the Crash Log Tells Us
From this crash log, we can determine:
- MIE was active (
mteState: enabled) - A synchronous MTE fault occurred (
GUARD_EXC_MTE_SYNC_FAULT) - The crash happened in memset (attempting to write beyond allocation)
- The faulting function was triggerHeapOverflow (our test function)
- The device was iPhone 18,1 running iOS 26.0.1 (MIE-capable)
Practical Exercise: Testing MIE
Step 1: Create a New iOS Project
- Open Xcode and create a new iOS App
- Set minimum deployment to iOS 26.1
- Select Swift as the language
Step 2: Add C Code for Testing
Create MIETest.c:
#include <stdio.h>
#include <stdlib.h>
#include <string.h>

void testHeapOverflow(void) {
    printf("Testing Heap Overflow...\n");
    char *buffer = malloc(64);  // 4 granules

    // This will crash with MIE enabled
    buffer[80] = 'X';  // 16 bytes past end

    printf("If you see this, MIE is NOT working!\n");
    free(buffer);
}

void testUseAfterFree(void) {
    printf("Testing Use-After-Free...\n");
    char *ptr = malloc(32);
    strcpy(ptr, "test");
    free(ptr);

    // This will crash with MIE enabled
    printf("Value: %s\n", ptr);

    printf("If you see this, MIE is NOT working!\n");
}
Create MIETest.h:
#ifndef MIETest_h
#define MIETest_h

void testHeapOverflow(void);
void testUseAfterFree(void);

#endif
Step 3: Create Bridging Header
Create YourApp-Bridging-Header.h:
#import "MIETest.h"Step 4: Add SwiftUI Interface
import SwiftUI

struct ContentView: View {
    var body: some View {
        VStack(spacing: 20) {
            Text("MIE Test App")
                .font(.largeTitle)

            Button("Test Heap Overflow") {
                testHeapOverflow()
            }
            .buttonStyle(.borderedProminent)

            Button("Test Use-After-Free") {
                testUseAfterFree()
            }
            .buttonStyle(.borderedProminent)
        }
        .padding()
    }
}
Step 5: Enable MIE
- Go to Signing & Capabilities
- Add “Enhanced Security”
- Enable “Hardware Memory Tagging”
- Disable “Soft Mode for Memory Tagging”
Step 6: Run and Test
- Connect an iPhone 17 (or newer with A19 chip)
- Build and run the app
- Click either button
- The app should crash immediately
- Check the crash log in Xcode’s Device Logs
Expected Result
With MIE enabled, clicking either button will immediately crash the app with GUARD_EXC_MTE_SYNC_FAULT. Without MIE (or on older devices), the app might not crash, or crash later with a different exception.
Understanding the Security Impact
Why MIE Matters
Without MIE, these vulnerabilities could be exploited:
- Heap Overflow → Overwrite adjacent objects → Code execution
- Use-After-Free → Control reallocated memory → Code execution
With MIE:
- Heap Overflow → Immediate crash at overflow point → No exploitation
- Use-After-Free → Immediate crash on stale pointer use → No exploitation
The Detection Probability
With 4-bit tags:
- 93.75% chance of different tags for adjacent allocations
- 6.25% chance of tag collision (same tag)
Even with collision:
- Attacker doesn’t know which allocations collided
- Secure allocators add additional protection
- Multiple exploitation attempts increase detection likelihood
System-Wide Protection
Apple enables MIE by default for:
- The iOS kernel
- 70+ system daemons and services
- Safari and WebKit (via libpas)
Third-party apps can opt-in via Enhanced Security capability.
When MTE Fails: The CVE-2025-0072 Case Study
While MTE provides powerful protection, it’s not infallible. In January 2025, GitHub Security Lab published a fascinating case study of CVE-2025-0072, a vulnerability in the ARM Mali GPU driver that allowed complete MTE bypass on Android devices.
The Vulnerability
The Mali GPU driver manages page table entries (PTEs) for GPU memory. Researchers discovered that the driver could be manipulated to:
- Create a writable GPU mapping to a physical page
- Have the CPU unmap and remap that same page with MTE protection
- Use the GPU to write to the page without MTE checks
┌─────────────────────────────────────────────────────────────────┐
│                    CVE-2025-0072 BYPASS FLOW                    │
├─────────────────────────────────────────────────────────────────┤
│                                                                 │
│  1. Create GPU mapping to physical page P                       │
│     └─→ GPU can write to P without MTE checks                   │
│                                                                 │
│  2. CPU unmaps P, remaps it with MTE-protected kernel object    │
│     └─→ CPU access now requires correct tag                     │
│                                                                 │
│  3. GPU writes to P through old mapping                         │
│     └─→ BYPASSES MTE! Kernel object corrupted                   │
│                                                                 │
│  Result: Kernel code execution despite MTE protection           │
└─────────────────────────────────────────────────────────────────┘
Why Apple’s MIE Is Different
This vulnerability highlights a critical difference between Android’s MTE implementation and Apple’s MIE:
| Aspect | Android (Mali GPU) | Apple’s MIE |
|---|---|---|
| GPU Memory Isolation | GPU can access CPU memory directly | Strict SPTM-enforced isolation |
| Page Table Protection | Kernel-controlled | SPTM-controlled (hypervisor-level) |
| Driver Trust | Kernel drivers trusted | Even kernel code cannot bypass SPTM |
| Attack Surface | Large driver attack surface | Reduced attack surface via SPTM |
Apple’s SPTM (Secure Page Table Monitor) operates at the hypervisor level and controls all page table modifications. Even if a GPU driver vulnerability existed on iOS, the SPTM would prevent the type of page table manipulation that enabled CVE-2025-0072.
Key Takeaway
MTE is only as strong as its implementation. Hardware support is necessary but not sufficient—the software stack must also properly enforce memory isolation. Apple’s three-pillar approach (EMTE + Secure Allocators + Tag Confidentiality/SPTM) provides defense-in-depth that standard MTE lacks.
MIE Across Platforms: iOS vs Android
Apple isn’t the only company deploying MTE. Google has supported MTE on Android since Android 13 (2022) on Pixel devices. However, the implementations differ significantly:
Deployment Comparison
| Aspect | Apple iOS 26 (MIE) | Android 13+ (MTE) |
|---|---|---|
| Default State | Always-on for kernel + 70+ processes | Developer option (disabled by default) |
| Consumer Availability | Enabled on all A19 devices | Requires developer mode enable |
| Exception Mode | Synchronous only (EMTE) | Async available (performance mode) |
| Kernel Protection | Default | Optional |
| App Opt-in | Entitlement-based | Manifest flag |
| Tag Confidentiality | SPTM-protected | Not specified |
GrapheneOS Perspective
The GrapheneOS project (a security-focused Android derivative) has been a vocal proponent of MTE adoption. They’ve provided valuable perspective on the sync vs async debate:
“Async mode may leave a window for exploitation in theory, but in practice, the detection rate is extremely high. Most exploitation attempts will still fail because the corrupted data is used before the async check completes.”
However, Apple chose synchronous mode to eliminate even theoretical attack windows—a design philosophy difference rather than a technical necessity.
Why Apple Leads in Deployment
Several factors explain Apple’s deployment advantage:
- Vertical Integration: Apple controls both hardware (A19 chip) and software (iOS), enabling tight integration
- Smaller Device Matrix: Fewer device configurations to test and optimize
- No Legacy Burden: A19-only support means no compatibility concerns
- Performance Investment: Apple dedicated silicon area specifically for EMTE, achieving near-zero overhead
Android faces the challenge of supporting diverse hardware from multiple vendors, making standardized MTE deployment more complex.
Security Researcher Perspectives
The security community has had mixed reactions to MIE, ranging from enthusiastic praise to cautious skepticism. Here’s a balanced view:
What Researchers Praise
- First Consumer-Default Deployment: Apple is the first to enable MTE protection by default for all users, not just developers
- Silicon Investment: Dedicated hardware resources for EMTE show serious commitment
- Tag Confidentiality: Novel Spectre mitigations address real academic attacks (TikTag)
- Defense-in-Depth: The three-pillar approach provides layered protection
What Researchers Question
-
4-Bit Entropy Limitation
- Only 16 possible tag values means 1/16 chance of collision
- Probabilistic protection, not deterministic
- Attackers with persistence can theoretically succeed
-
Heap-Only Protection
- Stack and global variables not protected by MTE
- Type confusion attacks may still be possible
-
Memory-Safe Languages Still Needed
- MTE catches bugs; memory-safe languages prevent them
- Long-term solution is transitioning to Rust, Swift, etc.
- MIE is a mitigation, not a cure
-
x86-64 Has No Equivalent
- Intel/AMD processors lack MTE-like hardware
- Macs with Intel chips cannot benefit
- Desktop security remains challenging
The Balanced View
From the Security, Cryptography, Whatever podcast discussion on MIE:
“MIE is genuinely impressive—Apple has done the work to make MTE viable as a production defense. But it’s part of a security strategy, not a silver bullet. The goal should still be eliminating memory corruption bugs at the source through better languages and tooling.”
Debugging Tips
Viewing Crash Logs
In Xcode:
- Window → Devices and Simulators
- Select your device
- Click “View Device Logs”
- Look for
GUARD_EXC_MTE_SYNC_FAULT
On Device:
- Settings → Privacy & Security → Analytics & Improvements
- Analytics Data
- Find MIEDemo-YYYY-MM-DD-*.ips files
Using Console.app:
- Open Console.app on Mac
- Select your iPhone
- Filter by process name
- Look for MTE-related messages
Common Issues
| Issue | Solution |
|---|---|
| App doesn’t crash | Verify MIE entitlement is present |
| Running on simulator | MIE requires real A19 device |
| Wrong iOS version | Requires iOS 26.0+ |
| Soft mode enabled | Disable soft mode for crashes |
Conclusion
In this two-part series, we’ve comprehensively covered Memory Integrity Enforcement:
Part 1 Covered:
- The memory safety crisis and economics
- MIE’s three-pillar architecture
- How MTE tags work at the hardware level
- Kernel analysis and the
irg-stgfunction - System-wide MTE deployment in iOS
Part 2 Covered:
- Enabling MIE in Xcode
- Checking entitlements for MIE verification
- Analyzing vulnerable demo app code
- Understanding MIE crash logs
- Practical testing exercises
Key Takeaways
- MIE is opt-in for developers via Enhanced Security → Hardware Memory Tagging
- Entitlement check: Look for
com.apple.security.cs.checked_allocations - Crash signature:
GUARD_EXC_MTE_SYNC_FAULTin exception flavors - MTE Page Tags in crash logs show the 4-bit tag values
- Immediate detection at the point of corruption, not later
The Future of Memory Safety
Memory Integrity Enforcement represents a paradigm shift in mobile security. For the first time, we have:
- Hardware-enforced memory safety
- Zero performance overhead
- Always-on protection
- System-wide coverage
Exploit developers who have relied on buffer overflows and use-after-free vulnerabilities for 25+ years now face a fundamentally harder problem. MIE doesn’t just raise the bar—it changes the game entirely.
References
Apple Official Documentation
- Apple Security Blog: Memory Integrity Enforcement
- Apple Developer: Enhanced Security Capability
- WWDC 2025: Memory Safety in iOS 26
ARM Architecture
Security Research & Vulnerabilities
- GitHub Security Lab: Bypassing MTE with CVE-2025-0072 – Mali GPU MTE bypass analysis
- TikTag: Breaking ARM’s Memory Tagging Extension – Speculative execution attack on MTE
- Security, Cryptography, Whatever Podcast: Apple MIE – Security researcher perspectives
Platform Comparisons
This Series
GET IN TOUCH
Visit our training page if you’re interested in learning more about these techniques. Check out our Certifications Program. Please don’t hesitate to reach out through our Contact Us page.