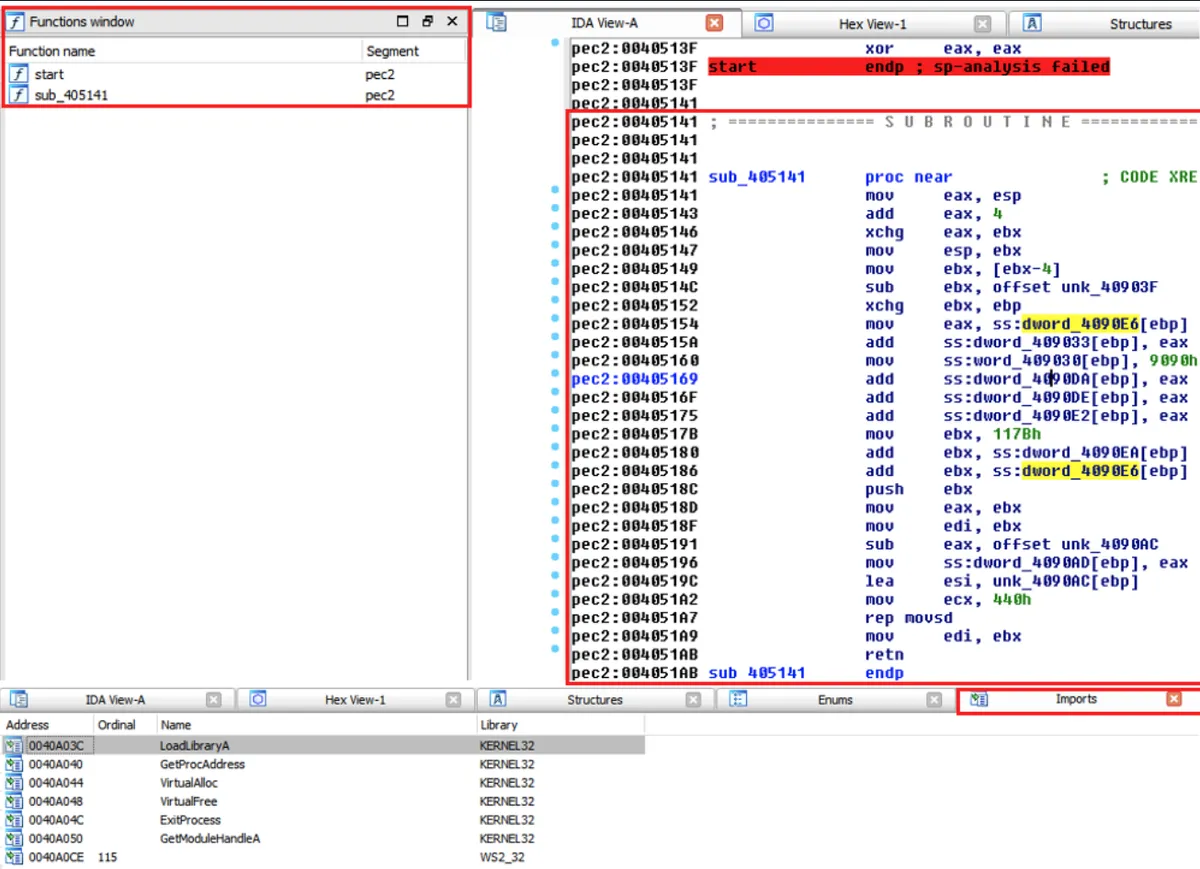
Dissecting Windows Malware Series - Unpacking Malware, From Theory To Implementation - Part 7
All parts in this series
- 1 Dissecting Windows Malware Series - Beginner To Advanced - Part 1
- 2 Dissecting Windows Malware Series - Process Injections - Part 2
- 3 Dissecting Windows Malware Series - Understanding Cryptography and Data Encoding - Part 3
- 4 Dissecting Windows Malware Series - RISC vs CISC Architectures - Part 4
- 5 Dissecting Windows Malware Series - Creating Malware-Focused Network Signature - Part 5
- 6 Dissecting Windows Malware Series - Explaining Rootkits: Practical Examples & Investigation Methods - Part 6
- 7 Dissecting Windows Malware Series - Unpacking Malware, From Theory To Implementation - Part 7
In the previous article Part 6 we did a deep dive on Rootkits.
We saw common ways Rootkits are implemented in order for malware to achieve one of their main objectives - Evasion. We also discussed some interesting components in the world of Windows Kernel, such as: Drivers, Device Objects and Driver Objects.
Armed with that knowledge, we’ll proceed with learning to how to unpack packed malware.
Table of Contents
- What’s In It For Me
- So, What Packers Are and What is Packing?
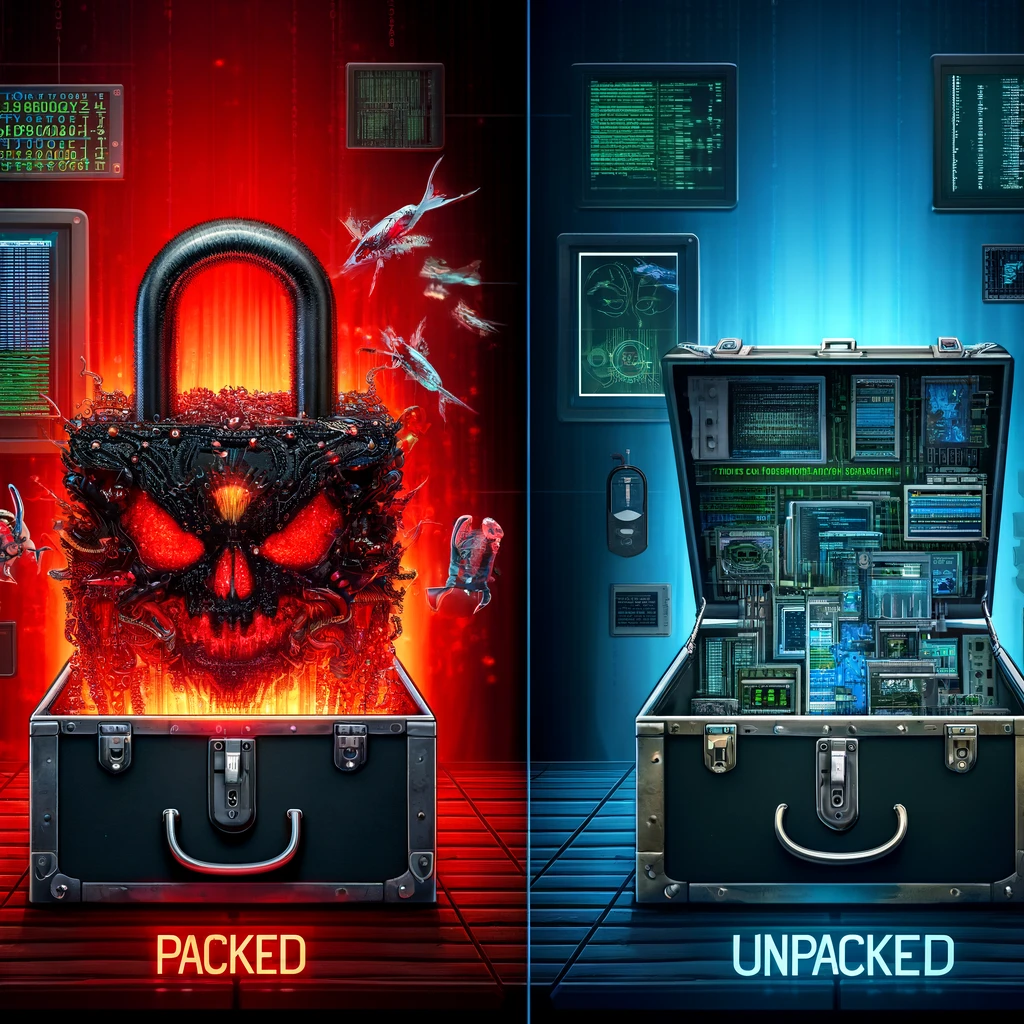
- Non-Packed vs. Packed Executables
- How an Executable File Is Executed - Back to the Basics
- From Packed to Unpacked: In Theory
- A Brief Illustration of What We Discussed
- So How Do We Actually Perform Unpacking?
- From Packing to Unpacking: In Practice
- So, What Have We Seen
- What We Didn’t See and We’ll Explore Later
- So, What’s Next
- References
What’s In It For Me❓
This article will discuss one of the most important topics in malware analysis - Unpacking.
Nowadays, as the awareness to Cyber Security attacks sky rockets, almost all malware are written with a purpose of making the analysis for the analyst a challenging task.
Attackers know, that their purpose is to prolong the analysis time as much as possible to allow to malware to extract as much data, run the ransomware as long as possible and so on…
Here, we’ll learn the fundamentals of unpacking a malware, what is OEP, Unpacking Stub and dive to the theory of malware unpacking.
Following that, we’ll see some use cases to better understand those concepts.
So, What Packers Are and What is Packing?🧐
As the name suggests, it refers to compression, packaging, or reduction (or any synonymous term you choose) which, in our context, is performed on malware samples.
The motivations for performing packing on malware are primarily the following:
- Reduce the size of a malware sample.
- Make it harder for researchers to conduct an in-depth study of the malware, causing them to waste a lot of time on the unpacking process.
What packers essentially do is take an executable file as input and produce another executable file as output (sounds simple, right?). The catch is that the executable file received as output, is usually characterized by one or several of the following:
- Compressed
- Encrypted
- Transformed - could (and almost always will) contain techniques of anti-debugging, anti-disassembly, and/or anti-VM.
Non-Packed vs. Packed Executables
Executable files that aren’t packed are loaded into memory by the operating system’s loader.
Executable files that have undergone packing will contain the original .exe* file as data (in a certain section or sections in the PE structure file) and will include an unpacking stub.
In packed executable files, the operating system’s loader loads the unpacking stub, which then loads the original *.exe file.
The entry point of the new executable file will point to the unpacking stub instead of the original executable file’s entry point. The unpacking stub’s role is to:
- Unpack the original executable file into memory.
- Resolve the imports of the original executable file.
- Transfer the program execution to the original entry point (or briefly, OEP).
As mentioned, the unpacking stub’s primary role is to unpack the original .exe file.
As a malware analyst, if we try to perform static analysis on the packed executable, we’ll find ourselves investigating the unpacking stub and not the original .exe file — which is exactly what the malware author wants.
How an Executable File Is Executed - Back to the Basics🏃
Executable files (in general) are loaded into memory by the operating system’s loader. The loader reads the PE header of the file and allocates memory for each section of the executable file.
Finally, the loader copies the sections from the disk to the allocated space in memory (RAM).
When it comes to packed executable files, the loader, in the same manner, will allocate memory for each section - only now, a section can come from the original file, or such that was created by the unpacking stub.
The unpacking stub performs unpacking for the code of each section, which is then copied to its allocated space in memory.
Apart from loading the .exe* file into memory (which is done by reading and loading its sections), there is also the stage of resolving the import address table.
Executable files in their natural state (unpacked) contain an import address table section. With this section, the loader knows which functions need to be imported to ensure proper execution of the program.
The loader cannot read packed sections, therefore the unpacking stub is the one that will perform the resolving of the imported function.
How this stage is executed depends on the packer.
Some of the common approaches are:
- The unpacking stub will only import LoadLibrary and GetProcAddress.
- After performing the unpacking, the original import table will be called -> calling LoadLibrary for each necessary library -> calling GetProcAddress for each import function used.
- The strict approach - the malware will remove all existing imports (including GetProcAddress and LoadLibrary).
To run, the packer will need to find all the necessary functions in other ways - without directly using LoadLibrary and GetProcAddress.
Alternatively, it will first need to figure out a way to find LoadLibrary and GetProcAddress and then import the necessary functions.
Side Note
In most cases, Shellcodes will use this method, as it allows for an entirely empty import function table. In such cases, it will involve a complex packer all with the aim of making the malware analyst’s investigation harder.
From Packed to Unpacked: In Theory
After the unpacking stub has finished the unpacking stage, the original *.exe file can start running.
A jump from the code segment where the unpacking stub performed unpacking to the original entry point (OEP), of the original code, will take place.
This jump is called: the Tail Jump.
The tail jump, is a jmp instruction that transfers the code to another location.
In most cases, the jump will be to a completely different section, so we’ll see a significant jump/change in the memory address space we jump to. Since the jmp instruction is very indicative, many attackers will also use instructions like ret, call, or even kernel function such as NtContinue, ZwContinue with the intention to disguise as functions serving another purpose.
A Brief Illustration of What We Discussed📊
Before and After Packing:
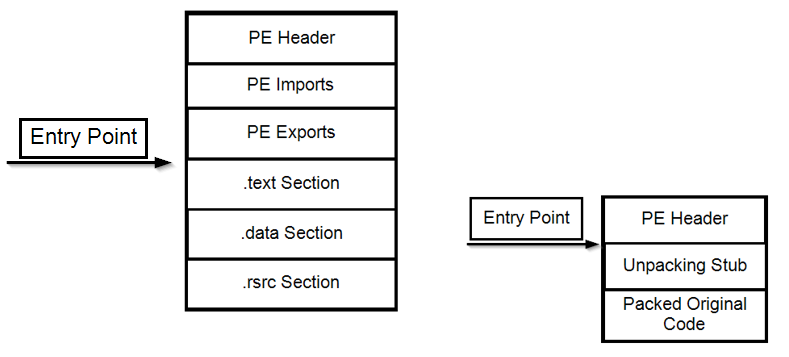
On the left, you can see the structure of the executable file - before it underwent the packing process.
The entry point points to the text section. Since the code of the PE file that will run at the beginning of the program is located there.
On the right, you can see the structure of the executable file after it underwent the packing process. As mentioned, in such a case, the entry point points to the unpacking stub.
The operating system’s loader will load the address where it starts running - into memory, which in turn will perform the unpacking stage and run the exe file.
Before and After Unpacking:
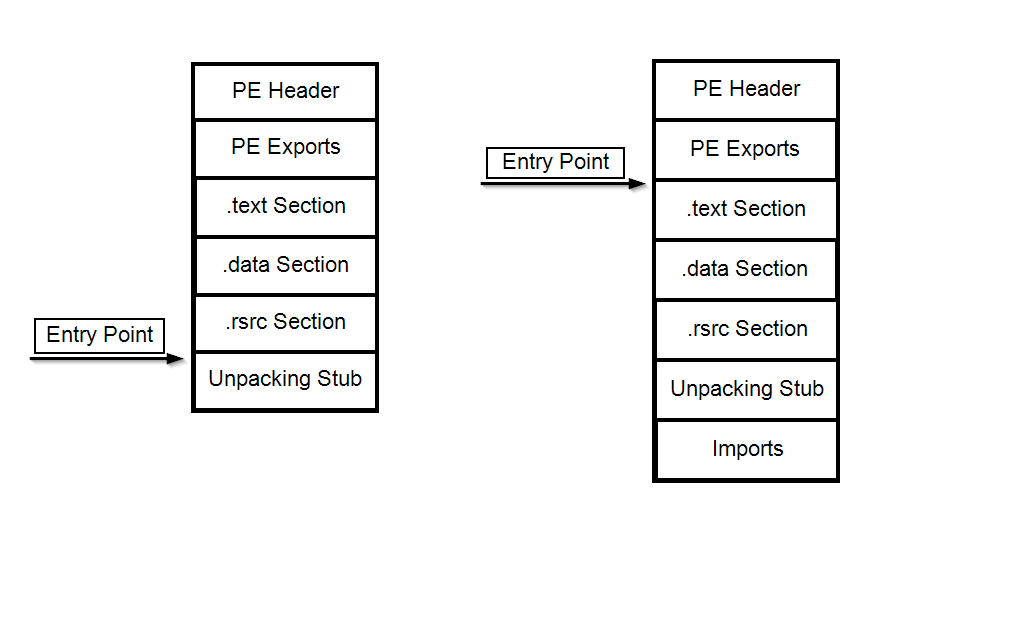
On the left, a packed executable file when it is loaded into memory.
The unpacking stub performed unpacking for the original code, and some of the sections necessary for running the program are already in an unpacked state. Since the unpacking stub has not finished the entire unpacking process (which will be executed during runtime), the program’s import table is still not deciphered.
On the right, the executable file after undergoing complete unpacking. The import table is now deciphered and readable, and the entry point points to the original entry point of the exe file.
So How Do We Actually Perform Unpacking?🌕
There are three approaches that can provide us with an answer here:
- Automated Static Unpacking - If we identified that our malware uses a known packer and indeed there is already an automatic unpacker for it, of course, we would prefer to use it - it will save us from performing the unpacking manually, and we can dive directly into the actual investigation.
‘Automated Static Packers’ essentially perform decompression and/or decryption to the file - back to the original .exe file, without running the malware.
If indeed we encounter malware that uses a packer that has an automated static unpacker - we would prefer to use this approach as it is the fastest and safest among the three. Useful tool: PE Explorer. Known packers: NSPack, UPack, UPX.
- Automated Dynamic Analysis - In this approach, the unpacker will run the executable file and allow the unpacking stub to do the unpacking stage.
Once the unpacker has finished its job, the program will be written to disk, and the unpacker will perform a reconstruct to the import table of the original exe file.
In this approach, the automated unpacker needs to identify the address where the unpacking stub ends and where the OEP of the original exe file begins - which is not an easy task at all. Therefore, in many cases, we will find that automatic unpackers fail to perform the unpacking because they simply cannot find that correct address.
Due to the fact that there are not enough automated unpackers that will do the job for serious malware - it brings us to the third approach.
- Manual Unpacking - In this approach, we actually let the unpacking stub run.
Once it has finished, we’ll dump the process from memory. Finally, we will perform a “rewiring” of the PE header so it points to the OEP and to the deciphered import address table.
The “manual” stage in this approach is finding the OEP and manually performing the reconstruct to the import table.
Both finding the OEP and reconstructing the import table, in some cases, can be performed automatically by existing tools such as OllyDbg or x64Dbg but in most cases, we will need to find them manually.
The ‘Reconstruct’ stage of the Import Address Table can be performed in several ways, among them:
- Conducting a static investigation of the malware and performing labeling for all the functions it uses - in this approach, we can analyze the malware statically but we won’t be able to run it since we didn’t really perform a reconstruct to the import table.
- Finding the address in memory where the import table is located -> from here we can manually input each function during the execution of the attacker or use a script that will do it for us.
From Packing to Unpacking: In Practice
The next part will present turning points during a malware sample investigation that illustrate that we indeed have found the desired OEP.
We’ll examine how they look in the assembly code and what sequence of actions we took.
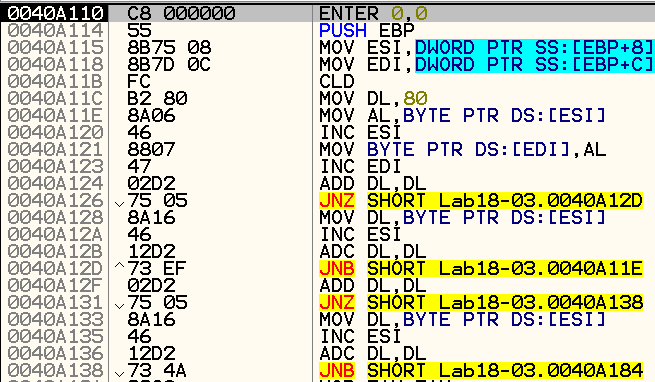
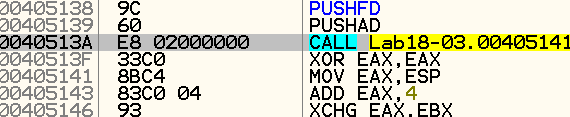
A jmp Instruction Followed By Null Bytes
After scanning in PEiD, it appears that the file has not undergone packing (or more accurately, PEiD did not correctly identify that it is a packed file).
A further look at the sections of the executable file shows there exists a section named UPX2 - which leads us to understand that it is a UPX packer that simply was not identified properly.
UPX is a quite common packer, so the fact that it was not identified - leads us to understand that it probably underwent some modification and it is a custom version of UPX (an unsuccessful attempt to perform unpacking with a UPX unpacker confirms this).
When we disassemble the file in IDA Pro, we encounter the following pop-up message:
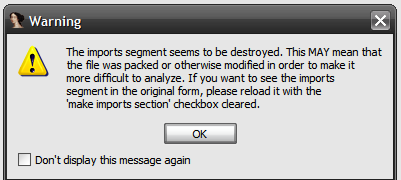
Another confirmation that we are dealing with a packed file.
We will review the assembly code in search of a jmp instruction (or a ret/call instruction) in an attempt to find the tail jump.
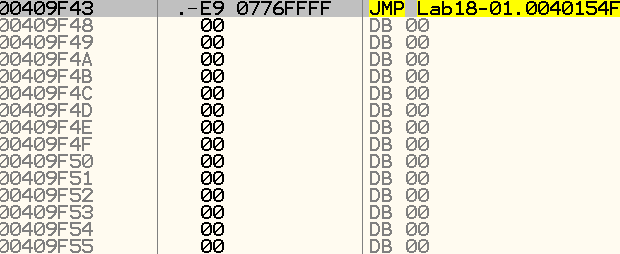
An instruction that catches the eye is:

Starting from this jmp instruction, IDA Pro failed to identify where the code continues.
Additionally, if we continue to review the place in memory to which the jmp instruction points, we will reach a much further address - which strengthens the assumption that this is indeed the tail jump that will lead us to the desired OEP.
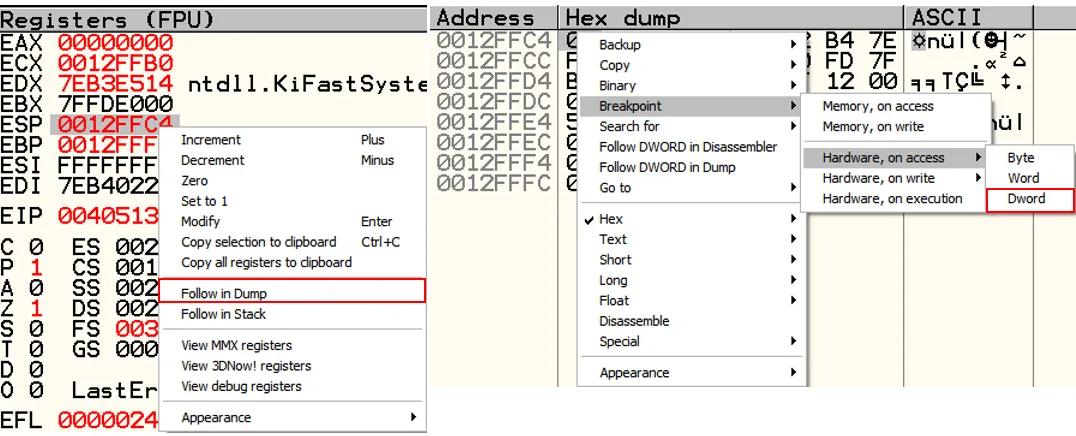
As a final validation, we will open the malware in OllyDbg and go to the address of the jmp instruction:
We’ll indeed see that this is the desired tail jump.
The fact that many null bytes follow this instruction serves as the final validation of our assumption - since it is a jump to another section.
We will set a hardware breakpoint at this address and let OllyDbg run the malware so that it resolves the IAT and unpacks itself.
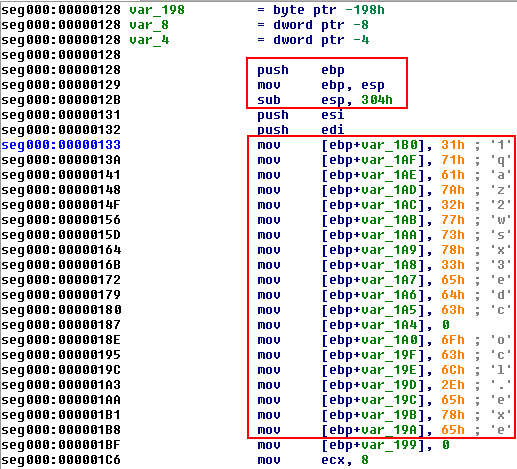
We’ll single step a number of instructions with our debugger, and arrive at the following code segment:
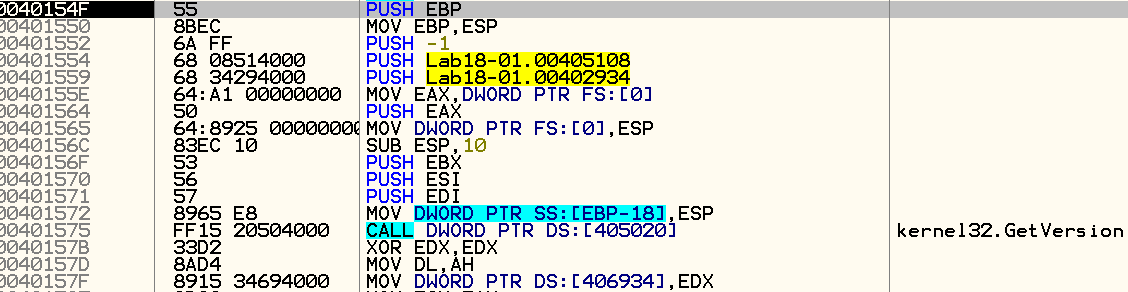
As we can see, this is the beginning of a regular PE file: A push of EBP onto the stack is made, in order to save the pointer to the previous stack frame.
ESP is assigned to EBP for a local reference to variables in the current stack frame. In addition, we can see the typical call to GetVersion that occurs in executable files.
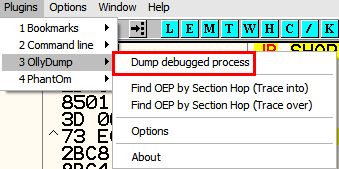
We’ll dump the process from memory, at the OEP we found:
Now, we will load the new .exe file into IDA Pro and see the full code (before being packed) of our malware:

We can see that all the imports used by the sample are now deciphered, the parameters that the main function receives were identified correctly, and there are more identifiers that indicate we have reached the starting point of the .exe file we were looking for.
From here, we continue with the regular investigation, aiming to discover the functionality of the malware in various aspects: Persistence, Stealth, Evasion, etc…
Using PUSHAD and PUSHFD Commands
After a scan in PEiD, it can be seen that it is a packer from the family of: PECompact 1.68 – 1.84.
If we examine it in IDA Pro, indeed we’ll discover the file is packed (sparse in imports and valuable code):
We’ll continue to investigate the file during runtime in OllyDbg. After loading, we will use the following OllyDbg plugin:
Find OEP By Section Hop (Trace Into).
Find OEP By Section Hop
In short, ‘Find OEP By Section Hop’ relies on the fact that usually, the unpacking stub is located in one section, while the packed executable file is located in another.
OllyDbg knows to identify when such a transition between sections occurs and will then break the execution of the program.
OllyDbg can perform this break in two modes: Step Into or Step Over.
In the step over approach, a step-over will be performed for every call instruction encountered.
Call instructions in many cases use functions in external DLL files, and these are obviously located in sections outside the .exe file.
Skipping these instructions - aims to prevent many false-positives in finding the OEP.
The step-into command, as its name implies, will perform step into for every call instruction, which can prolong the process of finding the OEP (and raise many false-positives).
Experienced attackers already know how OllyDbg and other investigation tools work, and therefore will implement mechanisms to bypass them.
For example, attackers often use call instructions that do not return any value. In these cases, OllyDbg won’t know “where to return” and will pop a message that it failed in finding the OEP.
The section hop leads us to the following assembly code:
It seems that we encountered a false-positive since we do not see a sequence of null bytes or a jmp instruction to another section. We will use the section hop function again, this time in step-over, and we’ll arrive at the following code snippet:
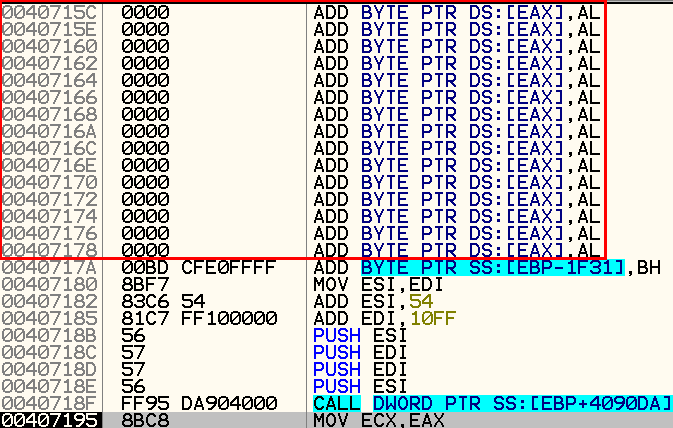
It seems that again we just encountered with an honest call instruction (not the desired tail jump), however, we see that a few instructions earlier, there is a long sequence of null bytes.
We’ll scroll up the null bytes instructions since it is possible that we’ll find the tail jump right before them.
During the review upwards, we encounter the following sequence of commands:
Since this is a rather rare situation, we will continue to investigate in this direction.
Keeping in mind, that all the investigation we have done so far is on the unpacking stub, and our goal is to find the place where the transition to the original OEP of the executable file takes place…
Therefore, any scenario in which we encounter something strange/exceptional/suspicious, what’s called – It’s gonna worth our while to check it out.
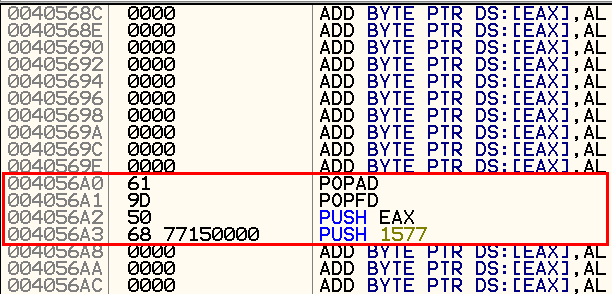
Following the observation of POPAD and PUSHAD, we will see if PUSH commands are performed to the stack - before the unpacking stub runs. After rerunning the program and searching for PUSHAD commands, we encounter the following code segment:
Using the PUSHFD and PUSHAD commands, in fact, saves the values of the general-purpose registers and the EFLAGS registers in the stack.
This action is performed before the unpacking stub runs.
We can set a hardware breakpoint on the moment these registers are popped out of the stack - it will almost certainly be the moment we reach the original OEP.
The moment our breakpoint occurs, the following assembly segment is presented to us:

We have found the, when the registers we saw earlier, are popped out of the stack, and following that, the desired tail jump to the OEP.
We will perform a step-into the push command and immediately after that, we will perform a dump as we did in the previous example.
Now when we load the sample into IDA Pro, we will see that indeed it is the original executable file, before packing:
So, What Have We Seen❓
- So, we saw quite a lot in this article.
We explored theoretically how a packed executable file looks compared to an unpacked executable on different cuts.
-
We learned what are the approaches for performing unpacking - automatic and manual.
-
We saw that in practice, performing the unpacking, whether it is done manually or automatically, consists of two main stages:
-
Finding the OEP which is the place in memory where the original file starts running the moment the unpacking stage ended.
-
Resolving the import address table - to ensure proper running of the file after the unpacking stage is done.
-
We saw practical examples of performing unpacking of .exe files and explored the thought process during the investigation, to which points we would want to pay attention in the assembly code, and more.
What We Didn’t See and We’ll Explore Later
In many cases, when dealing with a complex malware sample, it will be much harder for us to find the OEP or to perform a full resolve to the import address table. Sometimes, we will encounter an unknown packer that uses new techniques or even an unpacker that performs unpacking for specific segments from the code during runtime, again to complicate the malware analysis stage.
We will try different directions in the investigation, get stuck and start from the beginning - in short, we will burn precious time! In such cases, it’s worth considering performing a partial unpacking of the malware, even just to advance in the investigation and get some insight about the functionality of the malware (useful mainly in scenarios of ransomware attacks or tough IRs).
In such cases, we can load the code or parts of the code that we managed to unpack during runtime into IDA Pro or run strings on them, just to get a somewhat clearer picture about the functionality.
- Unpacking DLL files. OllyDbg allows loading and debugging of DLL files with the help of an OllyDbg process called: loadDll.exe.
The catch is, the starting address of DLL files called DllMain will be called before the break that occurs in OllyDbg - which will cause an unwanted situation.
By the time the first breakpoint occurs, the unpacking stub has already finished running - which will complicate finding the original OEP.
In such cases, we will change the header of the DLL file, so that OllyDbg will load it as an .exe file.
When we find the OEP, we will change the flag back to its original state, and revert to treating the file as a DLL file.
- Manually resolving to the import address table.
A very important stage that we did not present here.
In most cases, OllyDump and/or other tools like: ImpRec will manage to perform a restore to the import table simply by serially running through the program in memory searching for a list of imported functions.
In cases where the tools at our disposal fail to do so - we will need to know how to do it manually.
In the manual approach, we usually run the malware, put a breakpoint on the call to GetProcAddress since this function is responsible for calling the discussed function according to the library that was called with LoadLibrary.
Step by step, we will notice which functions the malware calls until it finishes performing a rebuild to the import address table.
After performing the rebuild, often the transition to the tail jump leading to the desired OEP will occur.
In conclusion, we’ll make a somewhat audacious statement, but one that most malware analysts will agree on - Your ability to perform unpacking quickly and precisely, will determine how good you will be as a malware analyst.
What’s Next?
This article was an introduction article to unpacking malware. We learned the fundamentals, and now, we’ll advance to the major league of unpacking real malware samples.
We’ll learn how packers of different malware families, such as: Emotet, TrickBot and many more.
Before, we dive deep to getting to know malware families, we still have a technical debt we need to fill.
In the following next two articles we’ll learn to:
- Analyze C++ compiled malware
- Analyze Shellcode
Stay Tuned 😎
References
- The following resources are taken from an amazing book called:
Practical Malware Analysis By Michael Sikorski and Andrew Honig
-
The two malware samples
-
The ‘Before and After’ packing and unpacking images
-
All other resources were generated through the analysis process.
GET IN TOUCH
Excited to learn more about Windows Malware Analysis? We just released our latest training on Windows Malware Analysis And Memory Forensics! You can find more information about it here. Please don’t hesitate to reach out to us through our Contact Us page if you have any questions.
Visit our training page if you’re interested in learning more about our other course offerings and want to develop your abilities further. Additionally, you may look through our Events page and sign up for our upcoming Public trainings.
Get in Touch
Want to learn these techniques hands-on, or need help assessing your own mobile or AI stack? We run live and on-demand trainings, offer mobile-security certifications, and take on penetration-testing engagements. Pick the door that fits.
We respond within one business day. Visit our events page to see where we'll be next.