Advanced Frida Usage Part 3 - Inspecting XPC Calls
All parts in this series
- 1 Advanced Frida Usage Part 1 - iOS Encryption Libraries | 8kSec Blogs
- 2 Advanced Frida Usage Part 2 - Analyzing Signal and Telegram messages on iOS
- 3 Advanced Frida Usage Part 3 - Inspecting XPC Calls
- 4 Advanced Frida Usage Part 4 - Sniffing location data from locationd in iOS
- 6 Advanced Frida Usage Part 6 - Utilizing writers
- 7 Advanced Frida Usage Part 7 - Frida Memory Operations
- 8 Frida Advanced Usage Part 8 - Frida Memory Operations Continued
- 9 Advanced Frida Usage Part 9 - Memory Scanning in Android
- 10 Advanced Frida Usage Part 10 - Instruction Tracing using Frida Stalker
Introduction
In the last two blogs, we have discussed briefly how we can use Frida with applications, today we will cover briefly how to do that with the system binaries.
Before we can proceed with the binaries, we first need to discuss XPC which is used as a means of communication between processes. XPC is a type of IPC (InterProcess Communication) used on *OS.
According to the documentation:
**XPC provides a lightweight mechanism for basic interprocess communication. **
Operation modes and usage
There exist two modes of operation:
- server
- client
In the server _mode, binary creates a specific _mach service and registers it with launchd, while in the client mode connects to that specific mach service and sends a specific message to the server.
The first function that gets called from the server and client is xpc_connection_create_mach_service which returns xpc_connection_t.
This function accepts three parameters:
- name of the service
- dispatch queue (can be NULL)
- mode (1 for the listener/server mode or 0 for the client mode)
Once we have done this, we need to configure the handler which is actually ObjC block by calling xpc_connection_set_event_handler.
Parameters are:
- connection of
xpc_connection_t - handler of
xpc_handler_t
xpc_handler_t is a block, defined as void (^xpc_handler_t)(xpc_object_t object)
Sending message
To send the message, we first need to define from what does the message consists of. Message consists for xpc_object_t types where the main one being xpc_dictionary.
xpc_dictionary consists of values mapped to distinct key.
The main function to create xpc_dictionary is xpc_dictionary_create(const char *const _Nonnull *keys, xpc_object_t _Nullable const *values, size_t count)
Once we have created the dictionary, we can use one of the following to send the actual message:
xpc_session_send_message- send a messagexpc_session_send_message_with_reply- send a message while blocking to get the replyxpc_session_send_message_with_reply_async- send a message with reply handler asynchronously
Since we want over the basics of XPC, the steps for server and client are the following:
Server:
- Call
xpc_connection_create_mach_servicewith some specific name, while settingflagsparameter to 1 - Call
xpc_connection_set_event_handlerto setup the handler for the connections - Call
xpc_connection_resumeto resume the connection (start listening)
Client:
- Call
xpc_connection_create_mach_servicewith the name used for server and settingflagsparameter to 0 - Call
xpc_connection_set_event_handlerto setup the handler for the connection - Call
xpc_connection_resumeto actually connect to the server - Craft the message
- Call one of
xpc_session_send_message*variants to send the message
Now that we have covered that, let’s create a simple server and client using C.
server.c:
#include <stdio.h>
#include <stdlib.h>
#include <dispatch/dispatch.h>
#include <xpc/xpc.h>
#define NAME "io.8ksec.xpc"
int main(void)
{
    xpc_connection_t conn;
    conn = xpc_connection_create_mach_service(NAME, NULL,
        XPC_CONNECTION_MACH_SERVICE_LISTENER);
    xpc_connection_set_event_handler(conn, ^(xpc_object_t peer) {
        xpc_connection_set_event_handler(peer, ^(xpc_object_t event) {
            if (event == XPC_ERROR_CONNECTION_INVALID) {
                return;
            }
            if (xpc_get_type(event) != XPC_TYPE_DICTIONARY) {
                return;
            }
            xpc_object_t resp = xpc_dictionary_create(NULL, NULL, 0);
            xpc_dictionary_set_string(resp, "hello", "8ksec");
            xpc_dictionary_set_int64(resp, "blogCount", 3);
            xpc_connection_send_message(peer, resp);
        });
        xpc_connection_resume(peer);
    });
    xpc_connection_resume(conn);
    dispatch_main();
}- server creates new mach service called io.8ksec.xpc
- sets up event_handler for the new connection
- for each connection, sets up event handler
- this event handler checks whether the type is XPC_TYPE_DICTIONARY; it is new dictionary is created
- dictionary contains string 8ksec under key hello and int64_t 3 under key blogCount
- sends the message to this connection
- in the outside handler connection is resumed for the peer(client)
- finally, connection is resumed for the entire xpc connection
#include <stdio.h>
#include <stdlib.h>
#include <xpc/xpc.h>
#define NAME "io.8ksec.xpc"
int main(void)
{
    xpc_connection_t conn;
    xpc_object_t msg;
    msg = xpc_dictionary_create(NULL, NULL, 0);
    xpc_dictionary_set_string(msg, "Hello", "world");
    conn = xpc_connection_create_mach_service(NAME, NULL, 0);
    if (conn == NULL) {
        perror("xpc_connection_create_mach_service");
        return (1);
    }
    xpc_connection_set_event_handler(conn, ^(xpc_object_t obj) {
        const char * hello_value = xpc_dictionary_get_string(obj, "hello");
        int64_t count_value = xpc_dictionary_get_int64(obj, "blogCount");
        printf("hello=%s\n", hello_value);
        printf("blogCount=%lld\n", count_value);
    });
    xpc_connection_resume(conn);
    xpc_connection_send_message(conn, msg);
    dispatch_main();
}- client creates a new dictionary with key Hello and value world
- connects to the mach service which is exposed by the server (io.8ksec.xpc)
- sets up event handler for the connection where it extracts the values for the keys defined in the servers dictionary
- resumes the connection
- and sends the dummy message so that event handler inside the server is triggered which sends the message
We also need to create Info.plist file the server which looks like this:
<plist>
<dict>
    <key>CFBundleIdentifier</key>
    <string>io.8ksec.xpc</string>
    <key>CFBundlePackageType</key>
    <string>XPC!</string>
    <key>XPCService</key>
    <dict>
        <key>ServiceType</key>
        <string>Application</string>
    </dict>
</dict>
</plist>
Once we did that we will embed this file into the __info_plist sections inside __TEXT segment during compilation.

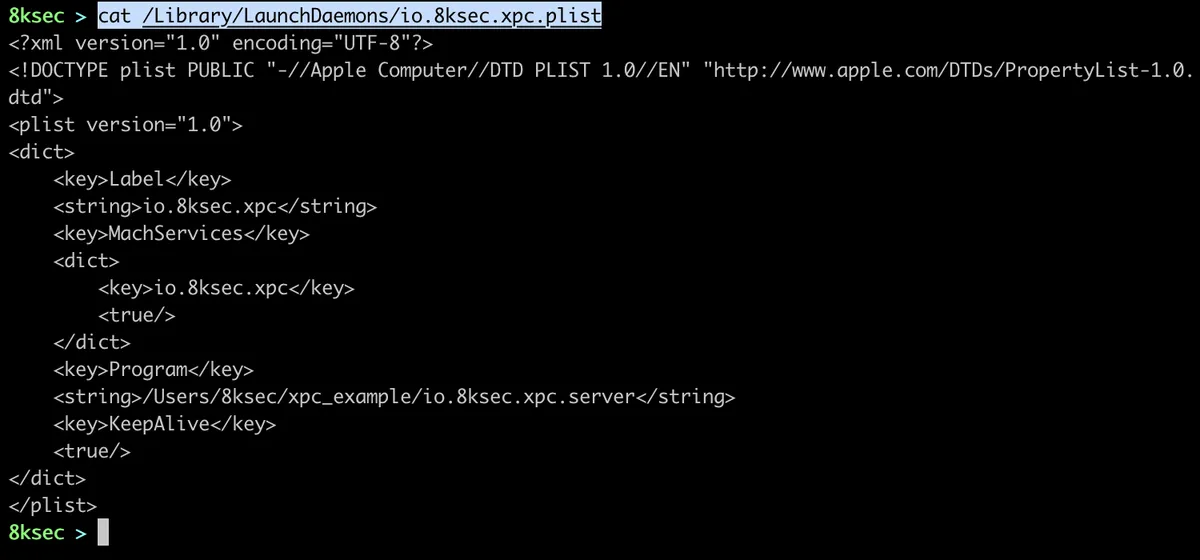
Once we did that, we will add our server to the LaunchDaemons, to do that we need to create plist file. The plist file looks like this:

After loading this plist, we can try connecting to the server and we can see that we got the correct values.

Now that we have covered basics and showed an example of XPC server/listener and the client, let’s now use Frida to analyse a bit of some daemon on macOS.
We will create frida script that will intercept a couple of functions:
xpc_connection_create_mach_servicexpc_connection_send_messagexpc_dictionary_set_string
To examine the xpc_object_t type we can use xpc_copy_description which accepts xpc_object_t and returns the description as char *.
Since we went over the server/client example, we want to do the following:
- for
xpc_connection_create_mach_serviceread first parameter (char*) xpc_connection_send_messagehasxpc_object_tas a second argument and we want to inspect thatxpc_dictionary_set_stringwe want to inspect second and third argument as they are key and value
We will use Interceptor.attach on the addresses of the function above, however we will also create NativeFunction using the address of xpc_copy_description so that we can inspect xpc_object_t and another NativeFunction using the address of xpc_connection_get_name to get the name of the connection. We will also create two helper function which will just read that C string (char*) and return it back to us.
The script looks like this:
// Get addresses of the functions that we will intercept
var xpc_connection_create_mach_service = Module.findExportByName(null, "xpc_connection_create_mach_service");
var xpc_connection_send_message = Module.findExportByName(null, "xpc_connection_send_message");
var xpc_dictionary_set_string = Module.findExportByName(null, "xpc_dictionary_set_string");
// Get address of xpc_copy_description and create new NativeFunction
// It accepts xpc_object_t and returns char *
var xpc_copy_description_addr = Module.findExportByName(null, "xpc_copy_description");
var xpc_copy_description = new NativeFunction(xpc_copy_description_addr, "pointer", ["pointer"]);
// Get address of xpc_connection_get_name and create new NativeFunction
// It accepts xpc_connection_t and returns char *
var xpc_connection_get_name_addr = Module.findExportByName(null, "xpc_connection_get_name");
var xpc_connection_get_name = new NativeFunction(xpc_connection_get_name_addr, "pointer", ["pointer"]);
// Helper function to read char *
function readCString(cstr) {
    return Memory.readUtf8String(cstr);
}
/* parameters:
    1. name
    2. dispatch queue (not interested in this now)
    3. flags (listener or client mode)
*/
Interceptor.attach(xpc_connection_create_mach_service, {
    onEnter(args) {
        // first argument is char* name and we want to read it
        var serviceName = readCString(args[0]);
        console.log(`[*] xpc_connection_create_mach_service called for service: ${serviceName}`);
    }
});
/* parameters:
    1. connection (xpc_connection_t)
    2. message (xpc_object_t)
*/
Interceptor.attach(xpc_connection_send_message, {
    onEnter(args) {
        var conn = args[0];
        var connName = readCString(xpc_connection_get_name(conn));
        var message = args[1];
        var messageDescription = readCString(xpc_copy_description(message));
        console.log(`[*] xpc_connection_send_message(name=${connName}) called for ${conn} with description: ${messageDescription}`);
    }
});
/* parameters:
    1. dictionary (xpc_object_t)
    2. key (char*)
    3. value (char*)
*/
Interceptor.attach(xpc_dictionary_set_string, {
    onEnter(args) {
        var key = readCString(args[1]);
        var value = readCString(args[2]);
        console.log(`[*] xpc_dictionary_set_string called for ${key} = ${value}`);
    }
});
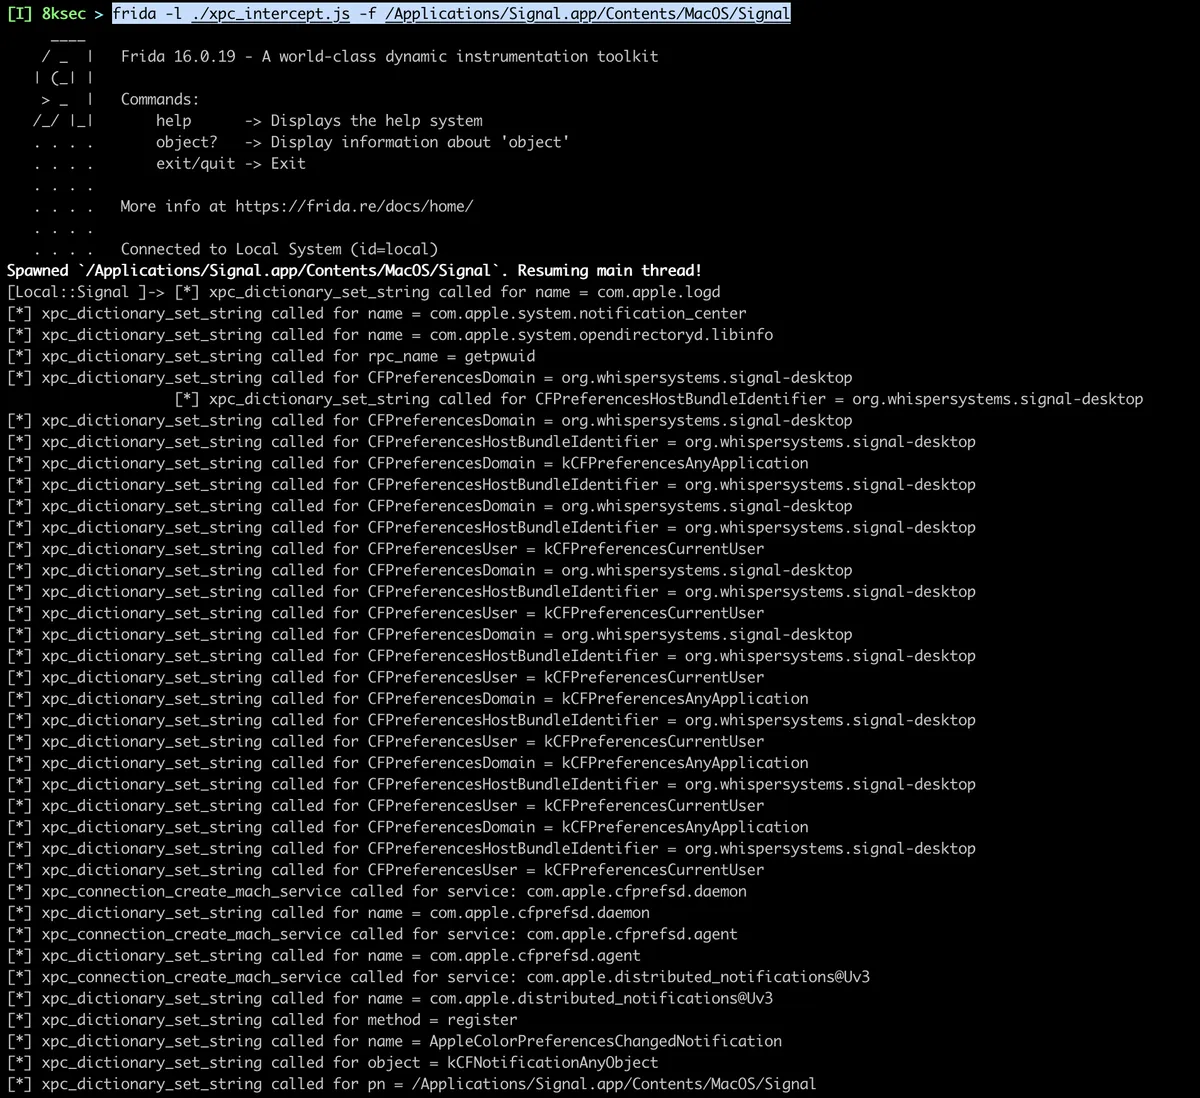
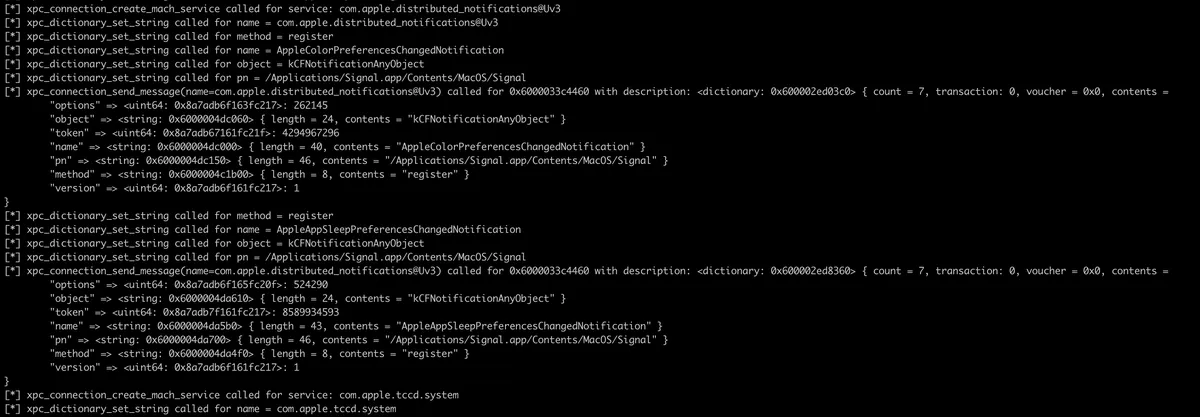
We will run this script against Signal macOS application.


We can see that the Signal application is making a bunch of xpc_connection_create_mach_service function calls and sending a lot of different messages to these connections. We can go even further with this, just like the tools such as xpcspy did it and cover almost entire applications communication with XPC services.
References
GET IN TOUCH
Visit our training page if you’re interested in learning more about these techniques and developing your abilities further. Additionally, you may look through our Events page and sign up for our upcoming Public trainings.
Check out our Certifications Program and get Certified today.
Please don’t hesitate to reach out to us through out Contact Us page or through the Button below if you have any questions or need assistance with Penetration Testing or any other Security-related Services. We will answer in a timely manner within 1 business day.
We are always looking for talented people to join our team. Visit out Careers page to look at the available roles. We would love to hear from you.


